

Drinking Beer
-
Content Count
77 -
Joined
-
Last visited
-
Remove the dust cover from the rifle. Now remove the recoil spring from its seated position. Beneath where the recoil spring was seated at the back of the receiver is a third screw that is holding the stock into position. Remove the third screw.
-
how to make my saiga 7.62 look aged
Drinking Beer replied to m1911a1-Blackhawk's topic in Saiga Rifle Conversions
Yup, it's a .308. and my most accurate saiga. I've played around with that rifles configuration many times trying to get the right balance because of the weight of the thicker heavy barrel. The 22" is a looong gun. -
how to make my saiga 7.62 look aged
Drinking Beer replied to m1911a1-Blackhawk's topic in Saiga Rifle Conversions
This is what I did, Step 1: Begin drinking beer. Any type of beer will do but remember its the quantity not the quality. This step is the most critical to begin and removes any hesitation or regret from beginning Step 2. Step 2: Find old sand paper and aimlessly begin rubbing in a back to forth motion. Don't forget to restart Step 1 often. In hardly any time your rifle will appear like it was found in a war-torn shithole and will look similar to this: -
I'm ready to buy a new rifle and want something compact. I have been looking into getting a polish underfolder. Yet I am uncertain of the build quality of these parts kits for the underfolders. Is this polish made underfolder at all comparible to the quality of this arsenal built side folder? I just would rather take the more practicle and better built rifle. Any wisdom from you ak owners would be greatly appreciated. Whats the best buy for a compact rifle?
-
Added a muzzel brake detent and spring to my stock FSB
Drinking Beer replied to canoecanoe's topic in Saiga 7.62 X 39
Very nice! Not having a detent pin is what stopped me from using a muzzle brake that required proper allignment. I did not like the hassle of removing my FSB either so I just ended up using a crush washer and birdcage. This looks like a great alternative and you don't need to worry about loosing your brake. I think you just inspired me to try this out. -
how did u get the metal to look like that, its awesome If I had to guess. I'd say 600grit sandpaper Not a bad guess hutchsaiga, It was 220 grit. I just lightly sanded everywhere in a back to forth motion.
-
I recommend just cutting no farther back on the shroud/sleeve than the length of the threads on your brake/hider. The distance I cut off was about half way on the shroud. You could cut the entire length of the shroud to the tip of the front sight block but you might run into some fitting problems since the 7.62 Saiga rifles have a longer distance from the muzzle tip to the front sight block than most AK variants. In that case, some flash hiders will be seated to far back and the muzzle will extend under the hiders ports. Or some brakes might not screw all the way down and become blocked by
-
My only advice would be to use a tubing cutter to make it easier if your worried about cutting into the barrel. Using the dremel cutting wheel required a very steady hand and it was difficult to evenly cut the depth around the barrel diameter while sparks are flying into your beer. You will see though when you finally have reached the proper depth before contacting the barrel. In the shinny metal cut being made around the shroud, you will very slightly see the darker material of the barrel in the cutting crack. Its only a fraction of material to remove at that point and any deeper you will
-
I appreciate the compliments apocalyptic, thanks. I originally had second thoughts about transforming my brand new clean rifle into an old battled look...but it turned out looking good, now I'm glad I'm not the only one who thinks it looks cool haha. Certainly a few cold beers helps take the edge off when your looking over your rifle deciding if you really should just sand a few years of paint off it. But I had 6 cold friends edging me on
-
I will see how long this stays on using a crush washer and red thread loctite. With this flash hider I could mindlessly torque down tight without worrying of alignment issues that a detent pin takes care of. I also wanted something that did not add length on the tip of the muzzle. I like it and it looks like it belongs there...
-
The manufacture date is marked 09, hope that helps catalog these. Any info if threaded barrels are at total random?
-
I just thought I would share these pictures for helping further identify factory threads. This muzzle looked like it had a rounded edge and a thread around the rim... So I took a chance with the dremel cutting wheel and found beautiful filthy crusty threads! I needed to use a chisel to break the band free from the epoxy. With some wire brushing they cleaned up ready for a new muzzle brake. Question: What type of muzzle brake will fit on these factory threads? I was considering an old school slant style brake maybe but I don't know much about them?... Any reco
-
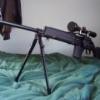
Nice shooting! What type/power scope is that and what mount? Thanks, The scope is a Leaper's scope with magnification 3-9x50mm. The mount is a solid aluminum Leapers side-rail. I think its a great entry level system for anyone who does not want to break the bank for good optics. This just goes to show you that a thousand dollar scope is not really required at these ranges.
-
Good results at 100 yards.
-
I decided on not reusing the BHO. The BHO spring was difficult to to manipulate and by the time I had it seated it just looked like it would cause problems so I removed it. I actually like not having the BHO sticking out and it was never used before so it seemed unnecessary, one less part to fail. I did have to grind down the bottom of the G2 hammer on the bottom triangular side because the hammer was not reaching the bolt. It was being stopped by a pin on the bottom of the receiver. I do believe you can order modified G2 triggers that are already made to drop in yet if you study the parts
