tshark 0 Posted April 21, 2008 Report Share Posted April 21, 2008 I am gathering parts to attempt to make my own lower hand guard retainer. I could buy one but this will give me something to do for a while and if I am busy I don't spend as much money. Of these two double split shaft collars below which would be the better choice. The barrel Diamater comes in right around 1.5cm so I am thinking the .5 would be snug and the .625 might be too large. Worse case scenario I'll get both and experiment but if anyone knows which would be best I am all ears. .5 http://www.surpluscenter.com/item.asp?UID=...name=powerTrans .625 http://www.surpluscenter.com/item.asp?UID=...name=powerTrans Thank you Quote Link to post Share on other sites
MD_Willington 11 Posted April 21, 2008 Report Share Posted April 21, 2008 Hmm, some numbers to work with... 5/8" = 0.6250" or 15.875mm 1/2" = 12.7mm 1.5cm = 15mm or 0.5906" 19/32" = 15.08mm or 0.5938" So could you get the 1/2 in collar and ream it to 19/32?? Don't forget, the top of the collar will need to be machined flat so it will fit under the gas tube... Quote Link to post Share on other sites
greatmoose 4 Posted April 21, 2008 Report Share Posted April 21, 2008 I acutally used something almost identical from Fastenal, had to cut the top off so it'd fit under the gas tube, but it works great (if a little clunky). Quote Link to post Share on other sites
IndyArms 10,186 Posted April 21, 2008 Report Share Posted April 21, 2008 once you get it to FIT and actually retain the plate... the FUN PART comes when you go to shoot the rifle and it inches forward after a few shots and your handguard falls off... gotta remember you need to secure it so it wont move under recoil. Quote Link to post Share on other sites
tshark 0 Posted April 21, 2008 Author Report Share Posted April 21, 2008 So it seems like the smaller .5 is the one to try. That is the way I was leaning and I appreciate the confirmation of my hunch. In addition to the gas tube clearance I will almost certainly have to make some adjustments to get the cleaning rod through as well. I don't want it to slip off while shooting so I suppose I should drill and tap for a set screw. Thank you all for the advice. Hopefully I can keep up my attention focused on this long enough to finish it before coming up with another cool idea. Quote Link to post Share on other sites
chupacabrah 0 Posted April 21, 2008 Report Share Posted April 21, 2008 keep us posted....and if you get it working well, you can post your dimensions/specs/layouts Quote Link to post Share on other sites
mini14jac 1 Posted April 23, 2008 Report Share Posted April 23, 2008 (edited) I wanted a "real" retainer on mine. Started with a Romanian retainer, with sling loop. Got a thick 5/8" washer, and cut it so it would lay nicely on top of the retainer. My plan was to drill holes in the retainer, with matching threaded holes in the washer. On each side of the retainer, I'd have two holes that would mate with 4/40 threaded holes on the washer. On the bottom of the retainer, near the cleaning rod hole, I'll have two more holes. After all the holes are drilled, threaded, and checked for fit, I cut the lower third of the retainter off, and attach it to the washer with small allen screws. Then I install the larger half of the retainer on the rifle barrel, then use the threaded washer to screw everything back together. Well, it's been trial and error. I bought two retainers at first. My first try actually worked, but was ugly. Second try would have been perfect, but I was going a little too fast and screwed it up. (The first one took a solid 8 hours. Now that my barrel is notched, the second only took 4 or 5.) Now, it's time to order a couple more retainers. Here's a rough representation. Hope you have better luck. Edited April 24, 2008 by mini14jac Quote Link to post Share on other sites
IndyArms 10,186 Posted April 23, 2008 Report Share Posted April 23, 2008 Thats really a pretty clever idea... excellent! Quote Link to post Share on other sites
MD_Willington 11 Posted April 23, 2008 Report Share Posted April 23, 2008 I've always wondered why no one has taken a tri-rail attachment and just machines a retainer slot into the back of it...? Quote Link to post Share on other sites
IndyArms 10,186 Posted April 23, 2008 Report Share Posted April 23, 2008 a what? Linky? Quote Link to post Share on other sites
JK-47 33 Posted April 23, 2008 Report Share Posted April 23, 2008 I've always wondered why no one has taken a tri-rail attachment and just machines a retainer slot into the back of it...? I've had the same thought. This is the thingy in question: Quote Link to post Share on other sites
IndyArms 10,186 Posted April 23, 2008 Report Share Posted April 23, 2008 I must be missing something... and use that AS A LOWER handguard? or? I guess as I am from the "wood furniture on the AK" school of thought... I dont understand some of the newer hi tech fancy shmancy stuff... This wouldnt fit between a standard wooden lower handguard and the gas block, right? Would it fit between a tapco Galil style and the GB? Quote Link to post Share on other sites
22_Shooter 1,560 Posted April 24, 2008 Report Share Posted April 24, 2008 Someone on the board tried that actually, and it worked. They didn't cut in a retainer slot though. Quote Link to post Share on other sites
MD_Willington 11 Posted April 24, 2008 Report Share Posted April 24, 2008 I must be missing something... and use that AS A LOWER handguard? or? I guess as I am from the "wood furniture on the AK" school of thought... I dont understand some of the newer hi tech fancy shmancy stuff... This wouldnt fit between a standard wooden lower handguard and the gas block, right? Would it fit between a tapco Galil style and the GB? What it would do is mimic the OEM retainer on the standard AK rifle, but it would have a small section of tri rail in front of that. Then you would have the classic style lower handguard with a small section of tri rail in front of it... Quote Link to post Share on other sites
MD_Willington 11 Posted April 24, 2008 Report Share Posted April 24, 2008 I've always wondered why no one has taken a tri-rail attachment and just machines a retainer slot into the back of it...? I've had the same thought. This is the thingy in question: Yes like that, only the shorter one, machined at the back like the backside of a regular retainer, then the whole she-band is a bolt on retainer/tri-rail... kill two birds with one stone !! Quote Link to post Share on other sites
DavePAL84 1 Posted April 28, 2008 Report Share Posted April 28, 2008 I made my own. Used a lower handguard retainer, cut the top off, and used a leftover FAL part to secure it. Pics before I refinished it: It's held up great. If you make the clamping screw a little lower you could just cut a notch in the barrel to hold the whole shabang in place. Quote Link to post Share on other sites
MD_Willington 11 Posted April 28, 2008 Report Share Posted April 28, 2008 I've also thought of doing a retainer like that too... I just never have time to try this stuff out though... Quote Link to post Share on other sites
tshark 0 Posted April 28, 2008 Author Report Share Posted April 28, 2008 I have the retainer in hand and I am waiting on the collars to be delivered. I got the .5 and the .625 since they were cheap and it would cost me more to have a second shipped if I am wrong. Once in hand I'll charge up the camera and see what I can do about documenting the process so others can learn from my triumphs/mistakes. Quote Link to post Share on other sites
wlnt 2 Posted May 2, 2008 Report Share Posted May 2, 2008 DavePAL84 That's not a bad looking re-do. Nice and low. What is the name of the FAL part that has the threaded screw assembly? louielouie I made my own. Used a lower handguard retainer, cut the top off, and used a leftover FAL part to secure it. Pics before I refinished it: It's held up great. If you make the clamping screw a little lower you could just cut a notch in the barrel to hold the whole shabang in place. Quote Link to post Share on other sites
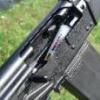
tshark 0 Posted May 4, 2008 Author Report Share Posted May 4, 2008 Phase 1 is complete The .625 double split shaft collar was the way to go because the barrel steps up under the hand guard. To get a nice fit with the barrel contours I smoothed down the inner edges of the collar. I separated the handguard retainer from its collar. I used some of that tacky stick a poster to the wall putty to find the right location to mount the lower section of the collar on the retainer and marked it. I then prepped and J-B welded the two together. The top part of the collar had to be ground down to clear the gas tube. Pics of it installed before adding the gas tube. Pics of it installed with the gas tube I have more parts coming. A new gas tube because this one that I picked up is a little shorter than I would like. A set of Choate hand guards. I hear they melt but I will add a heat shield and what I plan to do is to take donor parts from the original hand guard and plastic weld them to the Choate hand guard so that I can use the lower retaining hole to prevent forward motion of the handguard while firing. That will prevent me from installing a cleaning rod but I keep a bore snake in the saw pistol grip so I'm ok with that. I'll also need to do some cleaning and finishing of parts and I may have my friends mom (a welder by trade) put a couple of real welds on the lower retainer for piece of mind. More to come. Quote Link to post Share on other sites
wlnt 2 Posted May 5, 2008 Report Share Posted May 5, 2008 (edited) 'tshark' Both of us working with the same materials have come up with the same solution. It has happened in history over and over. I used: 1.) a Two-Piece Clamping Collars Type: Shaft Collar Style: Two Piece Bore Size: 0.625 In., 5/8 Material: Steel Width: 0.437 In., 7/16 Outside Diameter: 1.313 In. Available from MSC Industrial for for about $4. *Don't buy stainless because it won't take gun blue like the regular steel. 2.) Lower handguard retainer/ Bulgarian -The lowest price I could find was Global Trades for $5.99. Take the handguard retainer and grind the front of the retainer off and open the top leaving a U shape. (tshark has much better photos but I have included mine too). See: The second photo ( in the last row/ first retainer) This retainer still needs to be ground down just a little flatter but it does show you the basic retainer shape you want. 3. Place shaft collar on top of finished retainer (open U shape). Make sure that the allen head shaft collar screw heads are pointed up. Line up the hole in the collar so that the bottom inside of the collar is level with the bottom of the U shape of the retainer. This is how the finished handguard retainer will look. The last row and the last one down is the look of the finished retainer. I apologize for the fuzzy and not quite level collar. I haven't had time to make better photos. 4. NOW, you must **attach the lower collar to the retainer. **I first tried JB Weld and within a couple of drops to the floor it came apart. That's when I thought about learning to Tig or Mig weld. Instead I figured out how to do the same thing using one screw. 4. Now attach the the lower collar half to the retainer. Lay the lower collar face down and lay the retainer over it. Line up the 2 parts like you did in 3. 5. With the retainer on top of the lower collar you can see that the retainer almost covers the lower half of the collar. Using the top edge of the cleaning rod hole (12 o'clock ), mark the lower collar. You can see that taking advantage of the cleaning rod hole in the retainer you only need to drill a hole through the lower collar. Using a 5/32 inch bit, drill one hole in the lower collar with the cleaning rod hole in the retainer lining up with the hole in the lower collar. 6. You can tap the hole with an 8/32 tap. You can now attach the retainer and lower collar with a screw and washer from the retainer side or better yet I used a very flat screw head that I had left from a binder post. Here is a photo that shows the wide flat binder post screw in the drilled and tapped collar. The retainer would be held against the lower collar by the large flat head screw. I was just checking the hole I tapped in the photo. See the third row and 2nd down. 7. You only need one screw because the retainer will locate itself on the handguard in the channel that has been cut for it. If you have the collar tight against the barrel and pushing the handguard back into the receiver, the handguard cannot free itself from the retainer. Even if the screw failed and the collar and retainer were not joined the handguard still must stay in place because it is being held up on both ends, and it cannot fall away from the collar as long as the colllar holds. More to come, better photos I hope. I have added some extra photos that might help it all make more sense. louielouie Edited May 10, 2008 by louielouie Quote Link to post Share on other sites
tshark 0 Posted May 5, 2008 Author Report Share Posted May 5, 2008 Hey louielouie, thank you for sharing your progress. Sorry to hear your JB didn't hold up but it looks like you came up with a new approach. Quote Link to post Share on other sites
wlnt 2 Posted May 5, 2008 Report Share Posted May 5, 2008 Hey louielouie, thank you for sharing your progress. Sorry to hear your JB didn't hold up but it looks like you came up with a new approach. tshark, After I bought a couple of Dinzag's retainers, I happened to see a split collar on a bayonet lug in Cheaper than Dirt. As soon as I saw it the wheels in my head started turning on how to use it with a modified retainer to make a two piece handguard retainer. One thing I meant to mention was that the easiest surface treatment at the end is to use a Birchwood Casey touch up pen and it will "blue" the retainer and collar very nicely. About $5 at Wal-Mart. It is fantastic for knocking the shine off of screws that got scratched or any blued part that needs some touch up. You just need to follow the easy instructions, Clean the retainer and collar with alcohol, dry, apply bluing with felt tip Birchwood Casey pen, wait about one minute, apply cold water by paper towel, dry. Then if you want it darker just repeat. louielouie Quote Link to post Share on other sites
wlnt 2 Posted May 5, 2008 Report Share Posted May 5, 2008 (edited) double-post Edited May 7, 2008 by louielouie Quote Link to post Share on other sites
wlnt 2 Posted May 10, 2008 Report Share Posted May 10, 2008 I finally found one hour to spend on trying to get some better photos of my screw secured collar -retainer. These photos show alignment of collar to retainer; , the top of the retainer, this one is rough and needs to be flattened a little more. I did blue it so you could see the difference some bluing can make. This photo shows everything as it ready to attach to barrel and handguard. I hope these may help you at least get the idea of using a screw together retainer collar. I guess the best way might be to tap it to screw it together, and use JB Weld on the collar to retainer, and then add the screw. That would be the best of both worlds and give you a great way to hold the parts together with the JB Weld curing. . louielouie Quote Link to post Share on other sites
wlnt 2 Posted May 10, 2008 Report Share Posted May 10, 2008 I think I have the perfect camera to take photos of UFO'S and the Loch Ness monster. Every photo is guaranteed to come out fuzzy. louielouie Quote Link to post Share on other sites
tshark 0 Posted May 11, 2008 Author Report Share Posted May 11, 2008 Phase 2 The project is complete. The parts are in and the retainer is on. I could not get a heat shield into the choate handguards so for that reason I would recommend to avoid them and will likely replace them in short order. They use the plastic of the handguard directly up against the barrel in 4 places for support which I do not feel is very sound. I extended the nub that fits into the receiver and was able to bolt through the hole the original handguard used. A set of wood handguards with an extended nub would suit this project best so that a bolt can be grafted in easier. To finish the shaft collar and retainer I used duplicolor high heat paint and it seems pretty tough so far. enjoy the pics I'm out for now. Quote Link to post Share on other sites
mini14jac 1 Posted May 12, 2008 Report Share Posted May 12, 2008 (edited) Hey Mods, can we get this tacked? There are lots of good ideas here. Here's an updated sketch of what I did. I'll try to get some pics up in the next day or two. I went with 4 screws instead of 6, because you have to remove some wood from the front of handguard to get it to seat properly. I'm very pleased with the way it turned out. Edited May 16, 2008 by mini14jac Quote Link to post Share on other sites
mini14jac 1 Posted June 4, 2008 Report Share Posted June 4, 2008 (edited) Finally finished mine, and got pics up. Here's the washer I modified per the drawing above, along with the lower half of the retainer: Here's the upper half of the retainer sitting on the barrel: Here's what it looks like screwed together from the back: And from the front: With both forearm parts installed: Finally the whole gun: For all the hassle involved, I'm not sure I wouldn't have been better off to use the split collar method from the other posters in this thread. I'm not sure I'll really need the flip lever. Anyway, you have to remove wood from the forearm to use the screws, and I decided I didn't want to convert the gas piston and buy U.S. mags, so the wood is gone now, replaced with K-var polymer. The K-var handguard has a thin metal lip at the front, so it fits without modification. Edited June 4, 2008 by mini14jac Quote Link to post Share on other sites
scarioto 0 Posted December 20, 2008 Report Share Posted December 20, 2008 does anyone know if any stores sell Clamping Collars? (ie. home depot, ace hardware, etc) Quote Link to post Share on other sites
Recommended Posts
Join the conversation
You can post now and register later. If you have an account, sign in now to post with your account.