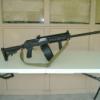
mlyoung83 0 Posted June 18, 2011 Report Share Posted June 18, 2011 Hello all, I converted two Saigas last summer and was hooked. This Saiga 223 is my first one, a few more Saiga rifles are in the works. I'll try to describe it as best as possible. Parts: Saiga .223 with dimples, skeleton stock, Carolina Shooters Conversion package with upgraded pistol grip, UTG quad rail, Magpul AFG, Tromix Charging Handle, Duracoat "Shake n Spray" kit, SGM 30 round magazine. PIC 1: The stock rifle out of the box PIC 2: Skeleton stock. I loved the skeleton stock, but didn't want to put a rubber pad on it. It's just a 223 anyways. I poped two bolts in the holes, then "profiled them" to blend them in with the existing texture. PIC 3: The stock trigger gaurd coming off. PIC 4: The stock trigger gaurd removed and the rear of the reciever grinded off for the new stock. PIC 5: The new but stock plate being installed. PIC 6: New trigger group installed. I also profiled the hammer and bottom of the bolt carrier. PIC 7: Duracoat going on. PIC 8, 9, and 10: Finished product. Quote Link to post Share on other sites
MrSaiga223 1 Posted June 19, 2011 Report Share Posted June 19, 2011 Very nice! Great process photos as well. Thanks for sharing. Quote Link to post Share on other sites
dowork1021 64 Posted June 19, 2011 Report Share Posted June 19, 2011 How do you like the utg rail. Im torn between that because its cheaper and the CSS tri-rail. Quote Link to post Share on other sites
mlyoung83 0 Posted June 19, 2011 Author Report Share Posted June 19, 2011 I like the rail. Fits like a glove and rock solid. Quote Link to post Share on other sites
Recommended Posts
Join the conversation
You can post now and register later. If you have an account, sign in now to post with your account.