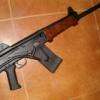
Wildcatter 28 Posted June 19, 2011 Report Share Posted June 19, 2011 Well I finally finished my SBS and I have to tell you, I think it's just about the neatest firearm I've ever layed hands on. I did all of the work myself. I rethreaded the barrel to factory spec on the lathe so I saved myself some cash on the tooling. I welded the front sight onto the gas block and soldered the rear sight onto the top cover. I went with an ACE 8.5-inch folding to the left. The setup gives a 13.5-inch pull. The forend is a UTG shortened by Boba Debt. I got this forend in a trade. It seems a very stable setup. I have installed the Tac 47 auto plug and hope it works well with this setup. I plan to use one of the screw-in choke adapters that looks like a phantom flash hider that Cobra sells. Thanks to all of the wonderful information garnered over the years from the folks on this forum, especially to Tony Rumore for being the first to take this platform to the reasonable limit I'm test firing it tomorrow. Full range report and video forthcoming. ---Catter 11 Quote Link to post Share on other sites
Azkamidaka 26 Posted June 19, 2011 Report Share Posted June 19, 2011 Gorgeous. Cant wait for the vids! Rock on. Quote Link to post Share on other sites
Lone Star Arms 2,047 Posted June 19, 2011 Report Share Posted June 19, 2011 Well done. Awesome piece of work! She's a real beauty! Quote Link to post Share on other sites
poolingmyignorance 2,191 Posted June 19, 2011 Report Share Posted June 19, 2011 Nice work! Looks like a real pro job! Can't wait to see the range report! 1 Quote Link to post Share on other sites
evlblkwpnz 3,418 Posted June 19, 2011 Report Share Posted June 19, 2011 Looks great. Quote Link to post Share on other sites
The_Caged_Bird 474 Posted June 19, 2011 Report Share Posted June 19, 2011 I like the pic of it with the tiny drum. It's like a scaled down S-12 with an MD-20 in it... ...only more bad-ass! Quote Link to post Share on other sites
uriahmenchaca 2 Posted June 19, 2011 Report Share Posted June 19, 2011 Truly spectacular great work! Quote Link to post Share on other sites
uriahmenchaca 2 Posted June 19, 2011 Report Share Posted June 19, 2011 Truly spectacular great work! Quote Link to post Share on other sites
Boba Debt 350 Posted June 19, 2011 Report Share Posted June 19, 2011 I hope that shoots as good as it looks Quote Link to post Share on other sites
Bridis 319 Posted June 19, 2011 Report Share Posted June 19, 2011 Look pretty cool to me. Good work. Quote Link to post Share on other sites
jw_shultz 83 Posted June 19, 2011 Report Share Posted June 19, 2011 A very potent little machine. Good job indeed. A bet it throws a serious fireball! Quote Link to post Share on other sites
lbsrdi 1,078 Posted June 19, 2011 Report Share Posted June 19, 2011 Very nice!! Quote Link to post Share on other sites
SaigaKen 338 Posted June 19, 2011 Report Share Posted June 19, 2011 Wow....top notch Video please Quote Link to post Share on other sites
Wildcatter 28 Posted June 20, 2011 Author Report Share Posted June 20, 2011 Range report and video, as promised. I shot just over 100 rounds through the gun yesterday. I started out by adjusting the Auto plug to function with Remington Nitro Sporting Clays loads. It took about 10 rounds to get it dialed in. I had had great luck cycling all buck shot and slug loads I tried after the initial setting of the plug. I could not, however, get the Fiochi low recoil buck shot to function after the initial setting nor could I get the super cheap winchester 1 ounce loads to function. It likes the Remington heavy dove loads and the Brazilian Rio 1.25 ounce field loads for cheap shooting. I am very satisfied with the results. Check out the video of testing with 11 different ammo types in one string out of the promag mini drum. On a side note, the gun functioned really well with 3-inch mags as well. recoil was a little brisk. I only ran 5 rounds of N04 3 inch buck out of the factory magzine. The shells landed about 7 to 8 feet away with the 2.75 inchers ranging from 4 to 6 feet away. I'll take more video soon. ===Catter 1 Quote Link to post Share on other sites
evlblkwpnz 3,418 Posted June 20, 2011 Report Share Posted June 20, 2011 It's alive! JMO, but I don't think you should stop until it will eat the cheap stuff too. It is obvious that you have a considerable amount of skill and talent. Quote Link to post Share on other sites
loner42 6 Posted June 20, 2011 Report Share Posted June 20, 2011 Good job................could you give some specifics on some of the mods you did to the barrel and related parts with maybe some pics ? Like : How many gas port holes did you drill and what size ? How far back did you move the gas block ? What did you do as far as modifying the bolt carrier, gas piston , and gas tube ? Thanks........... Quote Link to post Share on other sites
menace667 194 Posted June 20, 2011 Report Share Posted June 20, 2011 This just makes me want a 8" even more. Absolutely awesome. Quote Link to post Share on other sites
menace667 194 Posted June 20, 2011 Report Share Posted June 20, 2011 I too am curious if you could explain your process in more detail. I.e. How many gas ports? How did you decide how many to use? Your barrel cutting process? Gas block/ system work? how many man hours or how much work was involved? Difficulty rating? If you would that would be awesome! Quote Link to post Share on other sites
20nickels 21 Posted June 20, 2011 Report Share Posted June 20, 2011 The target in the video seemed quite impressed. A gaping hole dead center on shot #11. Quote Link to post Share on other sites
Wildcatter 28 Posted June 20, 2011 Author Report Share Posted June 20, 2011 That target was absolutely shredded. I should have taken a still shot of it after those 11 rounds. I'll get on a complete writeup momentarily. ===Catter Quote Link to post Share on other sites
Wildcatter 28 Posted June 20, 2011 Author Report Share Posted June 20, 2011 It's alive! JMO, but I don't think you should stop until it will eat the cheap stuff too. It is obvious that you have a considerable amount of skill and talent. I don't have a choke on it yet. When you run a choke, it provides a higher gas input to the system. I want to choke the gun and try the lighter stuff before I open a 4th gas port. It is on the verge of cycling with the fedral bulk pack shells now but the fiochi low recoil buck is really light stuff. Feels like a 20 gauge trap load. I have a feeling that it isn't going to run the really light stuff like the fiochi and 1 ounce trap loads. I'm okay with it. Besides, I can reload 1.25-1.375 ounce shot loads in AA hulls cheaper than bulk pack. ---Catter Quote Link to post Share on other sites
evlblkwpnz 3,418 Posted June 20, 2011 Report Share Posted June 20, 2011 I understand about the choke. I was under the impression that you would want to keep it short. Which choke did you have in mind? Quote Link to post Share on other sites
Wildcatter 28 Posted June 20, 2011 Author Report Share Posted June 20, 2011 I will try to give a breif overview of what I did, step by step, to build the shorty 12. I didn't take any photos during the build. My wife always tells me that I should take pics as I go but I always get into what I'm doing in the shop and never want to stop for pictures. Anyway... I bought a new S12 model 109 built in 2009. my first order of business was to send in a Form 1 application to make and register a firearm. I entered all of the pertinent info and mailed the application package to BATFE. I then decided to do as much of the build as possible without cutting the barrel so that all I had to do was cut and thread when the form 1 came back. I started with the standard conversion using a G2 FCG, an ACE cut the dang tang reciever block, ACE folder set up to fold left, HK sights, US Palm pistol grip, and the factory forend that I shortened to work with the shortened gas system. I have done this a few times before and have built a few AKs so this went quickly. I had less than 2 hours in this step. After I finished the conversion, I got to work shortening the gas system. I decided to shorten the system by 3.75 inches. This is the most common length to shorten mentioned in the thread dedicated to short barreled S12s in the NFA section of this forum. I simply scribed a mark representing 3.750 inches on the gas tube and carrier and cut them a little long. The gas tube lost the fluted section. The carrier lost the entire gas piston that is threaded in. The front of the carrier had the bottom of the threaded pocket exposed so I welded the hole up solid flattened the end, and beveled the leading edge to allow easy ingress of the carrier end into the gas tube during cycling. Since the carrier lost its operating rod, the front of the carrier actually is pushed by the puck in the gas block. The passage in the gas block has to be opened to allow passage of the front of the carrier. I chucked the gas block into the lathe in a 4-jaw chuck and bored the hole to allow the carrier to pass. I didn't want to remove the barrel from the reciever so I just turned the barrel in the lathe with the reciever still attached. I turned the barrel so that the gas block could slide back 3.75 inches closer to the reciever. With this done, I assembled the parts to check my lengths. I lucked out and all parts turned out at there proper lengths. Once I was satisfied that it would work, I drilled new holes for the gas block pins. I marked the barrel inside the gas block to locate where the gas ports should be drilled. I drilled 3 gas ports, to start at .083" with enough room to drill a fourth if needed. I completed the gas system shortening tasks in 2 three-hour work sessions. I assembled the gun and decided to try some field loads to make sure the thing functioned. With a super short gas system and a 19 inch barrel, the gun was in a severely over-gassed state. It would cycle bulk pack loads on the number 1 setting with the factory gas plug and recoil was severe. It never missed a lick so I returned home to installed sights. Since the carrier comes completely out of the gas tube during the cycle, the carrier sometimes wants to pop the top cover up and out of its track. This happen a couple of times while shooting. I welded a small tab to the back of the gas tube above the leading edge of the top cover to keep this from happening. I went with the HK sights as I am accustomed to them on other weapons. They also seemed to be an easy install on the S12 due to the mounting surfaces you have to work with. I started with the front. I cut half way throught the middle ring, widened the legs so that the interior curvature fit the S12 gas block, and trimmed the legs. I welded the legs to to the gas block. I pre tinned the rear sight base and the top cover of the S12 with solder and soldered the parts together, making sure everything stayed straigt and aligned with the front sight. This process took a little less than 2 hours to get it right. After I recieved my Form 1 in the mail, I stripped the gun to thread and cut the barrel in the lathe. I chucked the barreled action into the lathe as before and threaded the end in the same manner as the factory 22m x 0.75mm pitch. I then parted the barrel off at 8.25 inches, going very slowly. Once finished, I dressed the crown with files and emory cloth. I screwed the factory thread protector on and touched up the paint job. This step took about an hour as I had already set the lathe up to cut this thread pitch and praticed while waiting on the form 1. I reassembled the gun, this time installing the tac 47 auto plug and the railed forend I pick up from a member here on the forum, Thanks, Boba Debt! I have about 10 hours in the project. Not bad for my first shot at a super short S12! Really though, all I did was stand on the shoulders of the genious that did it first on this forum. I would consider this project about a 6 on a difficulty scale from 1 to 10 with a 1 being a standard FCG/pistol grip conversion and a 10 being scratch building a Mauser sporting rifle including contouring, threading, and chambering a barrel blank and building the stock from a blank of walnut. If you don't have a good lathe, don't even attemp this build unless you are interested in some spare parts for your other S12s Anyway, this is just a breif overview. If you have any particular questions, let me know. Quote Link to post Share on other sites
Wildcatter 28 Posted June 20, 2011 Author Report Share Posted June 20, 2011 (edited) I understand about the choke. I was under the impression that you would want to keep it short. Which choke did you have in mind? I'm going to use the winchoke adapter that is shaped like the phantom style brake that Cobra sells. It adds 1.5 inches to the length but allows the use of all winchokes and mosseberg accuchokes as well as rifled tubes for sabot slugs. I will get the most utility out of the gun with that setup. The effective barrel length will range from 8.25" with no choke to 9.75" with standard chokes, to 12.25" with a rifled choke. I'm all about flexibility. Wait until you see the fitted case I'm making for this rig! ---Catter Edited June 20, 2011 by Wildcatter Quote Link to post Share on other sites
BobAsh 582 Posted June 20, 2011 Report Share Posted June 20, 2011 Looks good. Quote Link to post Share on other sites
BobAsh 582 Posted June 20, 2011 Report Share Posted June 20, 2011 If you don't have a good lathe, don't even attemp this build unless you are interested in some spare parts for your other S12s Quoted for truth. Quote Link to post Share on other sites
loner42 6 Posted June 20, 2011 Report Share Posted June 20, 2011 I assume you chucked the barrel in the lathe before you cut it to length with the receiver hanging out towards the tailstock , otherwise you'd have to have a lathe with a very big spindle hole or a big 4 jaw and some labor intensive fixturing and a steady rest. Did you wind up with .083 gas port holes with the finished version or did you have to go bigger ? That little tab on the back of the gas tube flange looks like a good trick to include. I've wondered about that happening with the gas piston being gone. Quote Link to post Share on other sites
Wildcatter 28 Posted June 20, 2011 Author Report Share Posted June 20, 2011 (edited) I assume you chucked the barrel in the lathe before you cut it to length with the receiver hanging out towards the tailstock , otherwise you'd have to have a lathe with a very big spindle hole or a big 4 jaw and some labor intensive fixturing and a steady rest. Did you wind up with .083 gas port holes with the finished version or did you have to go bigger ? That little tab on the back of the gas tube flange looks like a good trick to include. I've wondered about that happening with the gas piston being gone. Yes. I placed the muzzle end in a 3-jaw chuck with a 1-inch spindle bore. I ran a steady rest just forward of the reciever bearing on the cylindrical portion of the barrel. I just placed 3 gas ports of similar dimension to the factory ports in my barrel. I measred 0.078 from the factory. The cobalt drill I had nearest that dimension was a 0.080 bit. My holes ended up at 0.083 inch. That little tab has worked perfectly, as specified by the pro builders. ---Catter Edited June 20, 2011 by Wildcatter Quote Link to post Share on other sites
menace667 194 Posted June 20, 2011 Report Share Posted June 20, 2011 What is your profession that gave you the know-how to perform these tasks? Just curious who has in the real world has the built in skills to do this type of thing. Quote Link to post Share on other sites
Wildcatter 28 Posted June 20, 2011 Author Report Share Posted June 20, 2011 What is your profession that gave you the know-how to perform these tasks? Just curious who has in the real world has the built in skills to do this type of thing. I was a gunsmith's apprentice for a little over a year in the mid 90s.That got me into machine shop practices, welding, and wood work. I have had an interest in mechanical design since I was a kid. Anyone can build this stuff with the right tools, patience, practice, and study. On a side-note, check out my scratch-built 7-bore percussion blunderbuss! This thing throws 3 ounces of shot in front of 150 grains of FFg. You know it went off ---Catter Quote Link to post Share on other sites
Recommended Posts
Join the conversation
You can post now and register later. If you have an account, sign in now to post with your account.