FunkedOut 91 Posted February 26, 2012 Author Report Share Posted February 26, 2012 easy now boom. don't get your panties all in a bunch. i'll let you know when i need any more unproductive "they told you so" contributions. 2 Quote Link to post Share on other sites
Boomstick12 11 Posted February 26, 2012 Report Share Posted February 26, 2012 easy now boom. don't get your panties all in a bunch. i'll let you know when i need any more unproductive "they told you so" contributions. No prob! I'll be waiting for the green light! Sorry, I know you're frustrated...you'll get it sorted and once the gun runs like a champ it's all you'll want to shoot. Quote Link to post Share on other sites
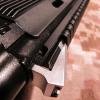
FunkedOut 91 Posted March 22, 2012 Author Report Share Posted March 22, 2012 (edited) It's been a while since I've updated this thread. I've been busy and got some pics to show you what I've been up to. As I was getting down to pressing off the gas block I noticed that my bolt carrier sat so far to the right in the action, that it was pressed against the right side of the gas tube. Look (I worked the image some to see the dark areas a little better): You can see in these next two shots that the carrier is seeing considerable wear only on the right side. This is after 300 shells: My action always felt stiff from day one. The day I picked it up, my buddy asked how I like it and my answer was, "The puck is loose, the action is tight and the paint sucks." So I went looking for the cause of the misalignment and found a few minor things that all stacked up the same direction. First thing I noticed was that the gas block was slightly canted to the right. This caused the gas tube to rotate out of parallel with the barrel, bringing the rear sight block to the left. Nothing major, but added a little bit. Then I noticed that the carrier had very little to no play in the rails and sat all the way to the right of the receiver. Again, nothing major, this is just a collection of little bits. You can see here in this next pic a couple of things. First, look at the red arrows. This is where the rails are cut to allow more room for the magazine and shells to feed. You can see that the right rail is trimmed along its length almost to where the mag notch is non-existent and the left side is untouched. Looks like when these rails were trimmed to fit the carrier, it was easier to only fit one side; the right side. Second, look at the green arrows. You can see the right rail is slightly lower than the trunion and the left rail is slightly higher than the trunion. This causes the carrier to rotate it's top toward the right; another little bit. This stack up of little bits was really causing all kinds of drag on the action. When I let go of the carrier, it would hit the gas tube pretty hard. I got to thinking about the cracked carriers at the op rod I've seen. Gotta fix it! Edited March 25, 2012 by FunkedOut 2 Quote Link to post Share on other sites
FunkedOut 91 Posted March 22, 2012 Author Report Share Posted March 22, 2012 First step I took was the easiest; "uncanting" the gas block. Remove the pins and few whacks with a rubber mallet did the trick. I couldn't believe how much smoother the action was now. It was almost on par with my AKM's. I then noticed that even though the gas block and tube where now straight, the right side of the rear gas block had a little blob of metal welded on where it sat inside the trunion. It's almost as if the gas block was too narrow and Izhmash fixed it by added metal... ...on the right side. I removed the gas block and tube, measured both sides of the rear sight block and confirmed that the right side was 0.013" thicker than the left. I removed that blob and plan to replace that with some stainless shim stock on the left side upon reassembly. 1 Quote Link to post Share on other sites
FunkedOut 91 Posted March 22, 2012 Author Report Share Posted March 22, 2012 Now I turn my attention to the rail. After measuring twice (more like 10 times really), I decided to remove 0.030" from the left rail, giving the carrier room to move towards the left of the receiver. You can see in this pic how much longer the left rail is than the right rail. About 0.030" actually. That went very well and really freed up the carrier which felt nice an smooth now. No way I could pull the carrier up out of the rails; there was still plenty of bite. I did measure twice. After just a little playing with it, I noticed that the ejector would sometimes catch the rear of the carrier as the carrier came out of battery. I thought that firing 12ga in this configuration would be a good way to permanently remove the ejector, so I had to remove the same 0.030" from the carrier's ejector groove. Put her back together and could not get the ejector to catch not matter what I did. Perfect. I lowered the left rail and the right trunion rail with swiss files and emery cloth until the bolt didn't have to jump across the transitions. This removed some of the carriers clockwise cant as well, as I lowered the full length of the left rail. 1 Quote Link to post Share on other sites
FunkedOut 91 Posted March 22, 2012 Author Report Share Posted March 22, 2012 (edited) and for all those of you screaming "GAS PORTS!!!" yes, I checked them. 4 nice holes, drilled 1.7mm, unobstructed by the gas block. one hole (the bottom hole in this next pic), had a burr that would allow a pick to show it's tip inside the barrel, but would not allow the 1.7mm drill bit to pass. The other 3 were fine at 1.7mm. this made me think back to when I cleaned it after my first range trip. I ran a bore-snake through the bore, and remember hearing the brass brushes on it squeal. I looked inside the bore and saw nothing. ran it through again and heard nothing. maybe a burr got bent back inside the hole? Any way, I cleaned up that hole with the 1.7mm drill bit. I figure with the reduced drag and the burr out of the way, I should be good. (1.7mm = 0.067" for those you without a calculator) Edited March 22, 2012 by FunkedOut 1 Quote Link to post Share on other sites
FunkedOut 91 Posted March 22, 2012 Author Report Share Posted March 22, 2012 (edited) so while I had the gas block and tube off, I figured I'd do a few things I've been wanting to do... mill it... drill it... tap it... same process to the rear sight: now she's ready for that E-TAC optics rail... the E-TAC rail came with 10-32 fasteners, but I went with M5 fasteners. That is the size of the handguard fastener. I figured if all of the gun's fasteners were M5, spares and tools (like an allen key in the cleaning kit in the buttstock) would be easier. Edited March 23, 2012 by FunkedOut 1 Quote Link to post Share on other sites
FunkedOut 91 Posted March 22, 2012 Author Report Share Posted March 22, 2012 I wanted to add a small section of rail under the gas block, but I wanted a second fastener and that tapped hole in the Arsenal handguard retainer didn't seem worthwhile at all to me. that tab is too flimsy without another fastener up front holding it to the gas block. the tab is drilled and countersunk for an M3 flat head screw, but M3 is tiny. So I came up with this: I turned down a small insert of S7 tool steel (I had some on hand) exactly 0.001" larger diameter than the hole in the gas block. Tapped it M5 and placed in the freezer for about 10 minutes. It tapped in easily with an 8oz. ball peen. Towards the end, I had to grab a 16oz. I wanted to stay away from the press on this one. Didn't want to risk cracking the gas block, although 1 thou interference isn't too bad. With the thickness of the gas block and area surrounding the hole, removing corrosion from the equation, I get ~850 pounds of force, if applied straight out for the insert to be pulled out. That is just shy of the threads stripping. If the force is applied at any angle, the friction will increase and greater force is required. don't forget that there is another fastener holding the rail on as well. I'm not going to weld that. In the last pic, you can see I tapped in far enough to have full contact between the insert and gas block. this meant I had to use a dremel to round the insert inside the gas block to clear the barrel. went quick with a sanding drum. 2 Quote Link to post Share on other sites
FunkedOut 91 Posted March 22, 2012 Author Report Share Posted March 22, 2012 (edited) here's a pic of the Arsenal handguard retainer modified to work with the insert. while i was at it, I welded up the extra hole, then caved and added some length to the tab, welded up all the holes and slot so I could move the holes and slot to remove all play from the RPK handguard. that 1/8" of play and all of it's "tick-tack" whenever I racked the action with my right hand was getting to me. Edited March 22, 2012 by FunkedOut 1 Quote Link to post Share on other sites
FunkedOut 91 Posted March 22, 2012 Author Report Share Posted March 22, 2012 as for the rail, I couldn't find any blank taller than 0.60" and I needed 0.80" to cover up all the way to the gas block. if you can't buy it, make it. here's a shot with the E-TAC rail on: getting there... 3 Quote Link to post Share on other sites
ndmak 10 Posted March 23, 2012 Report Share Posted March 23, 2012 thats good stuff Quote Link to post Share on other sites
The_Caged_Bird 474 Posted March 23, 2012 Report Share Posted March 23, 2012 You know that you could have just whacked the right side of the gas block real hard with a hammer to fix the cant right? I mean, great work and all but like my uncle Mike says, "Most of the time, the simplest solution, is the best solution." Quote Link to post Share on other sites
FunkedOut 91 Posted March 23, 2012 Author Report Share Posted March 23, 2012 yeah. that's what I did. I know, it's a long read. Quote Link to post Share on other sites
The_Caged_Bird 474 Posted March 23, 2012 Report Share Posted March 23, 2012 No, you missed what I said, no removing pins or anything, just whack the gas block. Besides, why fix the cant and then pull the gas block, that's like tuning the carburetor and then rebuilding the engine... Quote Link to post Share on other sites
FunkedOut 91 Posted March 23, 2012 Author Report Share Posted March 23, 2012 ok. got you. I pulled the block off to address the ports. it went back on straight. Quote Link to post Share on other sites
The_Caged_Bird 474 Posted March 23, 2012 Report Share Posted March 23, 2012 Your weapon looks badass man, you like to take the long road, but it sure makes for a beautiful destination! 2 Quote Link to post Share on other sites
IronRonin 19 Posted March 24, 2012 Report Share Posted March 24, 2012 This has been a good read, please keep us posted!! 2 Quote Link to post Share on other sites
Guns Are Great 140 Posted March 24, 2012 Report Share Posted March 24, 2012 (edited) Outstanding work and eye for details! This would be a good stickie for new members to view for conversions along with CSS videos! Edited March 24, 2012 by Guns Are Great 2 Quote Link to post Share on other sites
preparehandbook 326 Posted March 25, 2012 Report Share Posted March 25, 2012 This has been a good read, please keep us posted!! +1 1 Quote Link to post Share on other sites
FunkedOut 91 Posted March 25, 2012 Author Report Share Posted March 25, 2012 shot it today. Izhmash FCG and gas plug: 00B on setting 1: cycled 100% of the time federal low brass on setting 2: cycled 100% of the time winchester low brass on setting 2: cycled 50% of the time i guess i could call it good... ...nah! i'll open up the ports a little. the federal low brass was only ejecting about a foot anyway. buck shot was really getting outta there!!! 2 Quote Link to post Share on other sites
Spartacus 1,619 Posted March 25, 2012 Report Share Posted March 25, 2012 You sir, are one talented mo-fo! Great work and very nice looking S-12! Yep, I'd say the gas is just about right if the Federal is running good now. 1 Quote Link to post Share on other sites
FunkedOut 91 Posted March 26, 2012 Author Report Share Posted March 26, 2012 (edited) I pressed the gas block off again and opened up the ports a little. They were factory drilled at 1.70mm (0.067"), and i opened all 4 to 1.75mm (0.069"). This time, the gun cycled everything perfectly and really threw the empty hulls out a ways. Izhmash FCG and gas plug. "everything" includes: Federal Top Gun 7.5 & 8 Winchester Super Speed Xtra 7.5 & 8 Winchester Super-Target 7.5 & 8 Next, I pulled out the Izhmash FCG and dropped in the unmodified Arsenal S12 FCG. No change in performance! I guess I owe Arsenal an apology. Their S12 trigger is in fact a "drop-in" part. If your S12 works with the facotry FCG, then this FCG will work as well. Then, I pulled out the Izhmash gas plug and installed the Auto Plug. A few shots and it was dialed in. The adjustment screw sits flush with the end of the plug now. It would still work a full rotation out, but I was trying to match the factory plug's hull ejection distance. Thanks to everyone who offered up the free help, and not just in this thread. Also, thanks for all kind words. Some notes on the Arsenal FCG: It does feel smoother, lighter and way shorter than the Izmash FCG. Feels just like my AKM's. If the hammer is down (resting on the bolt extension / firing pin), and you rack the carrier, the trigger blade pivots to the rear as the hammer pushes the sear out of the way. This is not as pronounced with Izhmash FCG, because of the sear shape and height. It doesn't sound like a big deal, but I have developed a habit of using my trigger finger to press up on the BHO lever while racking the carrier with my left hand. First time I did that as quick as I could and OUCH!!! Smashed my finger good. I need to look into this some more. Edited March 26, 2012 by FunkedOut 1 Quote Link to post Share on other sites
RED333 1,025 Posted March 26, 2012 Report Share Posted March 26, 2012 All I can say is"WOW". Glad ya got it going like ya want, WOW. Quote Link to post Share on other sites
Guns Are Great 140 Posted March 26, 2012 Report Share Posted March 26, 2012 I would say I wish I had a good tool setup like that, but then you also have to know how to use them. 1 Quote Link to post Share on other sites
gunfun 3,931 Posted March 27, 2012 Report Share Posted March 27, 2012 Why doesn't anyone sell a handguard retainer with the rail built in? I would buy one for sure. As it is, I know that I have to copy your idea of putting in an insert. what is the size difference between the OD of the insert and the hole in the gas block? Quote Link to post Share on other sites
gunfun 3,931 Posted March 27, 2012 Report Share Posted March 27, 2012 Oh. I forgot to say Great Job. I envy your mill and skill. 1 Quote Link to post Share on other sites
FunkedOut 91 Posted March 27, 2012 Author Report Share Posted March 27, 2012 As it is, I know that I have to copy your idea of putting in an insert. what is the size difference between the OD of the insert and the hole in the gas block? "imitation is the best form of flattery." thanks. 0.001" was the interference i chose. 0.002" will give you stripped (75%) threads in most steel before the insert pulls out. keep in mind you should have at least 1 diameter of threads for full pull out strength. any more than that does not add strength. any thread engagement past 75% does not add strength either. all that math was counting on an insert that has contact all the way up and is then ground down to clear the barrel. if you don't want to pull the block off and grind the insert inside the block, the math is all yours. maybe go with 1.5 thou, or 2? guess what, that little square hump that is factory tapped M5 for the handguard screw, gives 5mm worth of thread engagement. those sneaky russians. that's why i left the insert as long as i did and not flush with the block. should you ever want to pull the insert out, you can thread a fastener in there while the block is on the barrel. tighten past contact with the barrel and it will pull the insert out. i tried it, with 1 thou interference. keep in mind that corrosion can increase the press fit friction by 200 or even 300%. fasteners: a grade 10.9 (metric) fastener is all that is required. it is stronger than the female threads in tool steel. let me know if you need any help with that. i can turn one or two if there's interest... Quote Link to post Share on other sites
gunfun 3,931 Posted March 27, 2012 Report Share Posted March 27, 2012 (edited) absolutely. I'd love to take you up on that. I was thinking I would use a drill and file as a ghetto lathe. People here are great. I am looking forward to doing a pay it forward soon as well. I am not averse to knocking the block off. I just measured the holes in both of my blocks. One just allows me to slip in a transfer punch that I measure at 9.07mm. measuring this hole with the calipers, my readings average at 9.15. The other block reads at 9.23. I had already started modification of a piece of rail and started tapping a hole next to the pass through hole there. I broke off my extremely cheap tap. Putting a rail on with this method would allow me to atatch my accessories, and cover my blunder. I notched the flat side of the rail to fit around the lug on the bottom of the block. I can just drill a recess into the flat side to fit the insert too. Thanks. Edited March 27, 2012 by GunFun Quote Link to post Share on other sites
FunkedOut 91 Posted March 27, 2012 Author Report Share Posted March 27, 2012 drill and file; been there. it ain't the arrow, it's the indian. PM sent. Quote Link to post Share on other sites
FunkedOut 91 Posted May 8, 2012 Author Report Share Posted May 8, 2012 it's been a while. here's the progress: baby got black: everything either got blasted or chemically stripped of paint. everything got a good coat of kphos. then I hit it up with semi-gloss black moly resin. bolt carrier is missing from this pic. I polished it up real good and I can't say I like it for this gun. With wood furniture, I'd say it's perfect, but black on black furniture doesn't do it for me, even with the semi-gloss. I'm letting it sit there to see if it grows on me before I blast, kphos and coat it because it was a lot of work. last thing that needs attention of this gun is the (lack of) sighting system. I neutered the factory sights to put the rail on top for a red dot; T1 micro seems to fit the form and function. I still want some irons on it, though. I'm just like that. Quote Link to post Share on other sites
Recommended Posts
Join the conversation
You can post now and register later. If you have an account, sign in now to post with your account.