MIKE20GA 11 Posted November 25, 2013 Report Share Posted November 25, 2013 I had the Cobra's shine up my bolt/carrier and thought I succeeded in getting it back together right ......but it looks to me like I missed a part . The slot behind the charging handle (that gets covered up when I slide the safety up and on - well , it looks wrong to my eye . It's just a gaping slot ( I love my wife ) that looks like all kinds of dirt and crud could just fall in there ; I don't remember at all that "look" before I broke it down to send off the bolt . I checked a whole bunch of images of the stock S20 and they nearly all look same as mine - but wasn't there some sliding panel or shield covering that when I bought the gun new ? Quote Link to post Share on other sites
csspecs 1,987 Posted November 25, 2013 Report Share Posted November 25, 2013 Yes there is a sliding dust cover part that goes there.. It would have been on the recoil spring assembly. I'm guessing that you did not send that part in. By chance do you have several AK pattern rifles? If so you could possibly have put the wrong spring assembly back in. If you can post a picture of the spring assembly we can answer more correctly. Quote Link to post Share on other sites
Cobra 76 two 2,677 Posted November 26, 2013 Report Share Posted November 26, 2013 (edited) There are two parts that cover the hole there. One is the safety when it's up. The other is the sliding dust shield that's on your recoil spring. Typing same time... You didn't by some chance replace your front recoil spring with a lighter one did you? Or did you put on a recoil buffer? If so you may have left the shield off when sliding the recoil buffer on there. Edited November 26, 2013 by Cobra's Custom Quote Link to post Share on other sites
MIKE20GA 11 Posted November 26, 2013 Author Report Share Posted November 26, 2013 You guys are quick ! I KNEW IT DIDN'T LOOK RIGHT ...... I suck with images and no , i didn't put a lighter spring on 'der and I don't have any other Saigas .........and I would'nt dare put a recoil buffer on it ! I was so proud of myself and now It appears I'm screwed , well ......... not really .........but what seems so simple I have made complicated . If I have to , I'll stay up all night trying to photograph my debacle ........ b4 I do that though ......... is there two plates/shields on the recoil spring assembly ? I know for sure I got the one on there ...... let me go get that dang gun and I will report back p.s I got the tool kit o.k -thanks Cobra Quote Link to post Share on other sites
MIKE20GA 11 Posted November 26, 2013 Author Report Share Posted November 26, 2013 all righty then - I had the gun all packed away and locked in it's case ( going to the farm tomorrow to shoot it) - now it's on my lap ......... with the safety on fire and the gun uncocked -the dust shield is there , but I can look in that 2" x 3/8 " wide slot and see the spring and the thing the bolt comes back and hits ......as plain as day . It could be I'm somewhat whacked and imagining things -could be completely normal for all I know ......I know a picture would help you guys solve my problem - but I'm all tied up in my shorts worring about the Chicago police pulling me over tomorrow and dragging me out of my truck to beat me senseless with their billy clubs because I got a weapon in my vehicle ....that and my wife is busting my chops - and Chinese Grandma got lost at the Fitness center today ..she can't speak a word of English .......it's just crazy 'round here - I just wanna go shoot my Saiga Quote Link to post Share on other sites
Cobra 76 two 2,677 Posted November 26, 2013 Report Share Posted November 26, 2013 OK you know when you field strip the weapon and first thing you take off is the dust cover? The big part that snaps down onto the top over the bolt carrier. Take that off. Now remove the recoil spring assembly. Now with that out, look at it. Does it have a small dust shield on there about 1 1/2" long that you can spin around with your finger? It should be shaped like the big dust cover on the right side so it can slide up inside it as the bolt carrier comes back. Quote Link to post Share on other sites
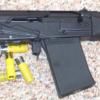
csspecs 1,987 Posted November 26, 2013 Report Share Posted November 26, 2013 This is what it looks like with the safety turned off. This is what the dust cover part looks like. 1 Quote Link to post Share on other sites
MIKE20GA 11 Posted November 26, 2013 Author Report Share Posted November 26, 2013 You both got hearts of gold ....here I am unable/unwilling to take pix and your bending over backwards to help me ...... o.k - i just put the freaking thing back and locked it up tight ............let me go and unpack it again ..... O.k , off with the big thingy - Hallelujah !! theres that cover spinning around just like you say ...... and yes CSSPECS .........you pix look exactly like what I'm looking at ( real nice mags you sent me by the way !) .............so I'm good to go and got a big smile on my face !!!! but say ......, looking down into the guts with the cover off - it sure looks Mickey Mouse with those twisted bent wires flexing in thin air when I pull the bolt back I'm laughing at myself at this moment and I hope you two are laughing at me as well Quote Link to post Share on other sites
MIKE20GA 11 Posted November 26, 2013 Author Report Share Posted November 26, 2013 (edited) tHAT SMILE got wiped off my face real fast ........... took me 10 min. to get that P.O.S dust cover back on !!! I got 250 rounds of the Rio Buckshot and 100 rounds of Winchester birdshot - I am gonna shoot this pig until the barrel melts down ! Edited November 26, 2013 by MIKE20GA Quote Link to post Share on other sites
Cobra 76 two 2,677 Posted November 26, 2013 Report Share Posted November 26, 2013 LOL I remember my first Saiga... J/K bro it gets much easier. 1 Quote Link to post Share on other sites
Shandlanos 1,470 Posted November 26, 2013 Report Share Posted November 26, 2013 This thread is a shining example of the greatness of the board.(And Cobra's dead right - dust covers on AKs suck to put back on - until you get used to it) Quote Link to post Share on other sites
MIKE20GA 11 Posted December 2, 2013 Author Report Share Posted December 2, 2013 Ahh yes ...........how in the world I got things done b4 the internet I really cant say ! I was trying to put on my new wood stock (Tiger Maple ...beautiful ! ) and removed the 2 screws and spent several miniuits with the vice in the basement trying to pull it off ....... (the gun I'm talking about ) , anyway ,when the sweat started beading on my forehead , a little voice kept whispering : "there's a third screw u fool -remember what you read on the boards ., 3 screws " so I pulled off the dust cover and there it was ! ........still had a hellova time hand fitting the stock with razor knife , sandpaper, files , chisel , etc but when I get it done I bet it will be real sweet ! Quote Link to post Share on other sites
Cobra 76 two 2,677 Posted December 2, 2013 Report Share Posted December 2, 2013 Hahaha just kidding man! Sounds purdy though quit holdin out! Quote Link to post Share on other sites
MIKE20GA 11 Posted December 2, 2013 Author Report Share Posted December 2, 2013 I just got done applying the third coat of stain , next will come the boiled Linseed Oil and then several coats of shellac ......... remember - I got some form of impediment when it comes to photo's .......... I am disappointed though , I had planned a three day trip down to the farm to sight in my XL7 in .30-06 and to try out the improved S 20 ; I never made it .....funny how life can throw so many curve balls Quote Link to post Share on other sites
Cobra 76 two 2,677 Posted December 3, 2013 Report Share Posted December 3, 2013 Something I don't know if you are aware of but I'ma put it out there anyway. If you are in a hurry do not use boiled linseed oil. That shit looks pretty but takes for fuggin EVER to cure out. Quote Link to post Share on other sites
MIKE20GA 11 Posted December 3, 2013 Author Report Share Posted December 3, 2013 damn ......I'm in no hurry .........and of course I just washed that stuff off my hands after smearing it all over the stock you mean "cure out" like 24 hours or more to "dry" ? And I gotta say , don't pull no punches with me , don't be walkin' on eggshells on account of my explosive nature and all the killin' I done ....I got a need to know - so lay it on the line and help me get an education ! Quote Link to post Share on other sites
MIKE20GA 11 Posted December 10, 2013 Author Report Share Posted December 10, 2013 ...Like I said ..., don't sugar coat it - lemme' have it right between the eyes ! and yes - been waiting three days for that B.L.Oil to "cure" Quote Link to post Share on other sites
gunfun 3,931 Posted December 11, 2013 Report Share Posted December 11, 2013 tHAT SMILE got wiped off my face real fast ........... took me 10 min. to get that P.O.S dust cover back on !!! I got 250 rounds of the Rio Buckshot and 100 rounds of Winchester birdshot - I am gonna shoot this pig until the barrel melts down ! Something tells me you will wear out your shoulder and wallet first. Linseed will get sticky, look great, dissappear into the wood, and need another application.. And it will need occasional maintanence. That's why non-purists like me like to get high quality urethane and be done with it. Quote Link to post Share on other sites
IndyArms 10,186 Posted December 12, 2013 Report Share Posted December 12, 2013 I used tung oil on my Richards Microfit stock on my 10/22. Put on about 12 THICK coats... ( Yes, it says to use THIN coats... ) and it looks and feels amazing. super smooth, hard, and easy to maintain. Just hang the stock up where its warm, and rub as much more as you want on, as many times as you want! LOL Sure it takes a day or so to dry , but its SO worth it, I think!!! Quote Link to post Share on other sites
MIKE20GA 11 Posted December 12, 2013 Author Report Share Posted December 12, 2013 Well you fellers ought to know I did a whole bunch of research on the specific wood and finishing methods for my stock ( by the way -the forestock that go's under the barrel is going to need extensive reworking b4 it even comes close to fitting on the S-20 ) , and yes: lot's of different strokes for different folks . I must say ....it almost resembles " fun " working on the various stages ! The hard core woodmen heat up their Linseed oil ; I skipped that part ........ I used 3 coats of Trans Tint Dark Vintage Maple dye, sanding with 220 grit paper between each coat . Then I applied the three coats of Boiled Linseed oil , wiping off the excess and letting it dry @ least 48 hours in front of the hot air duct in the basement b4 each coat . Now I'm going to apply as many thin coats of that marvelous Minwax urethane Antique Oil Finish (which was a toss up between it and Tung Oil ) ,sanding with 400 grit in between , as I can stand . It has to be a labor of love , and of course I would like folks to say " oh my God - Look at that !! " , but it's mainly done I believe for personal satisfaction .......or at least I hope thats why I spend all those hours doing it . I learned with my N frame pistol grips that 20 hours of works can be easily sanded off and the whole process repeated if the end result is not satisfactory . Thats the neat part of having a nice hard piece of wood in your hand - stroking it and fondling it ....making it come alive and then climaxing with the finishing touch .........u fellers KNOW what I'm talking about !!!!!!! 1 Quote Link to post Share on other sites
MIKE20GA 11 Posted December 18, 2013 Author Report Share Posted December 18, 2013 COBRA GUY , I put that neat little tool set you sent me to good use ........ pulled the plug and was able to see all three holes . All 3 were open and I reamed them a bit with your special thingamajig . I used the bent wire doodad's and found the diameter of the holes is 1.5 millimeters . I got a micrometer (that I had for 30+ years ! ) and tried to measure the doodad wire but not sure the thing is "zeroed" correctly ........... I am damned relieved though to find all three holes are free and clear and that their probably plenty big enough . I was able to get down to the farm and got my Stainless Steel Marlin XL7 sighted in real easy with a laser bore sighter . Man , that .30-06 packs a hellova whollop !! Of course I didn't take my S 20 because I'm still waiting for the freaking boiled Linseed oil to dry 1 Quote Link to post Share on other sites
Cobra 76 two 2,677 Posted December 18, 2013 Report Share Posted December 18, 2013 Yeah that's what I was talking about I'll never use that stuff again. Did an AK PG with it last time I used some and after a week decided it was prolly good enough to go shootin with. Well that was a mistake... I prefer to use Zinssner Shellac and Waterlox Tung Oil based finishes as part of my preferred process for gun stock sets. It really helps make it pop and it's a lot easier to work with. Some of my Kalashnikov wood finish porn here.... I kinda love doin' this stuff myself. Oh hey I'm glad you are getting some good use out of the Saiga maintenance tool kit I put together for all my Lightning Bolt customers.. I use those tools all the time, especially the port cleaners / sizers, hook tools, and inspection mirror tool I made for the gas block. 2 Quote Link to post Share on other sites
MIKE20GA 11 Posted December 18, 2013 Author Report Share Posted December 18, 2013 oh man those pix are great !!! Do you use your cell phone to take them or a camera ? Quote Link to post Share on other sites
Cobra 76 two 2,677 Posted December 18, 2013 Report Share Posted December 18, 2013 Honestly I can't remember that was a couple yrs ago but I'm pretty sure it was my digital camera. Thanks! I was havin fun. What I love about the laminate is how the colors reverse and change hues depending on what direction you hold the parts in the light. Like in the 4th & 5th pic, and the same set out in the sun nearer to the bottom. Quote Link to post Share on other sites
Billybobf 50 Posted December 19, 2013 Report Share Posted December 19, 2013 gotta say the fourth and fifth pic are awesome cobra, sorry to threadjack, but yes, the color flip is pretty neet 1 Quote Link to post Share on other sites
MIKE20GA 11 Posted December 20, 2013 Author Report Share Posted December 20, 2013 aw shucks - this thread was born to be jacked ! I unscrewed the #1 , #2 labeled gas controller thingy and out came this filthy , black piston . I cleaned it all up - but let me ask you : I only shot maybe 30 rounds thru it .......and it was caked with carbon . Can I assume that after firing several hundred rounds thru it it would be almost locked up with that crud ? It was SOOOOO dirty !! humm...maybe the gun wasn't "brand new" like the guy said when I bought it ......maybe he had fired a couple cases thru it his self .........hummmmmm Quote Link to post Share on other sites
Cobra 76 two 2,677 Posted December 20, 2013 Report Share Posted December 20, 2013 It's nothing to be concerned about really. First thing you always need to keep in mind....it's an AK. It is MADE to abuse, be abused, and take abuse. It will work after most any kind of abuse you can do to it, including normal use. The first time I cleaned out my S-12 gas system was after firing over a thousand rds or so through it. It was still working fine I just got curious so I took out the gas piston to clean it finally. BTW I also bought the gun used and it was 4 yrs old then in 2004. When I removed the gas regulator plug I could not even see the actual piston and it wouldn't come out. I wish I had taken a picture of what did come out of there. I had to take a wooden dowel and a hammer & drive the piston out from the rear. What came out in front of it was a big black carbon / plastic shit biscuit that looked almost like a second piston. It had almost completely filled the void in there yet the gun was still cycling normally. So in other words no a little carbon won't effect anything unless your gas ports are undersized or obstructed by the gas block. Quote Link to post Share on other sites
MIKE20GA 11 Posted December 20, 2013 Author Report Share Posted December 20, 2013 man , I gotta tell you .........this Forum is almost like having a direct hot line to you fellers , I throw up my questions and when I check back -I get all the answers I need ! That there piston ; I take it it moves ?? we got the gas regulator plug , then screw that out and we can get to the piston , o.k - I'm with you ........ then enters the danged gas block ! now what the heck is that ? are the gas reg. plug and the gas block one in the same ? p.s - u gotta know how indebted I am to you for taking the time to explain the obvious ......... Quote Link to post Share on other sites
Cobra 76 two 2,677 Posted December 20, 2013 Report Share Posted December 20, 2013 The gas block is that big hollow chunk of steel that is slid over and pinned in place on the middle of the barrel. The little thingie with the 1 & 2 on it is the regulator / plug and screws into it. 1 Quote Link to post Share on other sites
MIKE20GA 11 Posted December 20, 2013 Author Report Share Posted December 20, 2013 oh crap ........ I'm thinking all this time the puck is the piston ........., it sure LOOKS like a piston I did a search for that Tac-47 Auto plug and saw all kinds of pix of plugs, pistons, blocks, regulators, etc........ pictures are worth thousands of words The gas block is that big hollow chunk of steel that is slid over and pinned in place on the middle of the barrel. The little thingie with the 1 & 2 on it is the regulator / plug and screws into it. got it ! derned old gas block Quote Link to post Share on other sites
Recommended Posts
Join the conversation
You can post now and register later. If you have an account, sign in now to post with your account.