paprotective 362 Posted August 1, 2014 Report Share Posted August 1, 2014 1st Saiga build since 2009 for me.. took no time to fall back in routine. All stripped down.. I misaligned the bullet guide.. drilled the hole a hair off.. then I proceeded to botch it up too much for use.. Waiting for new one to come in from CSS. Folder locks up tight.. MagPul AK grip feels good as well.. Function check with factory mags went well.. I did dremel off the mag catch to accept the surplus mags so thats done.. Questions?? 2 Quote Link to post Share on other sites
thebuns1 4,323 Posted August 1, 2014 Report Share Posted August 1, 2014 Looks good to me. What color you gonna go with? Quote Link to post Share on other sites
paprotective 362 Posted August 1, 2014 Author Report Share Posted August 1, 2014 Also ordered the threading die and tat from CSS yesterday to do the barrel threading. got the Damage Industries Brake to put on... turned out very well thus far IMO. No worries I didn't mess up the trunnion, just the bullet guide.. Thinking I may need to tap for 8-32 screw when I get the new one in and center it better. Quote Link to post Share on other sites
Nailbomb 10,221 Posted August 1, 2014 Report Share Posted August 1, 2014 Nice. Looking forward to seeing the final product. Like the looks of the brake chosen. Quote Link to post Share on other sites
paprotective 362 Posted August 1, 2014 Author Report Share Posted August 1, 2014 Straightened out the existing bullet guide with dremel-fu.. bolt now turns all the way and locks in.. and it opens up and ejects too.. which is always good.. LoL Quote Link to post Share on other sites
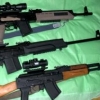
paprotective 362 Posted August 1, 2014 Author Report Share Posted August 1, 2014 Not pretty but it works.. and with the 30 round surplus.. Don't mind the other Saiga boxes in the back.. 1 is for my partner.. the other is up for sale.. Quote Link to post Share on other sites
paprotective 362 Posted August 2, 2014 Author Report Share Posted August 2, 2014 I ran 120 rounds thru it this evening with no issues. Zeroed it at 100m. then range some 10" AR500 steel plates... Quote Link to post Share on other sites
Spacehog 2,218 Posted August 2, 2014 Report Share Posted August 2, 2014 That is a good looking rifle! Quote Link to post Share on other sites
paprotective 362 Posted August 2, 2014 Author Report Share Posted August 2, 2014 Thanks. I was going to go with wood but the gastubes are running $40 #ND then another $40 for the lower retainer. I got the AMDTECH cheekriser on the way as well. but it shoots great as it is. Don't know which way my business partner will go with his... Quote Link to post Share on other sites
paprotective 362 Posted August 2, 2014 Author Report Share Posted August 2, 2014 (edited) So I cut back 1/2" with the tube cutter.. no threads.. In other news CSS has shipped the DIE and TAT on Friday.. Debating if I should leave at 1/2" or go back a bit further?? (and yes that is a 14mm-9/16" crush washer for the Brake/Comp).. Edited August 2, 2014 by YWHIC Quote Link to post Share on other sites
paprotective 362 Posted August 7, 2014 Author Report Share Posted August 7, 2014 (edited) **Almost wrong forum again.. Edited August 7, 2014 by YWHIC Quote Link to post Share on other sites
SaigaFL 4 Posted August 31, 2014 Report Share Posted August 31, 2014 I've done 5 Saiga muzzle threading jobs myself and to answer your question about how far back to cut I recommend 5/8. The thread cutting die has a tapered lead on it so you have to factor that in. You don't want the muzzle brake hanging on at the end of the barrel. I've also learned that the tube cutter can't cut back far enough and have had to use a Dremel cut off disc. Note on photo I hadn't as yet painted the brake to match. Quote Link to post Share on other sites
signcutter 3 Posted August 31, 2014 Report Share Posted August 31, 2014 (edited) Looks good to me. What color you gonna go with? You sir need to change your avatar...I must have wasted 2 to 3 minutes everytime i see it on this forum............ Nice job O.P Edited August 31, 2014 by signcutter 1 Quote Link to post Share on other sites
Spacehog 2,218 Posted September 1, 2014 Report Share Posted September 1, 2014 Go 5/8" back. More threads, less worry. If you measure the threads on a factory thread job, they are usually around 5/8". I have not found a tubing cutter yet that will allow you to go that far back without hitting the FSB post while turning, so it is dremel or hacksaw from there. I know you already have the tat and die coming so this may be a moot point, but the newest batches of Saigas (yours included) have pinned instead of dimpled FSBs. In the case of the pinned ones, I like the idea of replacing the entire FSB with a Bulgarian or the multiple options from KVAR. They will pretty much line up with the existing pin channels in the barrel, and you have the luxury of the detent, no crush washer, a cleaner look, and being able to keep the cleaning rod on the rifle. Just a thought, but be forewarned driving those pins out can be a bitch. 1 Quote Link to post Share on other sites
SaigaFL 4 Posted October 1, 2014 Report Share Posted October 1, 2014 Replace FSB or cut off muzzle cap is a question all us Saiga guys face. My answer is this, it all depends on how many Saiga's you are going to rework. If only one the FSB replacement is a draw cost wise. Some how I got really into these fine rifles and have threaded 6 muzzles. So that said the threading die, TT, and tap handle paid for themselves many times over. 1 Quote Link to post Share on other sites
Recommended Posts
Join the conversation
You can post now and register later. If you have an account, sign in now to post with your account.