

Saiga12Lover
-
Content Count
27 -
Joined
-
Last visited
Content Type
Profiles
Forums
Gallery
Blogs
Calendar
Store
Posts posted by Saiga12Lover
-
-
$90 for an 8 round mag? Um, why pay so much for them?
-
WOW!!! Just WOW!!
$999.00 for a Saiga 12.
-
How does the Gun Kote hold up for you guys?
Yeah, well when it isn't your gun, you just aren't as careful with it as if it were your gun.
Nice Avatar, where did you get a picture of my ex?
-
Yeah, I was thinking about that. Of course, after the fact. Doh!
-
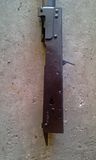
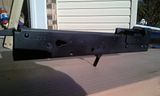
I took these pics with the crappy camera on my phone. A couple of the pics, the finish appears mottled, but that is not the case. Examining it closely in both direct sunlight and indirect lighting in the house from many angles, the finish is a nice even black. I think that it is oils from handling it. I really need to oil the whole thing up. As I understand it, the Gun-Kote will absorb a certain amount of oil. That should bring out the nice even shine.
There is a scratch on the left side of the receiver, towards the front. I can not for the life of me figure out how it got there, but there it is none the less.
On the dirty garage floor
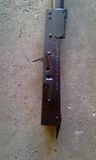
Out in the sun

I forgot to mention one other critical element, which is the small brown and white dog in the background. Fantastic energy, but crappy helper. Don't let the pets get involved. Trust me.
-
Picture Pages, Picture Pages, Time to Get Your Crayons and Your Pencils!
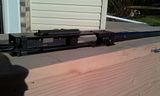
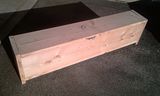
The Oven:
The Front
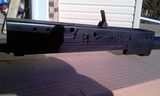
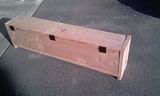
The Back
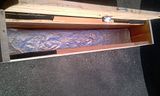
The Inside
I had Home Depot cut each of the 2"x12"x12' boards in half, so I had 4 each 2"x12"x6' boards. I brought em home and trimmed 17 inches off of each one for the end caps. I simply screwed everything together with 3" wood screws, put the end caps on, and put the lid on with hinges at the back. The oven sits 3" or so off the ground. The wood gets rather warm when the inside it 350 degrees, but I wouldn't call it hot. I can use it in the living room when the GF isn't home to complain about the smell.
What the pictures don't show is that in the bottom corner, towards the front, I cut a hole the same diameter as that of the cheapo $12.99 heat gun from Harbor Freight.
I put tin foil across the bottom of it because it is starting to crack after heating it up several times. I didn't know if the foil would help, but it certainly won't hurt. I can also use it to sweat the cosmoline out of a rifle I just got. If the crack gets really bad, I will get a 2"x12"x6' and replace it. There is a huge knot in the middle of the wood and the crack extends out from wither side. I am sure that is what caused it.
The wire is picture hanging wire from Home Depot. It was less than $5 for a whole spool. I wrapped it around a nut I had laying around, and then fed it into the box through a tiny hole. I cut a whole in the other end and pulled the wire through. Now I can hang anything I want in there. The thermometer is an oven thermometer from Target for $8.
When you look at the top, there is a thermometer there that is used for grills. I have no idea why, but it doesn't seem to work. I tested the oven thermometer in my oven, and it reads really close to true. The one in the top doesn't read about 200 degrees. Ever. ::shrug:: To check the temp, I need to open the lid a crack, and read the oven thermometer that is dangling there. I would check it every 15 min or so. If the oven got to 350, I would turn off the heat gun for a few minutes and turn it back on for a while. It is a little manual checking and rechecking, but the whole thing cost me less than $50, and I can use it to sweat cosmoline and oven cure Gun-Kote. :-)
-
No pics of the process, but pics of the oven and the final result are coming, probably tonight. If the stupid camera doesn't mess with me again. I haven't finished the small parts, those going to get done this weekend.
-
Wow, it took that long to get it to you? Hell, I swear he teleported it to my house the last time I ordered something! I swear!
-
I haven't seen anyone talking about refinishing a gun, so I thought I would post my experience with it, along with some different types of ovens to bake the parts in.
I have never done any refinishing to a gun in any way, but after taking a really close look at my Saiga12, I decided I really hated the finish on it. It was obviously cheap and going to scratch like crazy. I decided I was going to media blast the gun and KG Gun-Kote it. I spent some time figuring out how to accomplish this well and with a minimum of work. I looked at a lot of gun coatings, and I decided on Gun-Kote for availability, ease of application, durability, and cost. If you don't have an airbrush, you can get it in rattle cans from Brownells. If they ever get any back in stock that is. As I understand it, the rattle cans don't give as even a coat as an airbrush, but many people think it works fine.
Ok, I took everything apart as far as it will go without removing the barrel. I take all the parts over to a buddy's house to start bead blasting it. After some tedious annoying work, I ended up with bare metal. You can farm this out to a local company, but you really have to sandblast to get a good finish.
I got some Gun-Kote and K-Phos from Brownells. It seems that Gun-Kote, while not quite as durable as Cerakote, is a more forgiving finish to apply. Since I haven't done this before, I am a really big fan of forgiving. I like the comments here: http://thefiringline...ead.php?t=50377 from ScottS about the process of preparing the gun for coating. Gun-Kote requires baking at 300 degrees for an hour. Hmmm, I can't get the receiver with the barrel attached into the oven. Taking off the barrel seems to be a really bad idea of you don't have the proper tools and experience. Which I do not. So I started looking around for a solution, when I came across these:
$50 Hillbilly Oven
http://www.snipershi...&Number=1609093
I like this idea, but I really don't like sheet metal. I always cut myself somehow, and it gets crunched in storage.
Toaster Oven for a gun
http://www272.pair.c...er/heater1.html
Seemed like too much work. I am really lazy.
Oven Box
http://www272.pair.c...er/heater4.html
This is what I went with. It didn't cost much to assemble. All you need is 2 2x12x12, some screws, 3 hinges and an oven thermometer. It took an afternoon to put it together, even with much distraction. I didn't use the charcoal starters, but I used a cheap harbor freight heat gun for $12.99, drilled a hole the size of the heat gun barrel in the box, and turned it on. After about 20 minutes, the box is a nice toasty 300 degrees. :-) Perfect! When I was at harbor freight to get a second heat gun in case the first bailed on me at an inopportune time, I got a $4 discount if I bought the 1 year warranty that cost $3. Now that is a deal. Ask em if they offer that at your local store.
The cons of this method are that
The finished product is heavy! A real pain to move around.
You can not buy a 2x12 that isn't warped. The top cover on mine had gaps. I used some scrap leather I had laying around to pad the gaps, and I got another 50 degrees out of the oven.
I couldn't find a thermometer that was accurate that I could read from the outside. I put an oven thermometer on the inside, hanging from a small piece of wire. Then I could crack the top a small bit and see the thermometer.
Alright, the oven is ready, the gun is bead blasted. I got the Gun-Kote and my airbrush all hooked up, and a Saturday to work on this.
So my process is this:
Degrease the gun with brake cleaner.
Hit the gun lightly with a scotch brite pad, while wearing latex gloves.
Degrease the gun with brake cleaner again.
Bake the gun in the oven for a hour to ooze out any oils left in the metal. Even on a brand new gun you will be surprised what comes out.
Degrease the gun with brake cleaner again.
Do not touch the gun with your bare hands once you start the degreasing, or you will put oils back into the metal. This will cause your finish to start wearing off.
Now it is time to apply the K-Phos. This stuff is a type of cheater parkerization that will allow the Gun-Kote to stick to the metal better. Simply spray or paint it on, and once it dries, it is time to paint.
Check out this video here: http://www.brownells...er_4___Gun_Kote. It talks about how to apply the Gun-Kote properly.
Ok, everything is painted and dried. Now it is time for the baking. Two hours of TV, watching the temp on the oven, and the Gun-Kote was all nicely cured. You can't get the temp above 350, or it will discolor the finish. I got a really nice finish that is very durable, and looks nearly perfect. I have a couple little spots that I messed up, but the process was very easy, and I am sure the next time I do it, I can achieve near perfection. Now we have a nice durable coating that will stand up. As a side note, I noticed after doing the small parts in one batch and the receiver and barrel in another, that if you let the Gun-Kote dry for 24 hours before baking, there is MUCH less smell. The smell dissipates quickly either way, but it is rather obnoxious at the time. Fans are your friend.
A few notes about applying Gun-Kote. I used a cheapo airbrush with a compressor that came from harbor freight. http://www.harborfre...-kit-95630.html. Typically I wouldn't spend this much on one part to do a job once, but I have several other guns I want to refinish eventually, so I invested a little money. After using it, I wish it had a bigger reservoir, but it worked just fine. The biggest problem was controlling the flow of the paint from the cheapo airbrush. I got several shiny spots where I hit it too hard with the air brush. So I let the Gun-Kote dry for an hour and took the hair dryer to it for a while longer. Then with a bit of very fine sandpaper, I sanded down the ugliest spots. After cleaning it to get the grit off there, I hit it again with the airbrush, and it looked really nice again. A buddy gave me a rattle can of Gun-Kote he used on a project and didn't need the remainder for anything. I hit the whole gun with a final coat from the spray can and it came out really nicely. I really like the rattle can for a final coat. It makes a nice cloud of paint that kinda falls onto the gun and gives it a nice even finish. I think that the airbrush is way better for getting into small places and controlling the amount of paint that you get on the gun. I am sure a better airbrush would do a better job. Remember that numerous very light coats are much better than fewer heavier coats.
It was very easy. The Gun-Kote covered very nicely with light coats. It was easy to get a clean, consistent finish, and it was easy to fix my screw ups. If you screw up completely, nail it again with brake cleaner, and the Gun-Kote melts right off, leaving you a perfect surface to start over with. The Gun-Kote goes a long way. I'll bet I could do 3 guns with one can of it.
I will post some pics soon.
-
I have taken the top HG retainers off of an AK gas block to use on my Saiga 12. After looking at everything, it would appear that both of the front retainers (upper and lower) are going to butt right up against the gas block. I am thinking that I will JB Weld em like Cobra did once I get everything lined up. Then when I am positive everything is lining up right, take the gas block with the retainers attached to a welder to get them permanently attached.
I am looking around on the web for a local welder in the Twin Cities of MN, and what I am finding is companies that weld big old chunks of metal. I need someone that can do some fine work.
What kind of company should I be looking for?
What questions should I ask? Most receptionists freak out when you say "I need X, Y, Z work done on my gun". When I was talking to sandblasting companies, it was quite humorous. I even got "We don't allow guns here *click*".
I know there are different types of welding. What type of welding works on small parts? Should I ask what method they are going to use?
I would love to get into welding, but I fear that I would screw something up without time to practice, so I rather farm the job out, and get into welding when I have time.
Thoughts?
-
Keep in mind that the barrel is below your sights. Bullets travel in an arc, but line of sight travels in a straight line. To sight in at 100 meters/yards, you can sight in at 25 meters/yards. This is because the bullet intersects the line of sight at 25 meters on its way up, then intersects it again at 100 meters on its way down.
Because the bullet is being "lobbed" from below your sights, but a laser is not, your laser will only intersect your line of sight once. It should be low at 5-8 feet.
Fun fact: If you sight your rifle in at 2 yards, the bullet won't come back down to your second zero until ~875 yards, and will still be about 20 feet high at 500 yards. http://www.handloads...calc/index.html
At 25 meters, it should be close to where your bullet will hit (assuming your laser isn't screwy).
Ouch! Too much math! ;-)
-
Yeah, if things don't line up, I will get the dremmel out and order the screw and nut for the AK pistol grip. I am hoping to avoid more cutting. This is the first gun that I have ever done anything with, and I am trying to keep it simple. But I would rather cut more than half ass it.
-
Awesome, thanks!
-
This weekend I am taking parts to a buddies house to blast my saiga with aluminum oxide 120. I am going to KPos it and the Gun-Kote it.
I have never done blasting before. Can I blast the dust cover? It seems kinda thin, and I don't want to kill it.
-
It uses a standard AK pistol grip screw, however, you will have to cut the screw short a bit because the DIY trigger guard hole does not extend up into the receiver like the standard AK grip nut.
Oh goodie. I wonder how badly I am gonna mangle the threads! <<fingers crossed>>
If it's a traditional style wooden grip like those on original milled guns, you will need a metal retainer that fits across the top of the pistol grip.
Does that provide any function besides strengthening the grip?
-
I want to put an AK style wood pistol grip made by Ironwood Designs. All that they are going to ship me is the wood.
I have zero experience with AK furniture. I haven't gotten around to getting one yet. The question I have is, what metal parts do I need to accomplish this. I am planning on putting on a tromix trigger guard (or the like). Do I need a pistol grip cap? I assume I need the pistol grip screw, or will the one that comes with the trigger guard kit work for me? Will the tromix trigger guard take an ak pistol grip screw? i.e. are they threaded the same size? What holds the screw in place at the bottom of the PG? In this application, would I be better off cutting the PG Hole instead of a custom trigger guard?
-
I placed my order mid morning, and I emailed to cancel the order early afternoon because I wanted to add to it and save on the shipping. Too late, it had already shipped. Got it 2 days later when I got home. WOW!!!
-
My S12 was pretty tight and didn't start ejecting Wallyworld low brass with any consistency until after a couple hundred shells through the thing. I'm not convinced you are undergassed but it would be instructional to check out the ports and see if they are unobstructed.
Check this thread for pics: http://forum.saiga-1...cked-gas-ports/
I used that post to pop off my gas block and it was really smooth going. It is an excellent post. The only problem I had was holding the gun while whacking the crap out of a piece of 2x4 on the edge of the gas block. It is hard to hold a hammer, a scrap of 2x4, and keep the gun upright. I had to enlist the aid of the GF. The looks I got...
Once you have the pin out that holds the little pin with a spring in, make sure you get that little dude out of there even if it seems like it is stuck in there. My little pin for the gas adjuster didn't want to come out, and when I was whacking the gas block, after a while, ZING! OMFG it was a pain finding that little bugger. Again, it was the GF that came to the rescue.
So this little adventure cost me $75 taking her out to dinner. Be wise, be careful, keep her in the other room.
I think that soft wood on hard metal is way better than the metal on metal of the shelf bracket. JMO
-
I have a Shotgun News from "04 it was the first issue after the AW ban sunsetted and on the back page it has a S-12 MSRP $299. Sure wish I knew then what I know now.
Exact year I bought mine and signed up here. I grabbed it for $199.
I do like the finish better on the newer ones, but hey, I'm not paying $700 for a flat finish.
Do it yourself!
Get it sandblasted somewhere, build one of these: http://www.snipershide.com/forum/ubbthreads.php?ubb=showflat&Number=1609093, order $60 worth of chemicals from Brownells (Gun-Kote and KPhos), and spend a Saturday making your baby awesome for roughly $120 + sandblasting!
I am considering tricking mine out with a Gun-Kote finish, AK wood furniture, polishing up the bolt and the carrier, and selling it on an auction site, and buying 2 more.
-
I also am having a problem finding something useful on this topic. I on the other hand have not yet removed my barrel.
Anyone got any good and useful advice in this regard, or a link to a post with some good information?
-
Not 100% positive about this, but what I remember from reading...
The pins are put in, and then one is is mashed a little to keep it lodged in there. That is the side that you must pound out twards. As I understand it, one side of the pin will be a little larger than the other. Bang from the other side. I would really like to know if there are any gotchas with knocking these little buggers out. I plan on taking off the gas block later this weekend. I think.
-
Well, I can help you with part of that. The LRBHO has been an elusive dream on the forums for some time to the best of my knowledge. Everyone wants one, no one is supplying one as an addon. Not sure that anyone here has modded one. Keep asking around, I am sure someone will know something soon.
As far as the single or double hook goes like this... The double hook is a double strong mechanism. It is redundant and over engineered except maybe in the worst case long term military example you can find. For civilian use Single hook will hold up to the worst you can do to it. The double hook is added, unnecessary expense. There are of course differing opinions, but that is what most people are saying. Once you cut off the trigger guard and look at the trigger hole (the one where the new triger will be going that was covered up) you will see a small cut out on one side of the trigger hole if it is ready for single hook. It will have a slice on both sides if it is for double hook. If it is cut for single hook, you will have to cut out the other side to use the double hook. Saiga 12s have always been cut single hook. Dunno know about the new ones.


Problem with my Saiga Conversion
in Saiga-12
Posted · Edited by Saiga12Lover
I finally got my baby done. I took it out to the range and click click click, no boom.
So I opened her up, thinking that I installed something wrong. I opened an AK and a RPK, and set them beside my S-12. Everything looked almost identical. The hammers in the same direction, springs the same, everything. I looked closer at my S-12 and the hammer is hitting on a spot inside the reciever and stopping just before it hits the firing pin. The gun was unloaded with no magazine in it, so I know that is not the problem. So I took out the manual bolt hold open, as it was a MF to get it installed and working properly, so I thought that perhaps it was putting stress on the hammer. Nothing changed.
I can cycle the gun manually, the trigger works nicely, and it seems perfect. The hammer just isn't reaching the firing pin.
I bought the replacement G2 trigger group from a vendor here on the site, could I have gotten the wrong trigger group accidentally? Have I maybe screwed up the installation in some way?
Any thoughts?