

DanTheEldest
-
Content Count
15 -
Joined
-
Last visited
Content Type
Profiles
Forums
Gallery
Blogs
Calendar
Store
Posts posted by DanTheEldest
-
-
Much obliged. I figured having a little slop might help with reliability, but this AK stuff is all new to me and I don't know what's normal yet.
-
I recently finished my conversion and took it to the range for testing. It ran 100% with all my mags and I'm totally happy with it, but the question arose when I got home. I disassembled it and started cleaning and when I was wiping down the piston, it felt "odd". I realized that there is a slight amount of looseness (wobble) where the piston threads into the carrier. I had an extra pin so I removed the piston and examined everything just to make sure nothing was cracked. Both the piston and the carrier are fine, but I took a pair of dial calipers and checked the threading diameter on the aftermarket piston and the original, and they're different. The US-made piston is .003-.005" smaller diameter than the original, depending on where on the threads you check it. The length of the threaded area that screws into the carrier is also shorter than the original, giving less bearing area on the threads, which I noticed when I was installing it originally. Now it's all back together again, and even though it's threaded in to where it's supposed to be and the pin is snug, there's still a little bit of movement due to the shank being a slightly smaller diameter. Has anybody else had this? Should I try a different piston, or leave it? Is the piston supposed to be absolutely rigid? I have no idea when it loosened up during shooting, but function wasn't affected at all. I just don't want the movement to cause something to fatigue and maybe the carrier cracks down the road.
-
Thanks for all the suggestions. Just because it was something the Mrs. could pick up at the grocery store, I went ahead and tried the nail polish remover. I used a little bit on napkin corners and it did the trick, but I didn't linger in any one spot for long. The finish seems okay; I'd like to get the whole rifle parked and Gunkoted later so I wasn't too worried, but it's nice that it didn't dissolve the factory black right away.
-
DanTheEldest, welcome to S12.com!
Very nice to see you here, I hope you bring a level of forum activity similar to that at XD.com.
Glad too, to see you finally bought and converted a Saiga

I'd try a razor blade and a steady hand to scrape it off, then a quick touch up if needed.
Of course this could be a good excuse to refinish the entire receiver in something better than the factory paint

The third hole is on the bottom/center of the receiver, on the Saiga rifles it is often covered by the pistol grip when converted.
If the aftermarket stock is tight with two, you're good to go, if not remove PG and use third screw.
I figured I'd see you here.
 I've been lurking around here for quite a while gathering info from other people's posts, but then when I finally got all the parts accumulated for mine I figured I'd go ahead and register. There's a ton of good info here at your fingertips.
The super glue is more very thinly smeared rather than "dropped' on the finish, which I think is actually going to work against me in getting it off. I might try some acetone or just leave it for the time being and see if it wears off with regular use and cleaning.
The stock is nice and snug with just the top two, so I reckon I'm good.
I'll see you around or over on The Other Site.
-
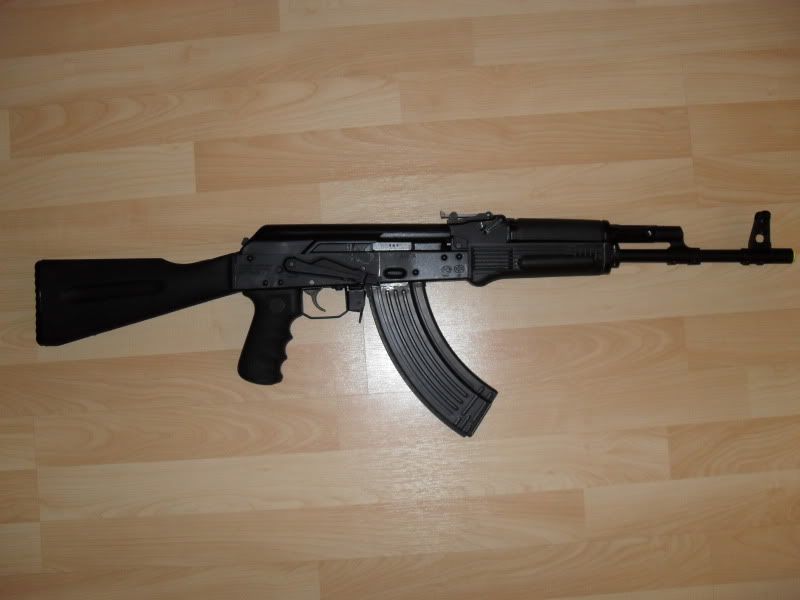
There are some fantastically original projects on this thread.

I was going for more of a slimmed-down "everything you need, nothing you don't" theme on this one, it being my first. Further plans still include a '74-style muzzle brake to complete the AK-103 cloning process, and a fast-acquisition optic like a Kobra or similar, but the major work is finally finished. I think I filed the mag catch just a hair too much (there's just a little forward-to-back mag wobble), but some range time to make sure all is well will answer that question. All in all it was fun, and it's time to go shooting.
Dinzag:
Bullet guide
Gas piston
Trigger guard
Screw-on lower hand-guard retainer
Gas tube
Pistol grip nut
Plastic hole plugs
Steel FCG pin retainer plate
K-Var:
All furniture
Gas tube "rattle" spring
Lower hand-guard retainer spring
Milsurpstuff.com:
Tapco single-hook G2 FCG (mostly because Dinzag was sold out at the time of order)
Red Star Arms:
Hogue pistol grip
LULA mag loader
-
Two quick questions:
1) I'm doing final assembly of my conversion and used a little super glue to secure the hole plugs in the old trigger pin holes. They look good, but in the process a little super glue got wiped onto the side of the receiver. What can I use to get super glue off the painted metal without damaging the paint?
2) This is my first conversion; is there a place where you're supposed to use the third buttstock screw from the OEM stock on the underside of the receiver? I see the two locations in the upper tang, but I don't know if there's one that goes on the bottom somewhere.
-
an easy way to install a handguard on the gas tube is to use an open end wrench. approx 3/4" or whatever the appropriate size of the tube is. i dont recall at the moment. hold the handguard and rotate the gas tube via the wrench and the tube will roll into place very easily. great for removal too.
I went ahead and bumped this thread after running into this issue myself, and I used basically this method to get it installed. Mine was too tight to hold by hand and I really wanted to avoid shaving any material to help guarantee a tight fit when finished, so this is what I did: I have some 1/4"-thick sheet black rubber that works really well as vice pads, so I got the assembly situated in the vise with rubber on both sides. The rubber both protected the parts involved and added a "no skid" effect like a jar opener, and combined with the pressure from the vise compressing and deforming the handguard slightly it rotated around with an open-end wrench on the squared-off part of the gas tube fairly easily. A little further tweaking to get it all squared up once it was out of the vise and it was finished. I'm not sure I'd try this method with a wood handguard because I'd be worried about splitting it, but for the flexible poly it worked well.
-
Thanks for the quick help--particularly yours, Tony.
-
Pretty self-explanatory. This is my first project using threadlocker on a firearm--do you folks use ordinary blue or the red stuff? Or is there a different brand that works better? Thanks.
-
Here is some advice from somebody that deals with rivets every single day (I do sheet metal work on helicopters). There are two sides to every rivet:
Manufactured head: This is the round head that comes from the factory. The one that you put the rivet gun and headset on. It should be nice and round.
Shop head: This is the side of the rivet that gets "bucked" with a bucking bar. This side of the rivet should have a flat head and looks like it has been smashed down.
It will be tempting to drill out the shop head of the rivets. DONT DO IT!!! Standard practice is to drill the manufactured head. You do not want to drill out the flat shop head. As the rivet gets bucked down, it creates heat that hardens the rivet. And you do not have as much room for error as far as drilling the exact center of the rivet. Step one. Select the right drill bit. If my memory serves me correctly, the rivets are 4's (4/32in). So grab a 30 or 1/8in drill bit. Start drilling the exact center of the manufactured head. If your drill bit walks, angle your drill and drill back to center. Then straighten your drill back up. You are only going to drill thru the head of the rivet. After you drill thru the head of the rivet, grab a punch, put it in the hole and break the head of the rivet off. The hole should be deep enough for the punch to catch when you lean the punch to the side it breaks the head off. Then you hammer the rest of the rivet out. It might take a couple good hits with a hammer but it will come out.
Common Mistakes:
Most of these are things that you dont want to do when removing rivets. Take what you want, I mean you are working on a $400 gun and not a multi million dollar aircraft so it doesnt have to be perfect.
Grinding the heads off: This sounds like a good idead but its really not. First when you grind the heads off, its really hard to see where you actually need to punch out the rivet. It also will lead you to scar the surface of the metal.
Chiseling the heads off: You dont want to do this b/c one, its a pain in the butt. Two it can damage the hole that the rivets are in or the surrounding metal. You can use a chisel to take the heads off AFTER you have drilled the heads. A nice little tap and the heads will come right off. This comes in handy if you do not have the right sized drill bit.
Drilling thru the shop head: One this side of the rivet is much harder. Also you have alot less room for error. Doing this usually leads to oblonging the holes.
Drilling all the way thru the rivet: Sounds like a great idea, but its not. If you have never done this before, you are probably gonna get off center and screw the hole up. Another thing, it usually leaves a small ring of metal from the rivet in the hole. So when you put another rivet in that hole, after a little time and vibration, it starts working loose.
Hope this helps.
^^^This. I played with aircraft sheetmetal for a few years (commercial heavies) and this is sound advice. The only thing I did differently from normal with the Saiga is I took a small file and flattened the tops of the manufactured heads and then center-punched them to start the drill. When I was working with aluminum I could start the drill with no prep and walk it as described to stay on center, but the steel rivets are tougher and I included an extra step or two to deal with it. I also found I had to remove more material than usual before I could break off the heads; I bent one of my pin punches in the process. I don't have any problem with grinding the heads down on a part that's expendable (like the floor plate), but it's a last resort and not good practice for the reasons mentioned.
Also remember that this is steel you're working with. With a soft metal like aluminum you could rev up the rpm's on the drill, but on steel keep your drill speed down and you could even use some sort of cutting oil when drilling out the rivets. I had an old bottle of air tool oil in my box that worked just fine. This is also very important if you're changing out the gas piston or drilling and tapping a hole for the bullet guide.
The only other thing I'd offer up is expanding on why not to drill the shop head unless absolutely necessary. It's a bit harder than the manufactured head (as mentioned), but the main reason is sometimes rivets will "smear" when being installed, and what you think is the center of the hole may not actually be. Take your time, be sure you know what you're doing before you put tool to metal, and stop and check your progress from different angles frequently. There's no rush on a project like this, so if it takes you an hour or two to remove three rivets but you leave perfect holes and no damage to the surrounding metal, it was worth it.

-
^^^Thanks for the details. After sleeping on it I've made a decision: my original idea for this Saiga was actually to make an AK-103 clone complete with a '74-style brake, and after seeing all that's involved with this furniture I think I'm going to go back to that idea. I'm going to put the Timbersmith set up for sale and pick up a K-Var black poly set. Does K-Var offer a buttstock in the Warsaw length with the proper mating surfaces to fit snugly for a Saiga?
-
Appreciate the responses. I'm no stranger to fitting things and "make it work" projects, but the size of the gap caught me off guard. I've made my peace with it and now I need to find some sheetmetal or a thin piece of hardwood or something to make the shims out of.
-
Before I post my issue I just want to say hello to all the Saiga folks here. I'm familiar with some of your members (especially Nalioth) from other boards, and now that I'm doing my own conversion I naturally came here for some answers.
My issue is this: I'm doing a conversion on a 7.62x39 Saiga and I really liked the looks of the Timbersmith black laminate furniture, so I ordered a set. Now that I'm actually doing the work I did a dry-fit to see how everything lines up and found (much to my dismay) that there is a very large difference in height between the inside dimensions of the receiver and the mating parts on the buttstock. Basically, when I put the stock in there's a large gap (at least 1/8" or more) under the upper tang. In order to give the stock a snug fit I'm faced with making some custom shims, which I don't necessarily mind doing, but I'm a little upset. Either my stock is seriously out of spec, or these aren't actually meant for Saigas and should have had a warning on the manufacturer's site and/or the place where I bought the stock.
I did a search for similar troubles on this board, and other than some other issues with the deep tang cut I couldn't find much, so my apologies if this is a recent repost.
Anybody else have these sorts of troubles with Timbersmith? I'm bummed because I really like the look, but these sorts of tolerances aren't acceptable in my book.
Cutting shroud off, need help
in Saiga 7.62 X 39
Posted · Edited by DanTheEldest
I'd been wondering how I was going to prep it for a brake, but I was a little hesitant to use a dremel. Yet another time I'm glad this place exists.