

pogy
-
Content Count
224 -
Joined
-
Last visited
Content Type
Profiles
Forums
Gallery
Blogs
Calendar
Store
Posts posted by pogy
-
-
Are you talking about a felt wheel and some buffing compound? I have those already. Is there any way I could go too far and make the action dangerous?
-
?? It shot OK before the conversion. The trigger seems much smoother now. Hope the weather holds 'til after the holidays and I'll try it again.
-
That is a nice looking rifle but apparantly there are some problems.
http://www.enfield-rifles.com/printer_frie...osts.asp?TID=66
-
I saw a pic somewhere. I am sure I can find it again. Seems like it should be somewhere near, or just behind, where the trigger sits now.

-
-
Never Mind!
-
-
Amen! Cool upgrade.
-
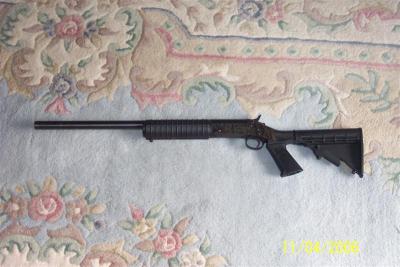
The conversion on the Saiga .223 is complete. I may try venting the forearm at a later date.
I followed the directions by Sheik Yerbouti (http://www.cross-conn.com/Saiga_Conversion/). They are an extremely valuable guide.
My preference was to go for a "sniper" type appearance with the 20" barrel so I used a Choate Dragunov butt stock to achieve what another member referred to as a "Ghettonov" style. Since I started with a Saiga, I didn't have the retaining hardware necessary to install the forearm kit. That's no big deal because I kinda like the stock forearm anyway.
I am not a mechanically inclined by any stretch of anyone's imagination. The conversion was done with a hand drill, a brand new set of Craftsman Cobalt drills and an old Dremel tool that has been vastly neglected for 30 years and assorted hand tools. The Dremel saved my butt in this build!
Since the "Sheik" first wrote his instructions, there have been some advancements (at least what I have experienced in my build) that I would like to share with the forum viewers. Take 'um, leave 'um or modify them for future viewers.
In "Step 3", you need to file down the rivet next to the magazine lever and the rivet under the trigger guard because they can't be reached by a Dremel with a cutting wheel.(I was using Dremel Brand #420 Heavy Duty Cutoff Wheels). You can grind or file the rearmost rivet as the directions relate.
My problem was with the "spot weld" on the trigger plate. I wanted to save the trigger guard and tried to drill it as per the directions. I dulled a bunch of drill bits in the process. If you want to save the trigger guard,(and some drill bits) forget about the spot weld until the trigger plate is removed. Take your Dremel and grind the weld off from the back side.
I was lucky because I have a recent .223 RAA import that had the trigger hole and pistol grip hole underneath the trigger plate .
My next big problem was in Step 7. The trouble was with the part called the "disconnector assembly".
I tried and tried to tap that pin out with a nail set but that did not work. The solution was drilling the pin out with a 15/64th drill. The pin spinned when I tried to drill it out so I jammed an appropriately sized slotted screw driver in the opposite end to stabilize it. After drilling out an eighth inch, the pin let loose and the assembly separated without the spring flying off into oblivion. (Take care anyway as per the directions)
The hammer/trigger/spring/axle pin reinstallation thing is what scared me the most before starting the build. It was a piece of cake. I bought a Tapco Single Hook Trigger Assembly. It came with a sleeve similar to the one I had just knocked out of the "disconnector assembly" but a bit longer. The disconnector, disconnector spring and trigger can be assembled outside of the receiver using that sleeve. You can just drop this assembly in the receiver and slip an axle pin through. I didn't bother reinstalling the "bolt hold open" since it only has marginal utility in my opinion.
Do yourself a giant favor and buy a "pin retainer plate" I got mine from Red Star Arms but I believe Tapco sells them also. It will eliminate the need for the two binding post screws, one of which would hold the "shepherds crook" spring that it replaces. Using the retainer plate lets you put together the hammer and spring assembly, insert its axle pin and then place the trigger assembly and its axle pin. The retainer plate then anchors both pins and is itself anchored by the "safety/selector lever.
The Choate butt stock needed a bit of relief as the rear of the receiver was contacting the stock not allowing the tang to line up with the screw hole. I had no pistol grip nut or bolt but almost any combination of nut, bolt or washers will work since there is plenty of room in the receiver without the extra trigger parts.
I hope this is helpful to you folks thinking about doing a conversion. Pictures would have been nice but my camera doesn't do closeups well.

-
OpFlash,
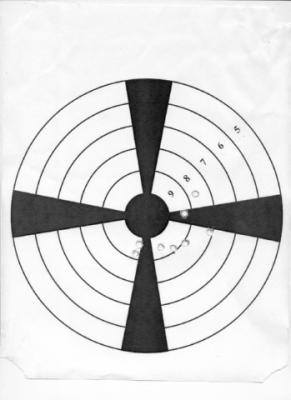
I didn't mean to be abrupt. The group on my target may be about as good as it gets, I don't know. I've only been out 4 times with the Saiga and that's the best so far. My experience so far is to think that when the barrel is clean and just warm, it will shoot 2-3 MOA @ 100 yards.
A friend has a .308 but is still dialing in his sights.
-
OPFlash,
The group on the above target measures 2.5 inches center to center from the two extreme rounds.
That would be about 2.5 MOA. If you discard the two outermost, you're probably looking at 2" or two MOA.
That group was shot off a bipod with no support on the butt other than my shoulder. I'm not bragging about my shooting prowess. That's what I shot yesterday. Tomorrow will be different but those results are possible with my Saiga .223 20" barrel with commercial reloads.
What's wrong with some of BlackDog's groups? The top targets look pretty tight to me!
Bottom line is "you get what you pay for". If you want a tack driver, get a T/C Encore.
-
No offense taken.
-
Hey, I cut my barrel to make a cheap home defense weapon. I wasn't trying to get fancy or anything. I have shot it several times since the cut and I still have a nose!
-
Lookin' Good BD!

I just got done cleaning the Saiga and realized something. Before that target shown, I shot about 30 rounds.
When I realized that I had the scope nearly zeroed, I ran a Bore Snake thru the barrel a few times. That was the group immediately following.
Hmmmmm! Clean barrel, better group!
Duh!

-
I got out for my fourth trip today also. The weather has been unbelievably mild.
This is my best group so far. (rings are 5/8") Shot @ 100yds with some reloads (55gr. FMJ) I bought at Dick's Sporting Goods. Scope is a POSP 4X24, shot from a bipod on a bench. By the way, I shot these with my left eye to address the theory posed by by some posters that A Russian offset scope is meant to shot with the left eye. It worked for me but was difficult to get a good sight picture.
I'm curious to see a group with some quality ammo.
-
From what I have read on this forum, the axis pin retaining plate is much easier to deal with and also makes it easier to remove the trigger ass'y to clean every once and a while. It doesn't sound like you're any more confused than me!
-
Calm down! If you have one of the newer RAA .223's the pistol grip hole and the single hook trigger hole are underneath the plate mounted to the bottom of the receiver. Read the tutorial- http://www.cross-conn.com/Saiga_Conversion/
I haven't done mine yet but have all of the parts. (It's been too warm in the NE to quit shooting) Make sure you get one of these! http://dpharms.com/axis-pin-retaining-plate-p-202.html There are several places to buy them not here necessarily.
-
I don't have a micrometer. I placed a Crescent wrench behind the FSB and measured the gap with a ruler.
I came up with 16mm.
Hope this helps.
-
I'm not a gunsmith! I cut my H&R Topper 12 Gauge shotgun barrel with a regular plumbing pipe cutter.
It took a while but it worked great. Take your time. Give it a twist every 4-5 turns and keep the cutting wheel snug. Deburr the inside end of the barrel with a Dremel tool, fine round file or some fine sandpaper.
Did I say I'm not a gunsmith.
-
Somebody was gonna say it but I was first.
"Welcome to the Dark Side!"

-
phoglund,
OH MY GOD!
Is that a view from your back porch!
 Count your blessings my brother!
I live in Connecticut and while I do like my life here, there is NOWHERE to shoot without a club.
I am trying to get into a hunting club which has a 100 member limit. I am #30 on the membership list.
Fortunately, I can shoot there with a friend.
Back to the topic.
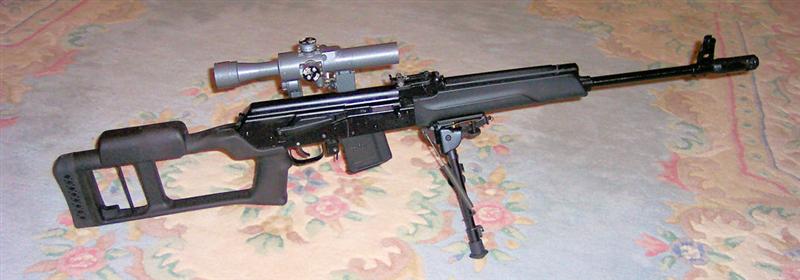
A Russian POSP scope is great and holds zero after removal if you make sure that the clamp is tightened properly.
-
Now! What are you gonna do for Christmas? Does it come earlier in the Southern Hemisphere?
Nice looking weapons!
-
Rory Gallagher- "Laundramat"
-
Welcome,
I'm new here too.
Use the "Search" and "Advanced Search" functions and you will be able to find the answers to several of your questions.


Conversion Complete
in Saiga .223
Posted
vjor,
I buffed up the trigger like you suggested and it is even smoother now.
Thanks and Merry Christmas