

T1gger
-
Content Count
99 -
Joined
-
Last visited
Content Type
Profiles
Forums
Gallery
Blogs
Calendar
Store
Posts posted by T1gger
-
-

Just feels better, I need to redo it though on the bottom.
Very nice indeed.
-
Preferably one that won't break the bank.
-
Opinions???
BTW: It'll either be that one or the one from Belarus
-
I'm running matching UTG978 Quick Detach models.. One with Bushnell Trophy RD and one on the 4x scope.
Holds zero thus far and centered over cover also. $35-40. (FYI. Older model #'s were not centered.)
Got last one for $35 shipped, PM me for info if you want.
Is that the Saiga factory side mount? I just want to get one with a lever that's solid and is low over the cover. I'd rather it not have that side rail. Suggestions???
-
My dad just called, him and his friend looked at it and the hammer was indeed backwards, so they fixed it. I want to thank everybody on this site. Without the cool people and help there's no way I would have been able to get this done, much less have it done in a few hours. Thanks fellas.
-
I didn't modify the trigger group.
-
I actually just made it to BR and the rifle is with my dad. I'm trying to get him to take another picture, but he's pretty computer illiterate.
-
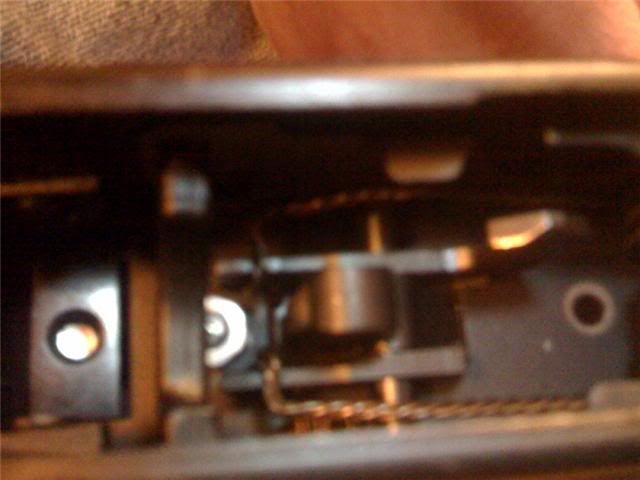
I think everything's in correct. I can push the hammer into the hook and it'll lock. But it looks like the bolt. 's not pushing it down far enough to hook when it's racked.
-
Just finished the conversion, charged the gun and the hammer is not locking into the hook, it's just coming back up with the handle. Here's a really cruddy pic of the Trigger group in. Please help fellas.
-
Are there any local places around that would have rivets that would work for this job (like Lowe's, etc.) I have a drill press.
-
i put one in my 7.62 during my resto for a compliance part. ran about 200 rds after that with no problems. i will say it was a pain in the ass swapping it out, and probably wouldnt do it again. would just change another part if for complaince reasons
So I'll have to go through that process of riveting the bolt carrier with the gas piston and everything???
-
That's no easy basic job like putting in a trigger. I don't think there are any videos that will teach you how. Most people read through the many threads on the forum about Saiga conversions. That's how I learned. There are parts you will need to buy, and machine work that needs to be done.
I know about modifying a lower handguard retainer and what-not. I was just wondering if I was going to need to use that screw area from the original, but i don't think that I will.
-
Did someone from this site make that video? Because it's pretty awesome.
-
So I'm watching a video on changing the trigger group, and I notice the screw that has to be taken out for the handguard on the stock Saiga (7.62). How am I going to go about putting in a lower handguard from an AK-74 (mine's a 5.45) when I don't see anywhere for that particular screw to go? Thanks fellas.
-
What size screw does the trigger guard take on a rifle (5.45 specifically)?
-
Yep, you'll need atleast one screw and nut for the trigger guard. (local hardware store)
Something no one ever really talks about, is the little trigger spring you will need to remove from your OE trigger group and install into the Tapco unit. DONT lose it, while trying to get it out of the OE trigger!
Thanks guys. I do have some of those 3/16 hole plugs, and I knew about the spring in the original disconnector; but what size screw should I get to screw in the trigger guard? Thanks again.
Oh yeah, and it's for a 5.45
-
Just want to make sure I get this right. After the rotation I'm on, I'm heading to my dad's to use his shop for the conversion, and I'll only have the weekend to do it, so I need to make sure I have all the parts that the job will require.
Here's what I have:
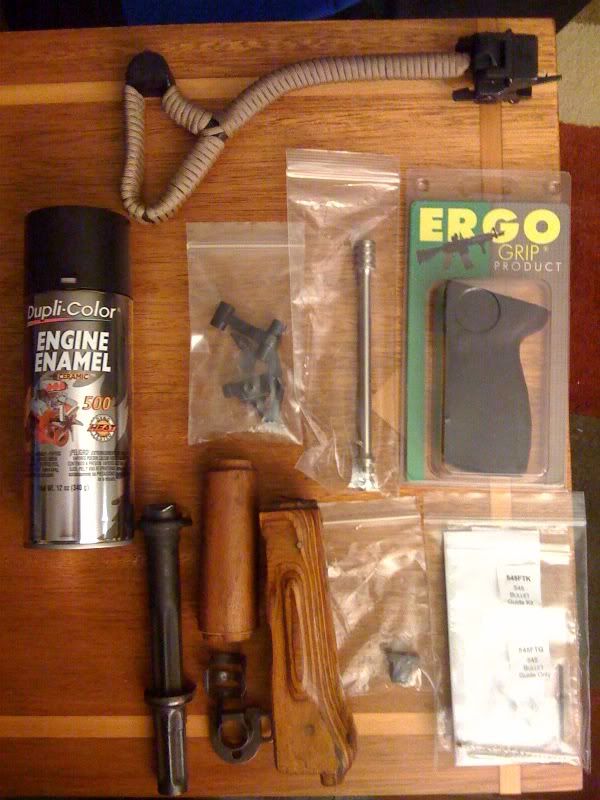
Some of the smaller pieces you may not be able to make out:
Tapco G2 single hook trigger group
Grip nut (the screw came with the Ergo grip)
Bullet guide from Dinzag
What I know I need:
Probably will suck it up and just get the Tapco axis pin retaining plate
I'll have access to a drill press and dremel. I know that a 3/16 drill bit is needed. And I was told that on the lower handguard retainer conversion, a #8 cap screw and bolt will work. I was also told that I may need 1/8 and 5/32 (I think) drill bits. Please let me know if there is anything that I'm missing, or if those drill bits are needed.
I think that after I do the conversion, I'll make a post about everything needed for a conversion for all of us newbies out there so that it'll all be in one nice place.
-
The pin retaining plate is not expensive and is extremely fast and easy to install.
So you would suggest getting a new one rather than salvage the one that came in the rifle?
-
And don't forget to order a shepard's crook or Axis pin retaining plate to hold it all together.
Is there not one on the stock rifle that you can use?
-
I have the single hook one. Will this have everything I need for the conversion (meaning whatever is needed for the BHO and what-not)?
-
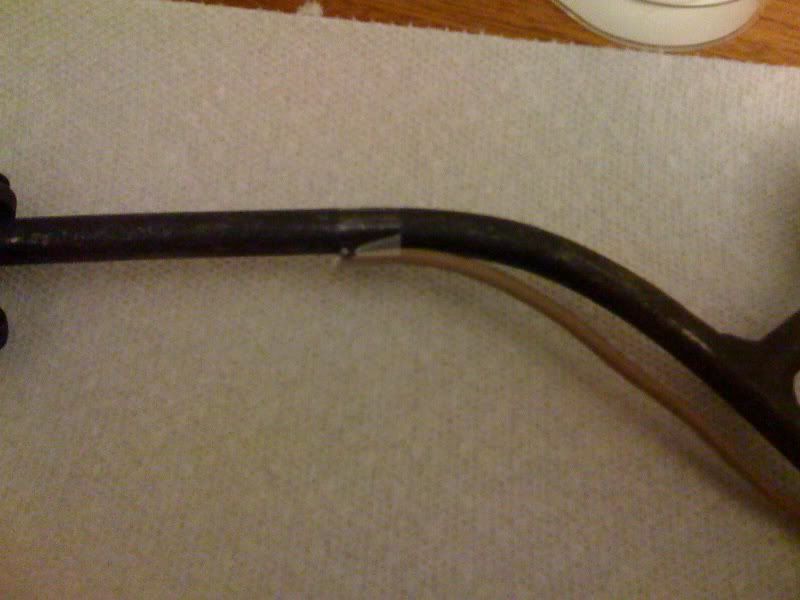
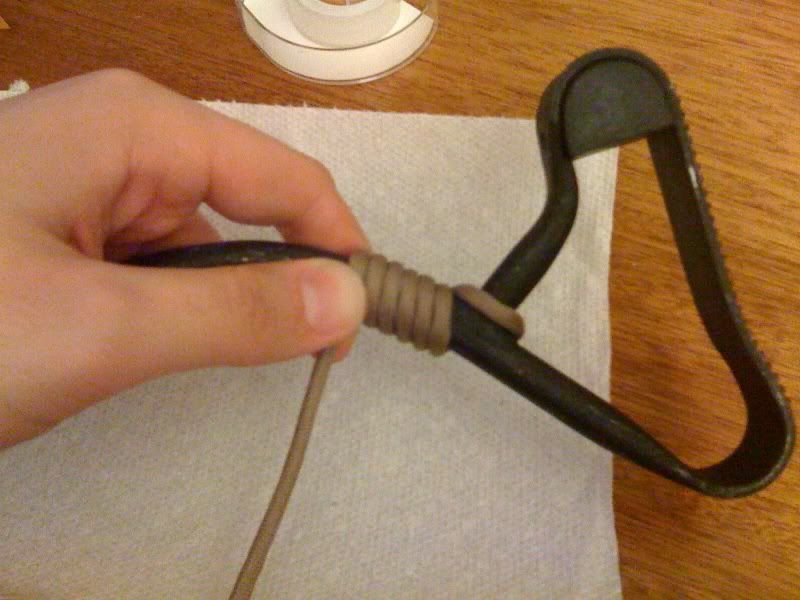
I put this in the General section, but this may be a better spot for it obviously. Instructions and pictures on paracord wrapping a side-folder.
Last week I paracord wrapped my whole Romanian side-folder in green paracord. While at a gun show today, I saw some tan paracord (naive of me to think that they didn't make it in that color), and since I initially wanted that color furniture, I bought some. I hated having to take down all that hard work from the previous wrap, but figured I would go through the steps of how I wrap the stock since I had questions about it from a previous thread and since the thread I got it from online is no longer a working link. So here it is.
For those wondering about cord length to wrap the whole stock:
Long straight arm of stock: give yourself about 7 feet of cord
Upper limb after the fork: give yourself about 2 feet of cord
Lower limb w/ shoulder rest: another 7 feet of cord
These lengths with give you a little extra cord left over to make sure you didn't cut them too short to finish the job.
First, melt (lightly) one end of your cord and tape it to the underside of the stock. I say underside because it makes the finished product look better. If you can tape this semi-high (a little higher than I have it in this picture), it will make the last step easier.
Continue to run the cord beneath the stock and then loop it around the top arm of the fork in the stock.
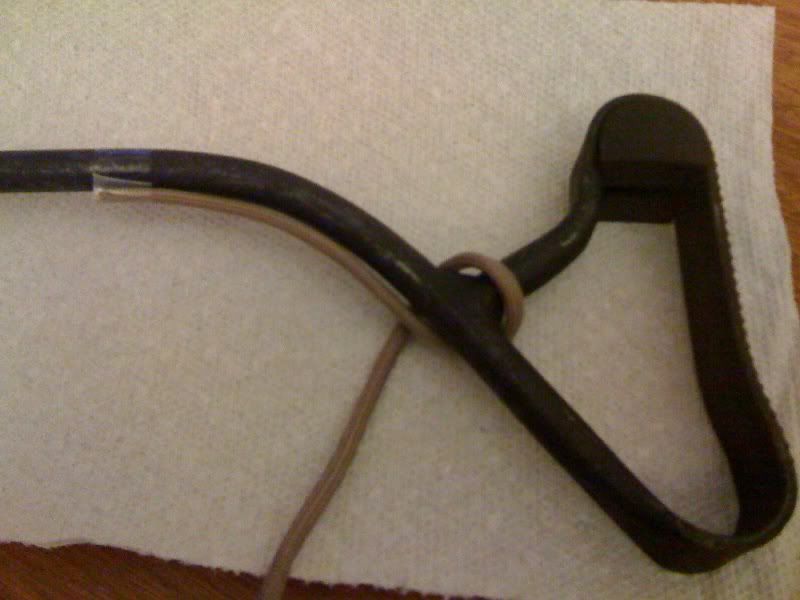
Now you'll want to start looping the cord around the stock. Make sure to keep the original run of cord beneath the stock in as straight a line as possible.
Once I've made a few loops, I take the tape off of the original piece so that it doesn't cause problems later
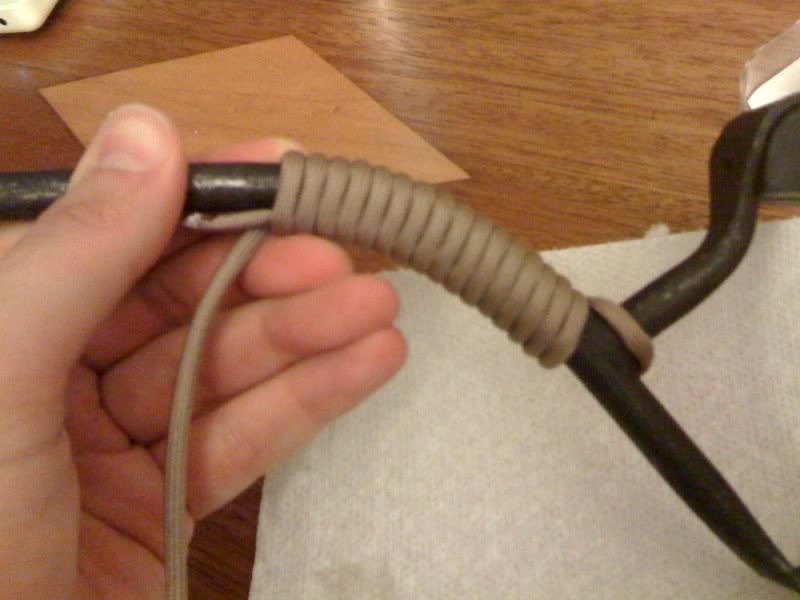
Keep running the loops up the stock. Keep them tight and close together. Now comes the tough part. Once you reached the end of the stock, you're going to have to loosen the cord. Before doing this, put a piece of tape around the initial end that you started with (you'll be able to tell because this part is bigger than the rest).

After placing that piece of tape, you can begin loosening the those top loops. Begin working your free end under the loops. I use the back side of the scissors in the picture.
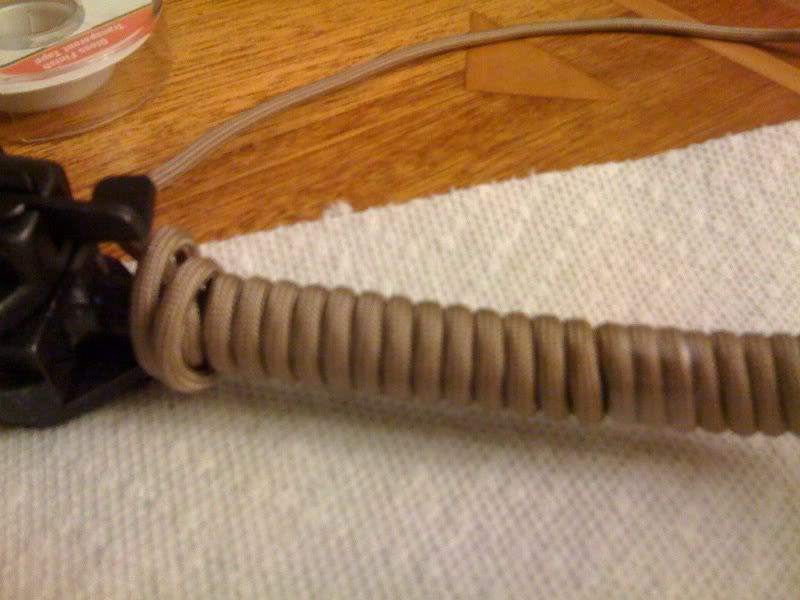
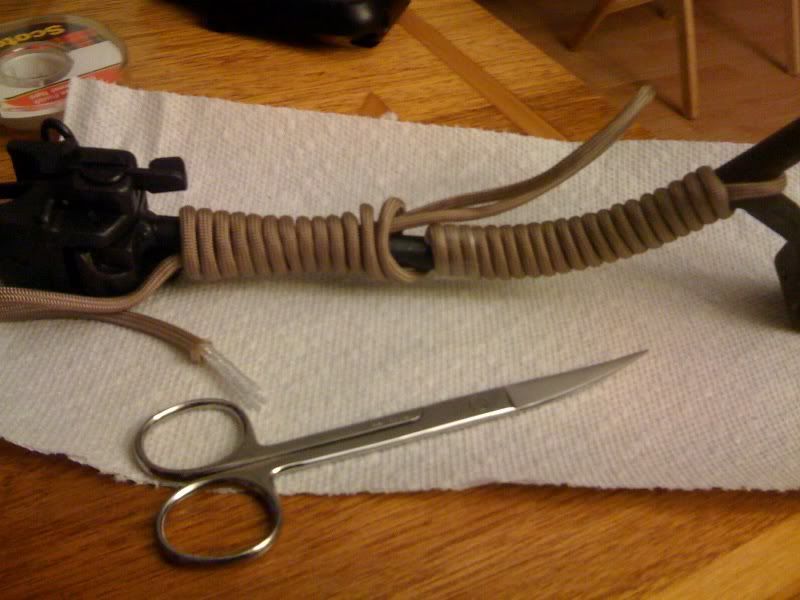
This particular part of the process is a pain. It's a lot of untwisting, tightening by twisting, and simultaneously working the free end down, pulling it tight so that you have nice tight loops for the full length of the stock. The ultimate goal is to have an end sticking out of the loop right about where the original end began. This is so the the 2 ends basically abut and give a nice uniform look. Once you have everything tight, you want to cut the free end that you have been pulling on so that it's able to meet the original end. Lightly melt it with a lighter, and tuck it under the loop right above the loop covering the original end. The result should be a uniform, tight wrapping.
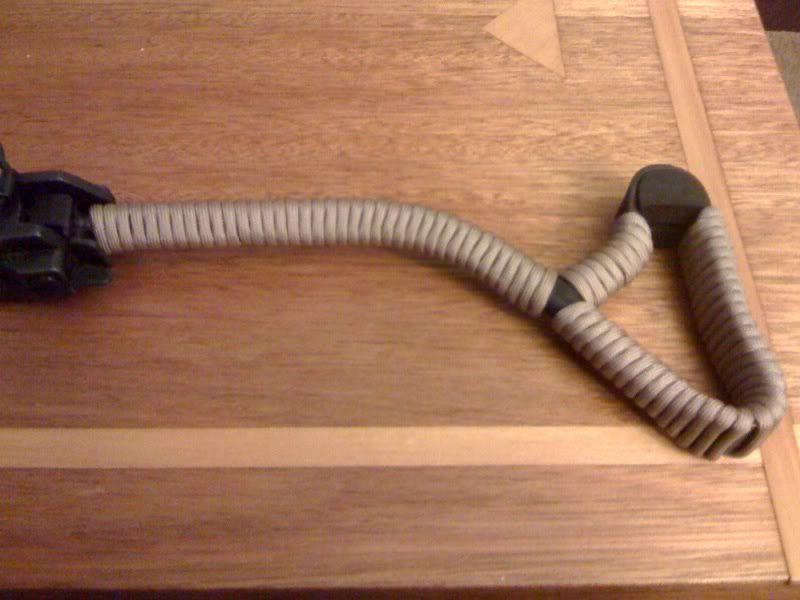
I apologize for the poor pic quality, and I'd like to thank whichever guy it was out there who made the original thread that helped me do this, but somehow had his thread deleted (or at least the link doesn't work anymore).
-
Really?? I thought they were both for 3/16'' holes. What'd you have to use the 1/8 and 5/32 for?
-
Don't the plastic rivet plugs that Dinzag sends come for 3/16" holes?
-
Will I need any other drill bit sizes other than 3/16" to do the conversion?

Red Dot Optic - which would you recommend?
in General Discussion - Any topic is welcome here!!!
Posted
I did search, and after about 3 pages of nothing that would help, I posted the question. Any stores in BR that would be a good place to browse around for one tomorrow?