

T1gger
-
Content Count
99 -
Joined
-
Last visited
Content Type
Profiles
Forums
Gallery
Blogs
Calendar
Store
Posts posted by T1gger
-
-
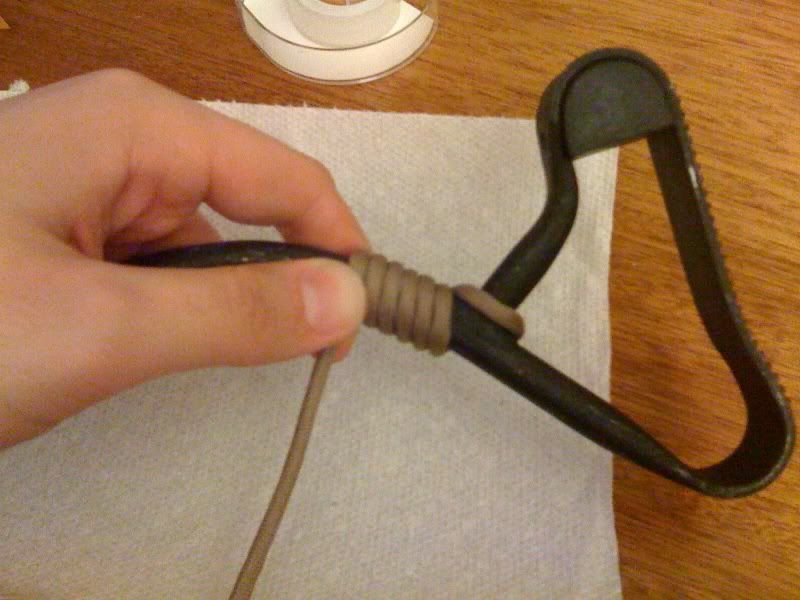
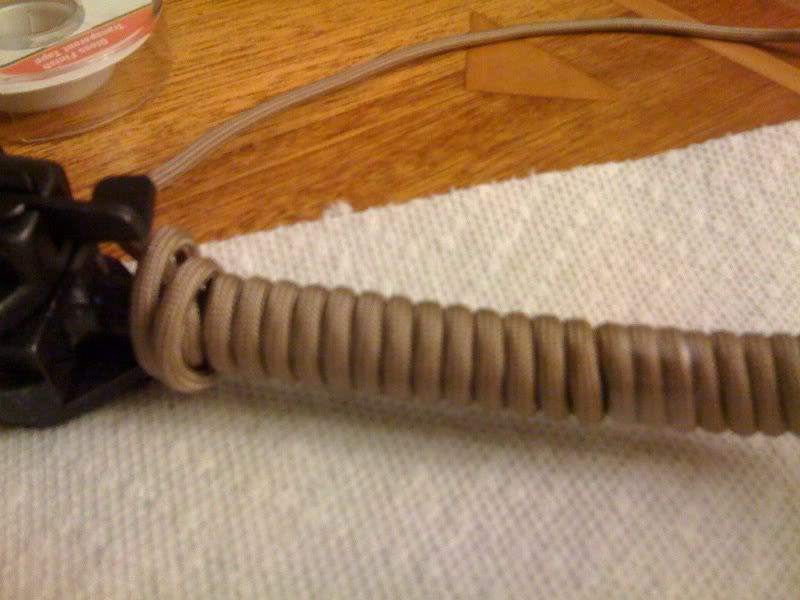
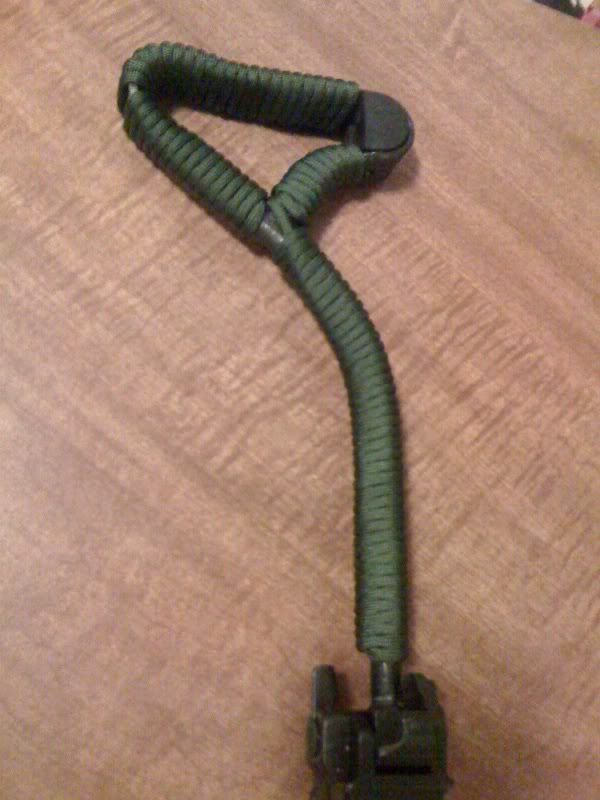
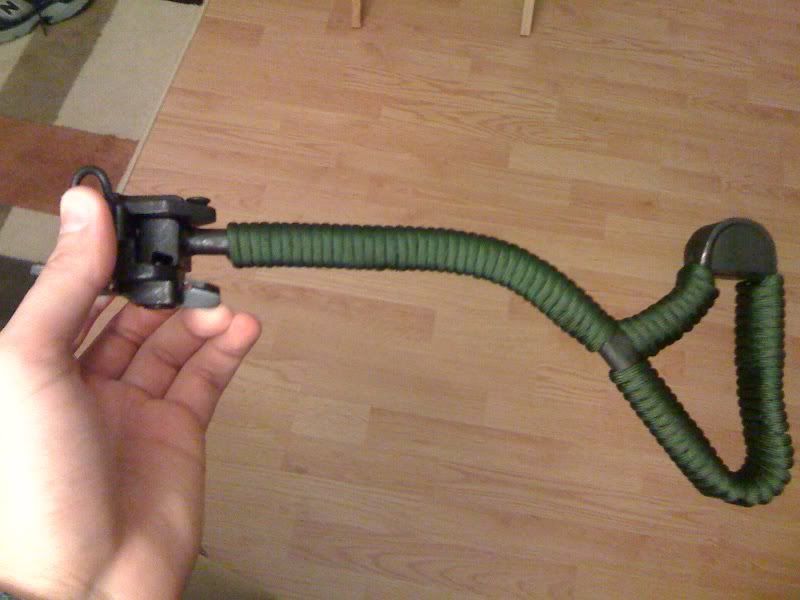
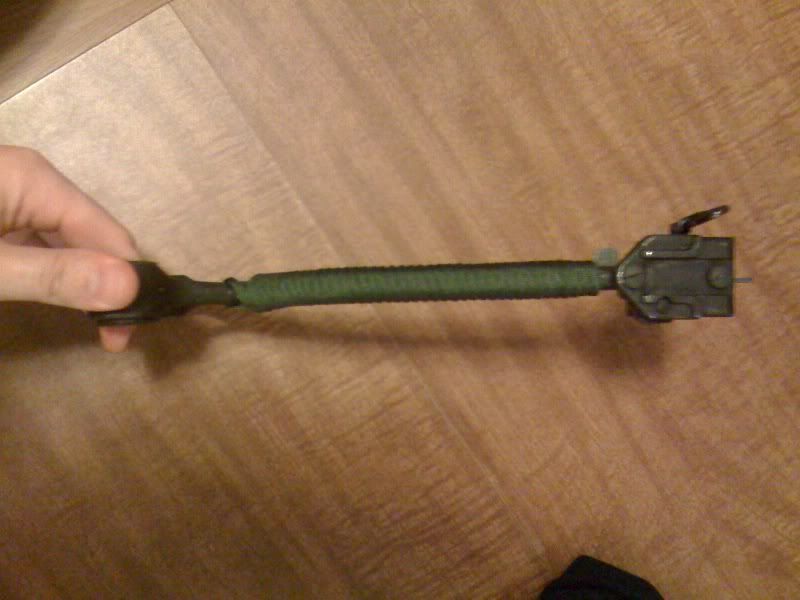
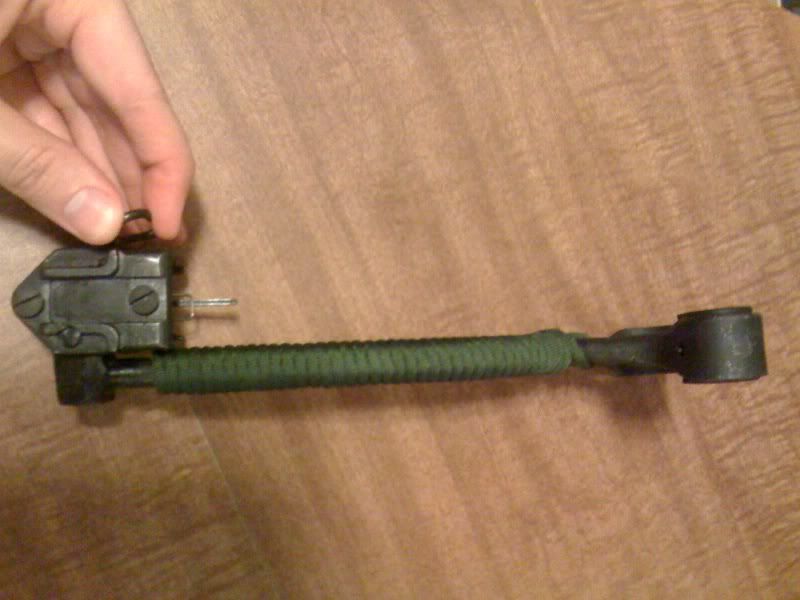
Last week I paracord wrapped my whole Romanian side-folder in green paracord. While at a gun show today, I saw some tan paracord (naive of me to think that they didn't make it in that color), and since I initially wanted that color furniture, I bought some. I hated having to take down all that hard work from the previous wrap, but figured I would go through the steps of how I wrap the stock since I had questions about it from a previous thread and since the thread I got it from online is no longer a working link. So here it is.
For those wondering about cord length to wrap the whole stock:
Long straight arm of stock: give yourself about 7 feet of cord
Upper limb after the fork: give yourself about 2 feet of cord
Lower limb w/ shoulder rest: another 7 feet of cord
These lengths with give you a little extra cord left over to make sure you didn't cut them too short to finish the job.
First, melt (lightly) one end of your cord and tape it to the underside of the stock. I say underside because it makes the finished product look better. If you can tape this semi-high (a little higher than I have it in this picture), it will make the last step easier.
Continue to run the cord beneath the stock and then loop it around the top arm of the fork in the stock.
Now you'll want to start looping the cord around the stock. Make sure to keep the original run of cord beneath the stock in as straight a line as possible.
Once I've made a few loops, I take the tape off of the original piece so that it doesn't cause problems later
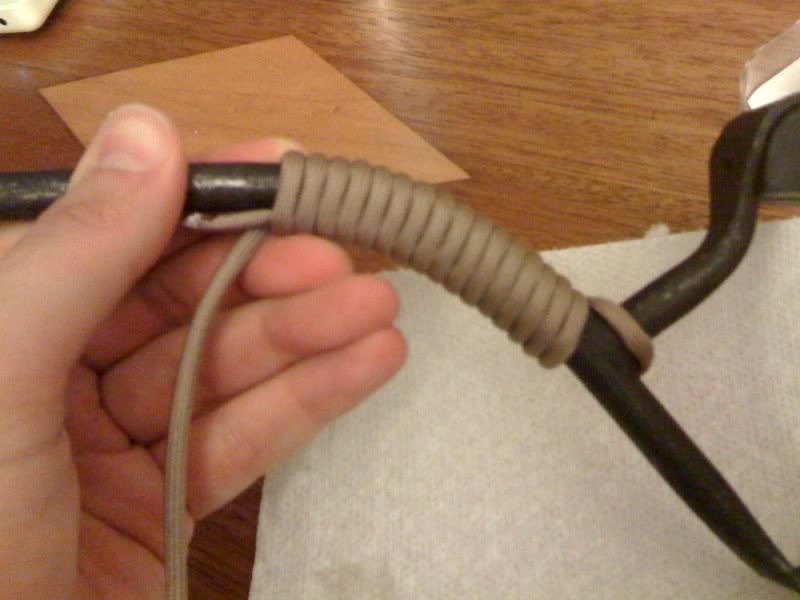
Keep running the loops up the stock. Keep them tight and close together. Now comes the tough part. Once you reached the end of the stock, you're going to have to loosen the cord. Before doing this, put a piece of tape around the initial end that you started with (you'll be able to tell because this part is bigger than the rest).

After placing that piece of tape, you can begin loosening the those top loops. Begin working your free end under the loops. I use the back side of the scissors in the picture.
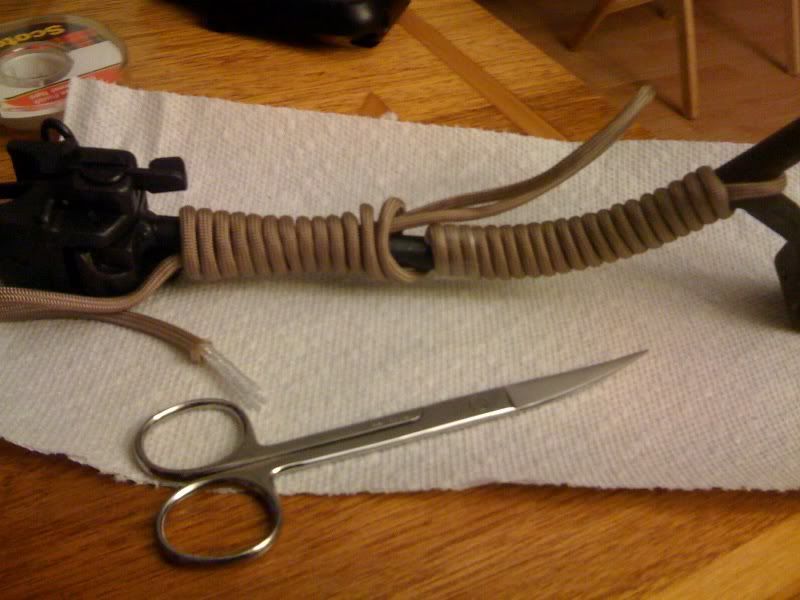
This particular part of the process is a pain. It's a lot of untwisting, tightening by twisting, and simultaneously working the free end down, pulling it tight so that you have nice tight loops for the full length of the stock. The ultimate goal is to have an end sticking out of the loop right about where the original end began. This is so the the 2 ends basically abut and give a nice uniform look. Once you have everything tight, you want to cut the free end that you have been pulling on so that it's able to meet the original end. Lightly melt it with a lighter, and tuck it under the loop right above the loop covering the original end. The result should be a uniform, tight wrapping.
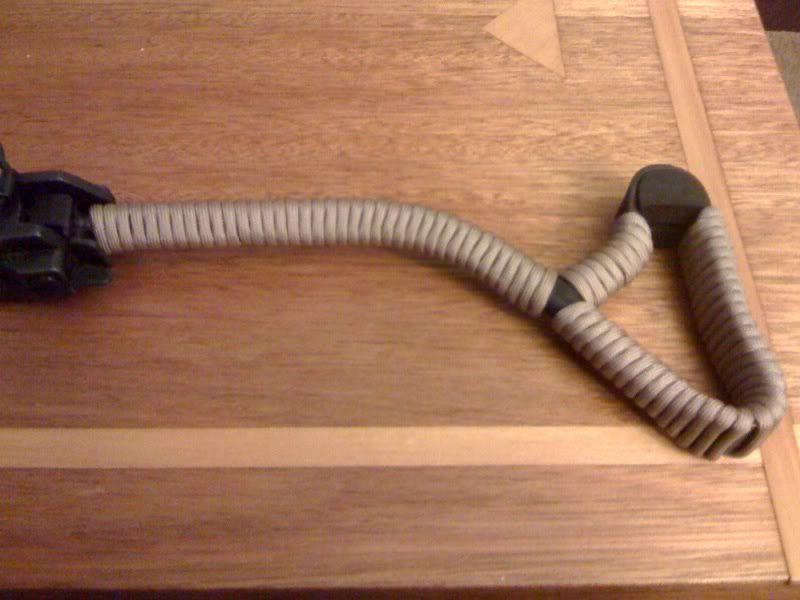
I apologize for the poor pic quality, and I'd like to thank whichever guy it was out there who made the original thread that helped me do this, but somehow had his thread deleted (or at least the link doesn't work anymore).
-
 2
2
-
-
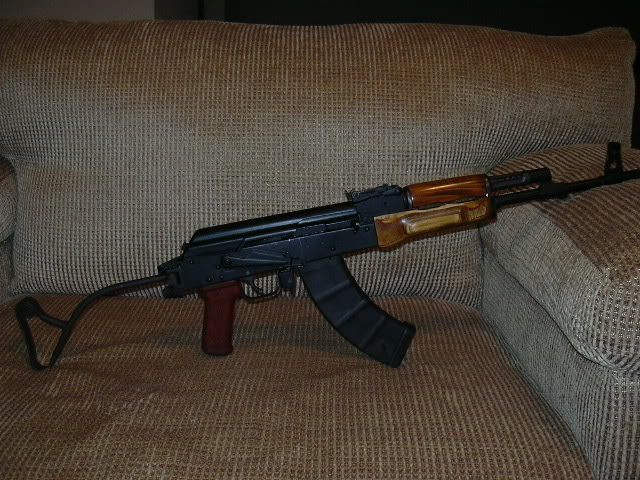
The reason is I'd really like to incorporate a "Molon Labe" design into the gun, but I really don't know how I'd end up doing it.
My rifle is going to essentially look like this except with a black Ergo pistol grip.
-
I'll pick up a can of that duplicolor tomorrow
-
The Perma-blue stuff that they sell at Academy (or the pen that also blues guns), will this stuff work on the underside of the Saiga after you move the trigger group up? I don't need an expensive fix once it's moved, but I'm not sure about going with spray paint that would come off with solvents.
-
I read on another forum that someone had success pressing off the fsb and gas block with a vise and ball joint puller. Unfortunately, it's not a very active forum so I haven't gotten a response about how they went about doing this. Anyone ever try it? Or if you have successfully pressed them off, how did you do so? Because, as of now, I'll probably just modify the lower handguard retainer to get everything on.
-
Are those basically like stickers that go on your back glass?
-
Anybody have decals or emblems on their rifle? If so, how'd you do it? Someone do it for you, spray paint, duracoat, etc?
-
If you happen to use hot water, make sure you oil the stock so that it doesn't rust.
-
No, it was from a post from another site, calguns I believe. I initially tried that way, but it didn't work so well for me. I felt the other way was easier. I used 3 different pieces of cord to do the entire stock.
-
That add-on looks pretty sweet as far as providing a nicer cheek-weld. As far as how I did it, there was a tutorial online showing how to do the straight part and I just translated it to the other areas. That particular link doesn't seem to be working anymore though.
-
I haven't seen anyone do this, not sure if they think it's ugly or personal preference, but I wanted to see how it'd come out. I kind of like it, makes it look a bit more uniform. Sorry for the poor quality.
-
I took a harder look at your stock, you do have a rubber bummper on there, so your worries about the receiver being banged up is a non-issue
Yeah, it's there. I guess I'll see once I'm able to actually get it on the rifle. I'm just so busy right now I don't have time for much of anything.
-
The Romanian wire stock is designed to stay clear of the receiver when folded.
You'll probably regret sending back a tight one, as they all loosen up as they're used. . .
What about hitting the frame in general? That other one was an absolute bitch to fold closed.
-
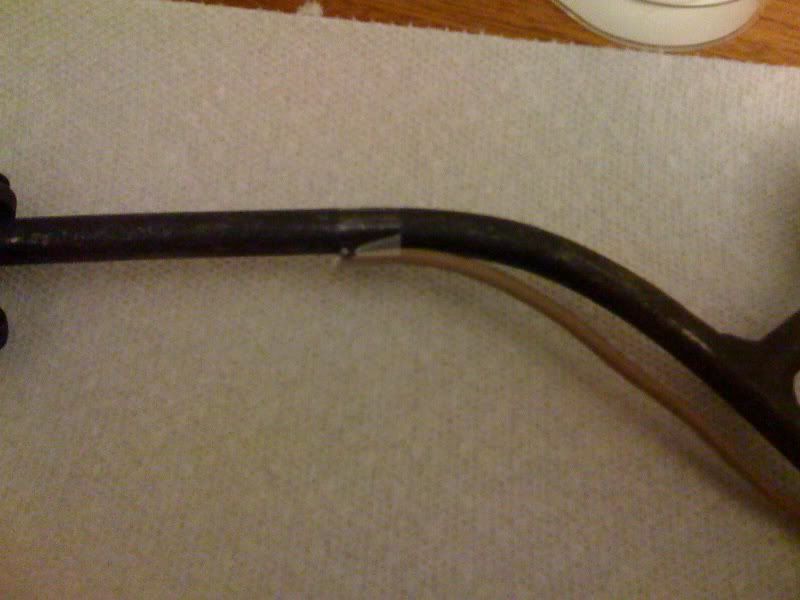
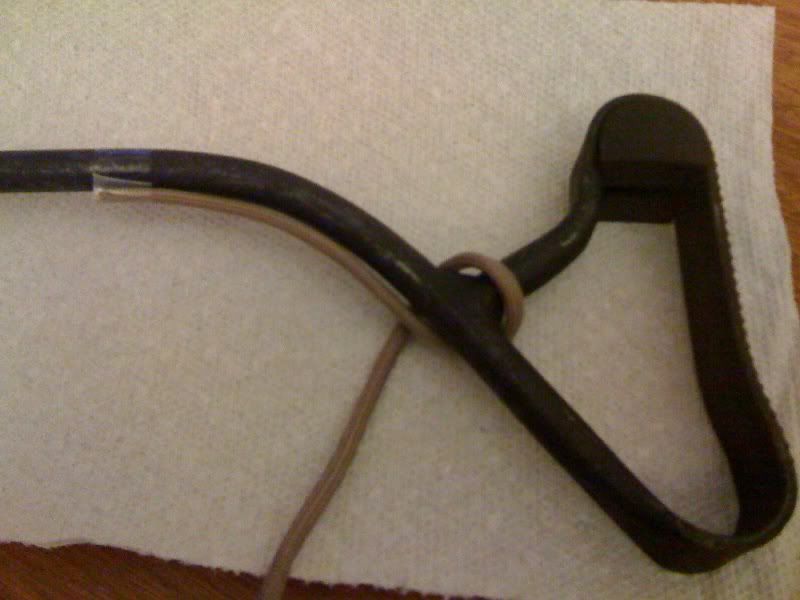
Since this will probably get a response quicker than the Tech section, and you guys will know what you're talking about, I'll ask here. I received my first Romy wire-folder and the lever was so damn stiff that I needed a pair of pliers to open it. So I got sent a replacement. I was so happy that it opened easily (though had a little play when in closed position), that I immediately tried to wrap some paracord around it (this was my first time with paracord). Any way, I noticed that it closed pretty far. The paracord helped, but I still noticed that it closes fairly far. I'm worried that it may rub up against the receiver. Here are some pics, sorry for the poor quality. Do you think that I may have a problem with it rubbing the receiver??
-
I received my first Romy wire-folder and the lever was so damn stiff that I needed a pair of pliers to open it. So I got sent a replacement. I was so happy that it opened easily (though had a little play when in closed position), that I immediately tried to wrap some paracord around it (this was my first time with paracord). Any way, I noticed that it closed pretty far. The paracord helped, but I still noticed that it closes fairly far. I'm worried that it may rub up against the receiver. Here are some pics, sorry for the poor quality. Do you think that I may have a problem with it rubbing the receiver??


-
There was a gun show last weekend, and I actually picked some up there
-
obake - your avatar may not cure cancer, but I would imagine it could cure erectile dysfunction
-
What metal is the Saiga receiver made of?
-
Somebody mentioned that they had some problems with some FTE with the Tapco gas piston. Anyone have any experience with them, positive or negative? Any recommendations on a different kind for a Saiga 5.45?
Were they talking about the gas piston for the shotgun perhaps? The "gas pistons" are two different things for the shotgun and rifle.
I've never heard of any failures with the Tapco gas piston in a rifle.
They just said that it was on their AK.
-
Somebody mentioned that they had some problems with some FTE with the Tapco gas piston. Anyone have any experience with them, positive or negative? Any recommendations on a different kind for a Saiga 5.45?
-
Yeah, I think the stock that I have has it as well. I may try to convert the lower handguard retainer to a bolt on as I've seen on here. I think that taking off the front sites and such may be a bit too much work. Anyone else have problems with the Tapco gas piston?
-
Another quick question. I won't need a receiver block for that Romy wire side-folder, right?
-
If the pistol grip is US made, you might not need the Tapco gas piston. I'm trying to remember if a Saiga has 14 or 15 parts. I think its 14. .... elvis christ....
I am in the same boat comtemplating (sp?) the $120 for Ironwood (US made) vs. Bulgy made wood $40 (and just sanding the piss out of it and going to try to go BLONDISH)..
If the Pistol Grip is US made does that and the FCG (3 parts) count as 4 parts for the BS 922r??? And there-by 10 or less foreign.. I'll order/make a wood PG to match the Bulgy.. But I was wondering the same thing. I think 14 as mine x39 is not threaded.
Maybe Naolith will be along and save us...

It's got 14, so adding the grip would make it 15. Therefore, you need 5 American parts (or at least to keep the foreign parts to 10).
-
Saiga 5.45 to AK-74
First off, I was surprised to see that they have the dimples on the sides of the receiver (sorry, I don't know what they're for, but I know people mention them often). I just want to make sure I have everything that I'll need (not only rifle parts, but tools) and would appreciate your help.
1) Romanian wire side-folding stock
2) Wood hanguard set with gas tube and lower handguard retainer (is this all I'll need to mount it to a Saiga?)
3) Ergo pistol grip (with screw and grip nut)
4) Tapco trigger set
5) Tapco gas piston
6) Dinzag bullet guide kit (with drill bit, etc.)
So, will I need any other parts/bits/tools? (I'll be doing the conversion in my old man's workshop since he's got a dremel and drill press)
My biggest concern is moving the trigger group and installing the bullet guide. I'm also thinking about putting Duracoat on the area where the trigger group is now.
Any suggestions/help would be greatly appreciated.
Perma-blue, etc.
in Conversions and Modifications for the Saiga firearms
Posted
Wally World is supposed to have Duplicolor, but I didn't see it there. I'm going to go by AutoZone later to see if they have any. Is it basically like the Rustoleum Engine Enamel?