

philip271
-
Content Count
46 -
Joined
-
Last visited
Content Type
Profiles
Forums
Gallery
Blogs
Calendar
Store
Posts posted by philip271
-
-
i live in CA never been to NY yet but the petition = signed!
-
$400 for a mag??! what's the world coming to?!
-
It looks like moly resin may be a little cheaper as well since it does not require any hardeners, reducers, or thinners and also includes free shipping. Especially if you were going to do 5 or 6 guns, the quart they sell for $65 is looking pretty good! Which moly resin would be the better looking, semi gloss or flat black?
Those are the exact reasons why I went with Moly Resin. No fancy marketing but the product works! And prep is key when doing any refinishing. I de-greased all parts in dish washing soap, dried with air compressor, stuck parts in the oven to preheat before actual air brushing the Moly Resin on.
I used flat black and it came out looking really good. The surface isn't rough but rather smooth... You can sorta control how flat or semi glossy you want by the pre-heating of parts. Higher temp will get you more flat finish. Some of the parts that started to cool by the time I got to them looked more glossy.

-
Nope, everything is backordered on Sportsman's Guide with estimated availability in July-Sept 2013 lol.
-
I'd suggest looking at Moly Resin. It's much more durable than paint or duracoat. You may have heard of Cerakote, IMO, Moly Resin is even better. Unfortunately for Moly Resin, Cerakote probably spends 100X in marketing materials/website.
I've used it on my Saiga 7.62x39 receiver. It does require baking which I did in my oven but I love the finished result!
Here's the link: http://www.johnnorrellarms.com/
Phil.
-
my 2012 S12 came with 4 ports and all open but still have about 40% failure to ejects on Win Universals. it's fine on Federal Bulks and everything else i've tried. so I'm just going to stay away from those crappy shells. problem solved. =)
-
^^ yeah, there is something seriously wrong for your hammer to look like that.
-
I filed the locking lugs based on instructions from AGP and e-store customer service. So if I have problems later, they'll hear from me again. =)
-
Normally the S12 shouldn't have any problems shooting slugs. Winchester Universals, yeah, you'll get ~30% FTE...
It sounds like there maybe an issue with the AGP mag. Check it, see if the metal feed lips feel very lose. It can get pushed up by the shells and potentially block the bolt resulting in FTL.
I decided to epoxy all of mine down after getting them out of the box.
That's my best guess. Good luck!
-
the 4 AGP 10 round mags I bought about a month ago all required filing to get them to lock in to my 2012 Saiga 12. Was told by both AGP and the E-store that is normal. *shrug* I filed down on each of the mag catch tabs and they all work fine now.
Edit: I did watch that video above but decided to not touch the tabs on the sides as he suggested. All of my 4 mags fit very snug/flush on the sides so I don't see how the mags could be pushed in past the side tabs.
What I did file was the "face/ramp" of the mag catch tabs till they click in. I also decided to reinforce the metal feed lips with epoxy to make them stay down instead of pushing up into the mag catch tabs.
Good luck!
-
Nice letter Cpt Hero. I'm copying and sending that to my Senator/Congressman.
-
Got my brand new Saiga 12 around end of November. Fired about 100 shells in it's stock configuration (no pistol grip no trigger conversion) without problems except the few FTE on Win Universals which is common/expected.
However, two days ago at the range, my trigger failed to reset after a few shots. =O Opened the cover and had to pressed down on the hammer to let the trigger reset. The trigger felt strange after that and I noticed I couldn't pull it all the way back but it fired 2 more 10 round mags just fine.
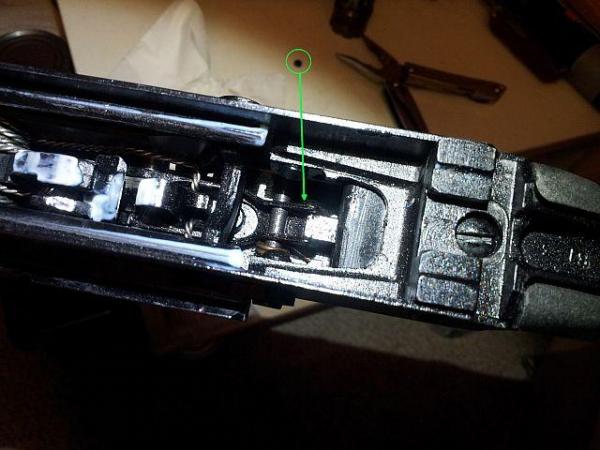
After I got home, I opened the cover again to see if I could figure out what happened. I could see that the trigger barely releases the hammer. I also could push the trigger assembly forward a bit more from up top but the trigger/crossbar/wishbone would not push up past a certain point as if it was hitting something like the safety lever (which was not the case).
The trigger just seemed to stop when there is still ~1/4" of pull toward the rear. I looked and looked... even got out another uncovered Saiga to see what was different...
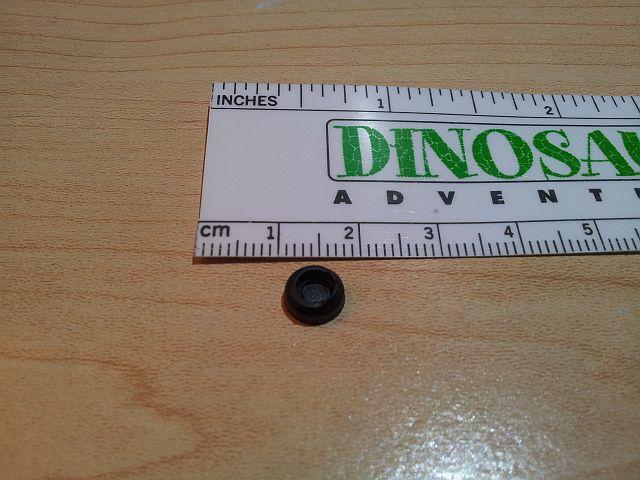
Eventually, I found the cause! Appears that Saiga had left me an easter egg! A rare piece from the factory I bet none of you guys have! =)
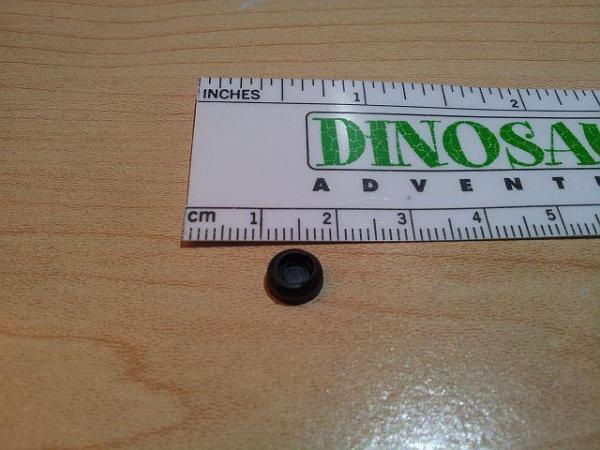

It was stuck under the point where the stock/un-converted trigger pressed down on the wishbone, preventing a full trigger pull. It was probably right under the wish bone when I had the failure of trigger reset and it got pushed back closer to the trigger. I had a feeling something was under there and used an allen wrench to push it out.
So what is it?? Any guesses? Here's a hint:
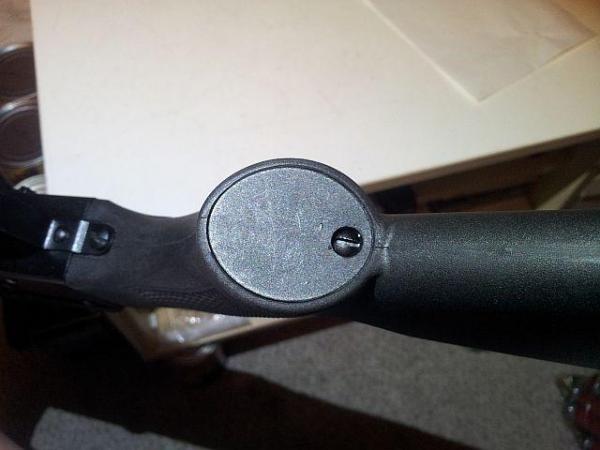
That's the bottom of the stock, see that screw hole? That's where the piece of round plastic came from! Perfect fit!
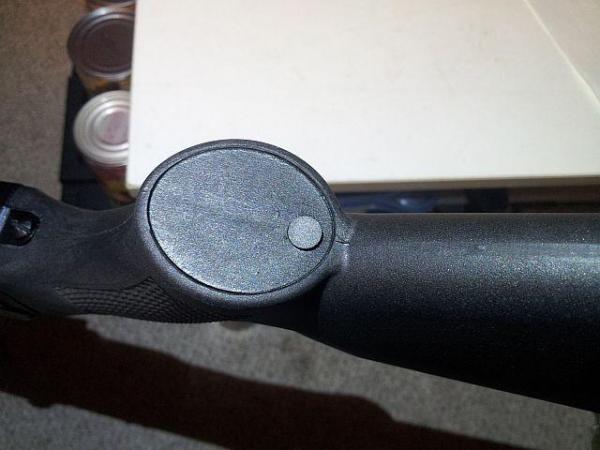
That thing could have been anywhere in the receiver all this time and eventually worked it's way under there to cause this freak malfunction.
If you have a new/unconverted Saiga, might be a good idea to just take a good look in your receiver just to be safe.
Edit: hmmm.. had to upload the pics. wonder why my links didn't work...
-
 1
1
-
-
^^ Truth.
-
Did you install a bullet guide?
-
Sorry... when I see a wall of text, i just kept scrolling hoping to see a photo... when there isn't a photo after all that scrolling...

-
1
-
-
nice side folder COAK. when folded, looks like the stock is blocking the trigger? maybe have it go to the left instead? or is the side rail mount in the way?
-
i got mine from amazon.com for 68.xx shipped.
-
Welcome to the world of Saiga!
Regarding the serial#, the first two digits indicate the year the receiver was made. and the dimples tell you nothing about whether the barrel is threaded or not.
Have fun shooting and choosing new stock/grips that you like.
-
Nice. I like the OD green!
-
I baked mine at ~325F for 1.5 hours to cure the Moly Resin I air brushed on my Saiga. No problems and came out great!
-
My 2012 has 4 ports and all clear. The 4th is at the very front edge of the hole toward the muzzle.
-
Saw this video on youtube. I actually like the ergonomics of the stock Saiga 12. The only thing I didn't like about the Saiga 12 was the horrible 2 stage trigger pull. This video shows how to modify the trigger group to make it a smooth single stage pull. Also, since I've already done a full conversion on my Saiga 7.62x39 (spent ~$400 conversion parts), figured I'll use the money this time on ammo instead.
So I did the trigger mod yesterday and now I have a single stage trigger pull that's crisp and clean!
Tried to do a search and didn't find anything about this trigger job. Figured I'd share it and maybe save a few people some $$. =)
Now... let's see if this embedding works... nope.. ok so here's the link... whoa.. guess "Link" is how you embed it lol.
By the way, I know he's showing a rifle, but it also does work with the Saiga 12.
-
+1 to what TJohn said. I don't think it's normal to have a mag just fit the Saiga 7.62x39 w/out filing the mag catch. Was this a brand new Saiga?
To use those mags though, I'm pretty sure you'll have to install a bullet guide.
-
Think you are good to go Dyno. I just measured the cutter I used and it left slightly under 1/2" after the cut but more than 7/16. I fitted a Tapco Razor Break on mine nice and tight. Muzzle devices for the most part are threaded 5/8" deep.
Once you've cut deep enough, you will just feel the muzzle shroud come lose and easily slide off the barrel as in it'll fall off if you point the muzzle down toward the ground. If it's already threaded.. I don't know. I'd guess it'll unscrew lose.
As far as threading your muzzle if it's not already threaded, ask around your local forum to see if anyone has the tool and will let you borrow it. Don't rent it from the link above. The rental fee is more than what you could buy a set for. cncwarrior has the best price on them.
Have fun and good luck!


is this okay??
in Saiga 7.62 X 39
Posted
I used the RIDGID 104 Tubing Cutter and my results look pretty much like Chile's photos in his post #5.