

unclebill
-
Content Count
37 -
Joined
-
Last visited
Content Type
Profiles
Forums
Gallery
Blogs
Calendar
Store
Posts posted by unclebill
-
-
i bit the bullet....(sorry)....
and bought 2000 rnds. of lake city match ammo.
i dont shoot my saiga like a madman so 1000 rnds. lasted me about a year.and of course i saved the brass.
i also bought 1000 cleaned lake city match cases from a man on a forum like this $80
i use the cases until they start forming the shiny ring near the base.
yes i get about 6 uses or so out of the brass.
full length resizing will shorten the life of the brass.
-
unfortunately i have a bad back and am only able to shoot from a bench.
that is why i no longer hunt.
so i am a bipod guy.
-
i had some sheet copper laying around so i wrapped some around the safety and crimped it into place.
time; about 90 seconds

-
fossten, hey no fair! you got a cooler p-grip than me!
i would love to put a galil type front handguard on mine but i want to still use the bipod.
any suggestions?
-
ok i wanna join in the fun too! here are the before and after


it does feel better in my hands this way.
i liked the original configuration too.
aw hell i like saigas!
-
the 1st kind of rubber i tried didnt last very long at all.
that car door stuff may be just the ticket!
-
the saiga creases them.
i put a piece of rubber on the ejection port and the charging handle.
that eliminated the brass damage.
i have been thinking of trying that liquid rubber that is used on tool handles.
Any chance of a pic for exact location?
you bet! the lack of photos is what added about 10 hours to my conversion!
i put blue tape on it so it is easily visible

-
thanks again.i dont know if i will use it or not.it is kinda a pain .
i think i will just cut a notch in the lever instead.
It isn't that bad to get the BHO in if you have a twist tie or string.
Slide it in when you put your hammer in.
Then place the spring inside with a twist tie or string around it and out through the bottom hole that the lever pops out.
Then put when you slide in your trigger pin pull the string down so it can go through it and under the back half of the lever.
Assemble the rest of the gun and bam you have a BHO built in.
The only draw back to that vs the notch is that it can ding your finger when firing.
The draw back to a notch is if the gun is jostled it will drop and the bolt carrier will slam home.
Both work fine though.
yep it just took a few minutes.
all that is left is the safety mod. it only needs to be about 1/32 or so doesnt it?
-
the saiga creases them.
i put a piece of rubber on the ejection port and the charging handle.
that eliminated the brass damage.
i have been thinking of trying that liquid rubber that is used on tool handles.
-
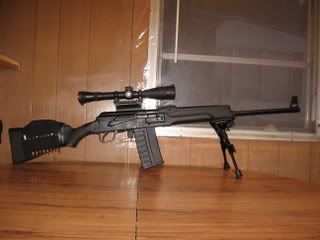
thats a redfield wideview 3x9x40 scope i just had laying around.
its about 30 years old.
i cant remember how much it was.but i like this scope.
i dont know if it will stay on this rifle.
i have a couple more i may try out.
-
fossten,
you my friend have made my day!
for a while there i thought this was some kind of cruel hoax.
i was getting ready to look it up under urban legends.
-
ok there is a forward facing hook and a rear facing hook.
when i hold my trigger down and pull the bolt carrier back,the rear hook engages.
when i let go of the trigger the hammer moves a little bit forward and is caught by the forward hook.
is this the way it oughta be?
please say yes!
-
i dont know if i will use it or not.
it is kinda a pain .
i think i will just cut a notch in the lever instead.
-
i think im done but what it this?
and where does it go?
i used the tapco pin retainer plate.

-
-
a long time coming but thanks to you guys i waded through it!
-
Thank god I had an extra hammer laying around after learning it the hard way.
We should get someone to toss a sticky up there of a correctly modded G2 hammer.
yes! that is a GREAT idea!!!!!
-
thanks for the tips!
does anyone have a photo of a ground hammer?
You have better than a photo, you have a finished stock hammer to compare it to. What I did was put my cleaning rod through both hammers side by side so I could have them lined up and see the difference. I ground down the hump until it had just about a couple of millimeters left above the tube. Then I added a shallower angle to the whale's head to prevent the bolt from hanging up. I went slowly, grinding a little at a time and refitting, trial and error until I got the fit I wanted. Install the hammer after you grind a little and pull the trigger to see how it's doing. Then grind some more. Rinse, repeat. The bonus is that you get really good at disassembly.
Good luck unclebill! Hey, what kind of stock/grip are you putting on?
a SAW p-grip and a T-6 stock
since i am uncertain what you mean by the hump i am making it look as much as possible as the stock trigger
-
thanks for the tips!
does anyone have a photo of a ground hammer?
You have better than a photo, you have a finished stock hammer to compare it to. What I did was put my cleaning rod through both hammers side by side so I could have them lined up and see the difference. I ground down the hump until it had just about a couple of millimeters left above the tube. Then I added a shallower angle to the whale's head to prevent the bolt from hanging up. I went slowly, grinding a little at a time and refitting, trial and error until I got the fit I wanted. Install the hammer after you grind a little and pull the trigger to see how it's doing. Then grind some more. Rinse, repeat. The bonus is that you get really good at disassembly.
Good luck unclebill! Hey, what kind of stock/grip are you putting on?
a SAW p-grip and a T-6 stock
-
Another thing that takes some time, but isn't part of the conversion per se: Material needs to be added to the safety to make it longer, so if you don't have access to pieces of metal to cut, you have to use JB Weld, which means putting on a drop and then waiting overnight for it to cure. Try to put on too much and it just runs down the side. Rinse, repeat three or more times. So a conversion can take several days for actual completion even though the trigger guard/trigger group is the big issue.
I'm glad I picked up a black jack safety lever.
Works like a charm and makes it easy to hold the bolt open and switch from safe to fire while only having to move my finger not my entire grip.
thanks for the tips!
does anyone have a photo of a ground hammer?
-
Another thing that takes some time, but isn't part of the conversion per se: Material needs to be added to the safety to make it longer, so if you don't have access to pieces of metal to cut, you have to use JB Weld, which means putting on a drop and then waiting overnight for it to cure. Try to put on too much and it just runs down the side. Rinse, repeat three or more times. So a conversion can take several days for actual completion even though the trigger guard/trigger group is the big issue.
how do you hold the hammer in position while looking to see if the pin is lined up correctly while holding a punch while tapping the punch with a hammer? did every one else have somebody to either tap the pin in or hold the hammer in place?
i am not trying to make this hard but i see no way for one pair of hands to do this.
if i ever get this thing together i am NEVER taking it apart as long as i live.
i feel like all 3 stooges rolled into one..
-
maybe im just stupid but i have been looking for instructions on how to modify my .308 for an hour and a half .
i have 20rnd.fbmc mags already
Here ya go.
http://www.cross-conn.com/Saiga_Conversion/Step_1.htm
I would also like to add my experiences, although I'm not done yet.
1. I absolutely had to use the carbide dremel bit to cut the hole for not only the spot welds and the rivets, but also for the trigger guard hole by the PG nut hole. I also had to enlarge the PG nut hole. That steel is so tough my titanium drill bit barely made a dent in it. I decided that I couldn't drill the hole under the mag release, so I ground the paint off the TG and the surface directly under the mag release and used JB Weld, which works great.
2. The bolt is still hanging up on the way back forward so I think I have to grind down the hammer hump a little more. This repeated assembly/test/disassembly is taking much time. I'm already 5+ hours into this project easily.
3. Bending that trigger guard is much more difficult than the instructions to simply "bend it."
4. No matter how careful you are, you will probably scratch your receiver at least once while using either the dremel or the drill, so go buy some paint. After I get the whole thing fitted right I'm going to disassemble it one more time and paint it.
5. I busted up two ink pens, with 2 different diameter springs. Put the smaller one inside the bigger one, cut them to length, and put them inside the disconnector. Seems to work ok for now.
6. The safety will have to be JB welded for length.
well i am making SOME progress.
but i have no safety
no bolt hold open.
and two spings that i dont know what to do with
i wish there were photos of what needs to be done!
thank you for your time!
9 hours in and im not done!
i dont know where the g-2 hammer is supposed to be ground and i dont want to ruin it.
You won't ruin the hammer as long as you don't grind the part where the trigger hook engages, and there's no reason to grind that, although I did polish mine so the trigger pull is smoother. You need to grind the hammer down in maybe two places. First thing is line up both hammers and see where they are different. You'll immediately see the hump right over the tube where the hammer mounts. That hump will hit the crossbar prematurely, so you need to grind it down until it allows the hammer to strike the firing pin. I ground about half the surface off the hump.
Next thing is the abrupt angle of the top of the hammer, sort of shaped like a whale's head. If you lay it down as though it's cocked, you'll see that the whale's head will be hit by the bolt after recoil on its way forward from the back of the receiver. The angle is much steeper than the old bolt; almost 90 degrees. The bolt may hang up on that and not close. I had to grind the angle down a little shallower and now it's fine. Work the action several times and make sure it slides smoothly and remember that the bolt will be oiled when you fire it.
I didn't replace the bolt hold open. I'm going to grind my safety later on for that, which should be an easy mod. I used some JB Weld on the safety prong to lengthen it so it can reach the trigger and it works fine now.
If you get the retaining plate you won't need the shepherd's hook spring.
I'm actually done, all I need is to paint the receiver and wait for my buffer tube to get here and I'll post pics.
apparently i am the only guy on the planet that has had this much trouble.do you reuse the pins that you punch out to change trigger, hammer etc.?

-
maybe im just stupid but i have been looking for instructions on how to modify my .308 for an hour and a half .
i have 20rnd.fbmc mags already
Here ya go.
http://www.cross-conn.com/Saiga_Conversion/Step_1.htm
I would also like to add my experiences, although I'm not done yet.
1. I absolutely had to use the carbide dremel bit to cut the hole for not only the spot welds and the rivets, but also for the trigger guard hole by the PG nut hole. I also had to enlarge the PG nut hole. That steel is so tough my titanium drill bit barely made a dent in it. I decided that I couldn't drill the hole under the mag release, so I ground the paint off the TG and the surface directly under the mag release and used JB Weld, which works great.
2. The bolt is still hanging up on the way back forward so I think I have to grind down the hammer hump a little more. This repeated assembly/test/disassembly is taking much time. I'm already 5+ hours into this project easily.
3. Bending that trigger guard is much more difficult than the instructions to simply "bend it."
4. No matter how careful you are, you will probably scratch your receiver at least once while using either the dremel or the drill, so go buy some paint. After I get the whole thing fitted right I'm going to disassemble it one more time and paint it.
5. I busted up two ink pens, with 2 different diameter springs. Put the smaller one inside the bigger one, cut them to length, and put them inside the disconnector. Seems to work ok for now.
6. The safety will have to be JB welded for length.
well i am making SOME progress.
but i have no safety
no bolt hold open.
and two spings that i dont know what to do with
i wish there were photos of what needs to be done!
thank you for your time!
9 hours in and im not done!
i dont know where the g-2 hammer is supposed to be ground and i dont want to ruin it.
-
i have been searching this site for instructions on how to convert my .308 for a while now.
i have FBMG 20 rnd. mags.
maybe im stupid but i gave up after 1 1/2 hours and decided to start a thread.
thank you for your time!
bill
that tutorial that i found online is wonderful BUT it doesnt help me with my .308 .
i thought i could do it by following carefully NOPE!.
THE .308 IS DIFFERENT THAN THE .223 AND THE 7.62X39.
i have a bench covered with parts to prove it.
i cannot find a .308 tutorial anywhere
what a bummer.........
Saiga .308 Conversion to Pistol Grip Configuration
in Saiga .308
Posted
ok here it is .
it looks like crap but it wont move.
i put black tape on it to make it black.
i didnt feel like painting it....
tools needed i forgot the tinsnips