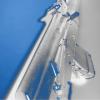
PacketStorm 0 Posted March 25, 2008 Report Share Posted March 25, 2008 Well I did it. Siaga #2 has arrived (16" x39). I stripped out the inards and am waiting for my FCG/Grip/Stock/MagFollowers to arrive. I am going with the Tapco crap again (what can I say except that I'm being a cheap bastard). My last one turned out pretty well. I must say that this conversion has been surprisingly easier. Still really fun. This new shorty should fit in nicely by her ugly big brother. Can't wait to get back to the range. I went to Harbor Freight over the weekend and picked up a few items to help with the process. They had a cheap Dremmel tool copy (only cost $7.00 for the tool and bits - mine is still on loan to my brother-in-law). This has been a nice help in working on cleaning up the sharp edges that the saw/drill leaves. I was also able to pick up a 10 pack of hardened 1/4" drill bits for $5.00. These have been very helpful. Trigger Guard Weld I saw on a couple of other posts that people were having trouble getting through the trigger guard weld. This time around it was easier for me. I put the cutting disk on the Dremmel and cut a square around the weld (on the bottom plate). This allowed me to bend and rip the metal plate off the bottom of the trigger guard and leave just a chunk of plate/weld attached to the bottom of the trigger guard. My grinder bit for my drill ate right through that mess and left me with the trigger guard nice and smooth. Now I put the trigger guard onto my bench and put a nice indentation with my center punch to start drilling through the weld. I would drill for a while with the 1/4" bits. These are pretty big, so I could rock back and forth while putting good pressure on the drill. Then I would punch the center again. This seemed to be enough to give the bits something to dig into. After a little while, I flipped it over and started from the back side going towards the same hole. With the 10pack of bits from Harbor Frieght, I was able to switch out and used three of them to get through. It was pretty quick (only about 10 minutes of work). This was much better than my first build where I was working and snapping off the smaller bits. I didn't drill all the way though with the 1/4" bits. Just enough to get the hole to the other side. Then the proper sized bit to fit my screw. That guard is on the rifle nice and tight. Loctite is holding the nut in place. Quote Link to post Share on other sites
moxie1c 3 Posted March 25, 2008 Report Share Posted March 25, 2008 Thanks Storm, keep us updated. Innovation and adaptation is the trademark of America! Quote Link to post Share on other sites
Starship1st 0 Posted March 28, 2008 Report Share Posted March 28, 2008 Hey thanks for shareing the experience. It helps us guys who have not done it yet: To ease our fears and to do it in a way that saves money. Quote Link to post Share on other sites
Recommended Posts
Join the conversation
You can post now and register later. If you have an account, sign in now to post with your account.