usmc0707 0 Posted July 8, 2008 Report Share Posted July 8, 2008 Has any one painted or used that cameo cloth tape stuff, or something e;lse thats cool.....I think the wrap around the bore would look sweet, and what about a magazine holster on the buttstock for easy asscess...i had one on my m16 and it works....maybe somethin for these ......just seeing whats other opt. with oup buying parts from people...kinda cheap right now..... Quote Link to post Share on other sites
Bvamp 604 Posted July 8, 2008 Report Share Posted July 8, 2008 it burns off of the barrel... Quote Link to post Share on other sites
usmc0707 0 Posted July 8, 2008 Author Report Share Posted July 8, 2008 what will burn off? the tape or paint? Quote Link to post Share on other sites
SaigaNoobie 66 Posted July 8, 2008 Report Share Posted July 8, 2008 Tape. Quote Link to post Share on other sites
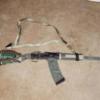
IGDude 0 Posted July 8, 2008 Report Share Posted July 8, 2008 Just painted mine yesterday. Thought of trying some of the uber coatings but found this link and it changed my mind. Krylon - Tan, OD, and Brown. Local vegetation for stencil. Satin clearcoat to protect. If it gets dinged up who cares. Got plenty more in the can and it actually looks decent. With mineral spirits and sandpaper, total cost was $42. Hopefully the pic loads. As you can see, it conceals nicely next to an oak. http://www.snipershide.com/forum/ubbthread...4031&page=1 Quote Link to post Share on other sites
usmc0707 0 Posted July 8, 2008 Author Report Share Posted July 8, 2008 Just painted mine yesterday. Thought of trying some of the uber coatings but found this link and it changed my mind. Krylon - Tan, OD, and Brown. Local vegetation for stencil. Satin clearcoat to protect. If it gets dinged up who cares. Got plenty more in the can and it actually looks decent. With mineral spirits and sandpaper, total cost was $42. Hopefully the pic loads. As you can see, it conceals nicely next to an oak. http://www.snipershide.com/forum/ubbthread...4031&page=1 Damn Dude that looks freakin awsome, That is almost perfect cover and concealment.....how does she fair with alot of heat or rounds through it????......and who cares really cause that is awsome Quote Link to post Share on other sites
IGDude 0 Posted July 8, 2008 Report Share Posted July 8, 2008 Thanks for the kudos. Don't know what heat will do to it. Thinking that paint "cures" with heat it shouldn't do too badly. The thin walled Saiga barrel should cool much quicker than an AK or M4. I put 25 rds. through it rapid fire about four hours after I put the satin on it, and it seemed to do ok. I also don't envision dumping five or six mags through it like I would my AK or M4. Quote Link to post Share on other sites
localfiend 0 Posted July 8, 2008 Report Share Posted July 8, 2008 Cheap krylon is a very good choice for a shotgun - and its not bad for a rifle either. I can't see you ever getting a shotgun barrel hot enough to burn the paint - and as was already stated, its easily repaired. Quote Link to post Share on other sites
bigj480 203 Posted July 8, 2008 Report Share Posted July 8, 2008 Cheap krylon is a very good choice for a shotgun - and its not bad for a rifle either. I can't see you ever getting a shotgun barrel hot enough to burn the paint - and as was already stated, its easily repaired. Very nice camo job! It's so good that I was wondering what kind of stock you had because I could not see the bottom tube for a second. I wanted to do urban camo on one of mine but it would serve no real purpose besides looking cool, maybe I should reconsider. Quote Link to post Share on other sites
Gunfixr 76 Posted July 9, 2008 Report Share Posted July 9, 2008 Man, that's looking good. Quote Link to post Share on other sites
IGDude 0 Posted July 9, 2008 Report Share Posted July 9, 2008 Very nice camo job! It's so good that I was wondering what kind of stock you had because I could not see the bottom tube for a second. I wanted to do urban camo on one of mine but it would serve no real purpose besides looking cool, maybe I should reconsider. Stock is an ACE folder and receiver block. The block was a royal PIA to fit. First attempt EVER at a finish job. A little nervous at first and didn't know exactly what would happen. Spent some restless moments deciding which color to use as a base. Worked it up like this...Removed the stock and forend...stuffed the muzzle and masked the thread protector, sights, forend screw hole, PG grip nut hole. Magazine in. Stuffed napkins in the receiver opening. Tan base. Used grass/weed bundle to spray through with OD. Last color was the brown. Used some leafy weeds that looked like they would give good pattern. Make sure the grass/weeds aren't too dried out as they will start falling apart and you'll have to pick bits out of the paint. Give each coat about a half hour to dry so you don't get newpaper stuck anywhere. After the camo job I gave it a coat of clear satin which smoothed everything out. Was a little shiny so I hit it with a quick scrub of 0000 steel wool just to take the shine off. Don't use the wool until the tackiness is gone. 20 minutes with a hairdryer really helped speed things up. BTW, couldn't find the hole plugs everyone was talking about so used Loctite epoxy putty, let it cure and then sanded flush with 220 grit. Quote Link to post Share on other sites
DFinch516 0 Posted July 10, 2008 Report Share Posted July 10, 2008 Painted my S20 last month with duracoat. I had to paint it after conversion anyway. Was suprisingly easy. Took more time to prep than anything. Quote Link to post Share on other sites
Recommended Posts
Join the conversation
You can post now and register later. If you have an account, sign in now to post with your account.