imarangemaster 315 Posted December 22, 2008 Report Share Posted December 22, 2008 (edited) Here we go. This can be done with any M16 Flash Hider (3 prong, M16A1, or M16A2) I happen to have an M16A1 in my AR stuff, so I chose it. First, scribe around the muzzle shroud about 5/8 inch from muzzle. Best to use a tubing cutter. Mine wasn't heavy enough to cut the metal, so I scored it, then used a small hack saw (10" blade, that goes part way into the handle, and sticks part way out). Easier to control than the full size. Use a good quality blade. I cut carefully around until I cut through the shroud, but not the barrel. TAKE YOUR TIME! That left a 9/16" muzzle. Then take the M16 FH and clamp it in a drill press with a 9/16" inch bit. Use a sharp bit, do it slow, and use oil. Drill in small stages until you go a little deeper than the 5/8" of the muzzle. MAKE SURE YOU ARE CENTERED IN THE EXISTING HOLE! ADDED INFO! Make sure you drill all the way through with the 9/16" drill so that no lip is present for the muzzle blast wave to hit. Your flash hider could become a projectile if you don't. Then center a staking punch in the thick part of the end band. Take a drill bit (don't remember the size, but I was using a 8-32 socket set screw, so I used the biggest bit that would go through a 8-32 machine screw nut. Clamp the FH on it's side in the Drill Press vise, center the bit in the stake mark, and SLOWLY in stages, using oil, drill it through. Use the 8-32 tap and tap out the hole. Also do this slowly, maybe an eighth of a turn at a time, back off, oil, and another 1/8 turn. Taps are brittle, so BE CAREFUL! Put the set screw in. Slip over the muzzle, and position where you want it. WHen it is where you want it, carefully back out the set screw, and use the punch centered in the hole to stake bottom of barrel. Take off the flash hider, and using a drill bit that is the same diameter as the 8-32 set screw to drill a shallow dimple in the bottom of the barrel that the set screw will anchor into. Slip the flash hider on, sset screw it in with some locktite, and touch up the shroud between the sight tower and the FH with some Testor's Black model paint (after de-greasing and steel wooling it to give it something to grab to). I opted for this method instead of threading, just in case I ever have to return it to "un-thread" and un-pistol gripped. I hope this helps Edited December 23, 2008 by imarangemaster Quote Link to post Share on other sites
imarangemaster 315 Posted December 22, 2008 Author Report Share Posted December 22, 2008 I plan on getting one of the M16 bayonet lug assemblies that clamps around the barrel on Post ban guns.. That and a new M9 or USMC bayonet would make a nice addition. Quote Link to post Share on other sites
SickMAK90 0 Posted December 22, 2008 Report Share Posted December 22, 2008 (edited) I am tempted to cut my shroud down some and thread the barrel. I wish it was easier to add a normal front sight base. Will the shroud come off if I press the FSB off? Like the original poster I am wanting to add a A2 flash hider to my saiga. Any chance you can get us a picture from further away? Maybe one that shows the entire gun? Edited December 22, 2008 by SickMAK90 Quote Link to post Share on other sites
IndyArms 10,186 Posted December 22, 2008 Report Share Posted December 22, 2008 Will the shroud come off if I press the FSB off? Yes. Quote Link to post Share on other sites
imarangemaster 315 Posted December 23, 2008 Author Report Share Posted December 23, 2008 I am still waiting on the mount for my red dot. It was supposed to arrive last week before I left for Mississippi for 9 days....It didn't show! Quote Link to post Share on other sites
Bad Bob 0 Posted December 23, 2008 Report Share Posted December 23, 2008 ...I hope this helps Excellent cook book post, Sir! Doing things your way saves one 'compliance' part over actually threading the muzzle (if I understand things correctly: and it might even become a mandatory requirement under federal law with Mr. Obama in the White House - assuming nothing worse happens).l.. Quote Link to post Share on other sites
imarangemaster 315 Posted December 23, 2008 Author Report Share Posted December 23, 2008 ...I hope this helps Excellent cook book post, Sir! Doing things your way saves one 'compliance' part over actually threading the muzzle (if I understand things correctly: and it might even become a mandatory requirement under federal law with Mr. Obama in the White House - assuming nothing worse happens).l.. It is definitely a US compliance part. I also have a muzzle break that was in my stuff from 20 years ago when I did gun shows. I drilled it out also, and set screwed it as an alternate for the Saiga if need be. Quote Link to post Share on other sites
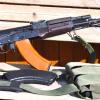
SickMAK90 0 Posted December 23, 2008 Report Share Posted December 23, 2008 Off topic but are those waffle style mags in the picture the new promags? They look pretty good. Quote Link to post Share on other sites
SGT Saiga 1 Posted December 23, 2008 Report Share Posted December 23, 2008 Have you done a functional check in the firing range to verify if the FH will stay in place with only one set screw? If so, I will go ahead and do the same thing on my .223. I have an Olyarms A2 FH that is on standby for this project. I am tired of waiting for that "no thread" muzzle brake to become available... Quote Link to post Share on other sites
imarangemaster 315 Posted December 23, 2008 Author Report Share Posted December 23, 2008 (edited) Answer to question one: Yes, the waffle is a Saiga Specific Pro-Mag 30. It has a raised rib in front of the lug, so no feed ramp modification needed (at least cycling by hand, I plan on shooting it today). The Sure fire has a more substantial raised area. I asked Pro-Mag about the size, and they told me they have not had any problems with it breaking off (lifetime warranty). If one every fails, I plan on getting some of that gray epoxy they sell at hardware stores where they have various things like a golf ball bonded to a pop bottle with it, and building it up like the sure fire just in case. (same stuff used for road turtles) I will post a side by side of the Tapco and surefire later. Answer to question two: It should stay on, that's why I have the dimple set into the bottom of the barrel for the set screw to seat into. It's probably about 1/16" deep. I used the same system on a Mini 14 about 20 years ago, and it worked. As I say, I am shooting it later today and will report back. Edited December 23, 2008 by imarangemaster Quote Link to post Share on other sites
imarangemaster 315 Posted December 23, 2008 Author Report Share Posted December 23, 2008 Update, After 100 rounds, it had tried to move a little, canting down slightly. When I get home, I will drill and tap the FH at the 12 o'clock position also (this set screw is at the 6 o'clock) and add one at the top. I will also deepen the barrel dimples very slightly. That should do it. Even if I do deepen it a tad, it should be OK. It will still not be as deep as the cross notches for the cross pins that hold the gas block and front sight tower on. Quote Link to post Share on other sites
imarangemaster 315 Posted December 23, 2008 Author Report Share Posted December 23, 2008 Mt bad again! I had put Tapco mags, instead of Pro-Mag! Edited. I guess I have Tapco on the brain. Browsed there web sight last night. Quote Link to post Share on other sites
imarangemaster 315 Posted December 23, 2008 Author Report Share Posted December 23, 2008 IMPORTANT UPDATE! READ! Well, I was looking over my design and I figured something out. I was wondering why when I did this same thing with a mini-14, one set screw was enough, and it never moved. I realized that the mini muzzle went all the way into the flash hider and butted up against the face of the drilled out area. In this design, the drilled out area is deeper that the protruding muzzle. Thus, a 50,000 psi shock wave exits the barrel and begins to expand into the remainder of the drilled out area, ramming full force into the small remaining un-drilled out face of the FH around the center hole! With this in mind I am surprised it didn't go sailing into my daughters pond! The fix is simple. I will drill it out 9/16th all the way, then there is no chamber face for the shock wave to hit. I am actually mad at myself for not figuring this out when I was doing the drilling in the first place. I was an armorer and know better. Guess ten years out of the saddle, though, makes you rusty! Quote Link to post Share on other sites
Bad Bob 0 Posted December 24, 2008 Report Share Posted December 24, 2008 (edited) I am actually mad at myself for not figuring this out when I was doing the drilling in the first place. I was an armorer and know better. Guess ten years out of the saddle, though, makes you rusty! Have to be careful with any set-screw type muzzle device (the 'thing went down range' result is pretty common ;>). Threading a muzzle is pretty straight-forward (with the appropriate tools [especially for an armorer]), but I will admit that threading my Saiga was tougher than anything I had done in the past (multiple FALs, Mini-14s, Lee-Enfields, even a Mauser or two). Still an option with hand tools, if you follow the cook book directions. Of course, a threaded muzzle requires an extra US-made 'compliance' part, IIRC... FWIW... Edited December 24, 2008 by Bad Bob Quote Link to post Share on other sites
imarangemaster 315 Posted December 24, 2008 Author Report Share Posted December 24, 2008 I think that with the "drill out all the way" modification, along with the double set screw and dimpling will work fine, especially since I didn't loose it with 100 slamming the partially drill out variation. Threading a muzzle is NEVER easy, even with the right tools. This way should be much easier if you have a drill press available. Quote Link to post Share on other sites
SGT Saiga 1 Posted December 24, 2008 Report Share Posted December 24, 2008 The fix is simple. I will drill it out 9/16th all the way, then there is no chamber face for the shock wave to hit. Concur. Muzzle face should be flush with inside face of flash hider. I will proceed with my project. Thanks for the recipe, Boss! If ever the "no thread muzzle brake" becomes available, i will install that on my planned purchase of a saiga 7.62... Happy Holidays to all! Quote Link to post Share on other sites
imarangemaster 315 Posted January 8, 2009 Author Report Share Posted January 8, 2009 UPDATE: I removed the flash hider, put it on the drill press and finished drilling it 9/16" all of the way out. I also added a set screw on the top, 180 degrees from the other one. Both set screws were set in shallow dimples drilled in barrel. Now it is rock solid, and the muzzle blast does not move it at all, since there is no "face" for it to hit when it expands outside the barrel. The flash hider seems to work as well on the Saiga as the M4gery. Quote Link to post Share on other sites
Recommended Posts
Join the conversation
You can post now and register later. If you have an account, sign in now to post with your account.