paprotective 362 Posted February 21, 2010 Report Share Posted February 21, 2010 Got my 5.45x39 Saiga in yesterday from Peach State. Here is (for me) step 2 after taking off the stock and handguard and taking out the bolt and such. This is where the FACTORY trigger assy. pins are located. Drill slowly to remove just the PIN rolled-edge and then carefully push the pins out. Then remove the factory retaining wire that holds the other pins (that you MUST re-use) and the hammer and bolt-hold-open pieces. Just save all the parts in a zip-lock till your done.. Here is apic of the bottom 'clinton-plate' showing the factory location of the trigger-guard and and the inside pic showing the 3 rivets you need to remove with a dremel or other tool. This is it for now.. More to follow when I go get the dremel/tool... Quote Link to post Share on other sites
Nailbomb 10,221 Posted February 21, 2010 Report Share Posted February 21, 2010 I love build threads. Looking foward to this. Quote Link to post Share on other sites
paprotective 362 Posted February 21, 2010 Author Report Share Posted February 21, 2010 (edited) Here is the parts I have left and parts I had ordered. I went with the $18 NEW trigger guard to alleviate the re-using of the old and save more time. Also have the G2 trigger group (single-hook type) w/hammer and 'retainer-plate' to speed things up on re-assembly. Notice at the bottom the 2 hammers. The Tapco G2 hammer on the left has tape on it to mark the 1/16" (or so) I need to remove to install my BHO (bolt hold-open) lever back in when done (one range I goto is anal). Also notice the BHO lever is marked with black marker, this is done so when I push it up it will be flush with the receiver when activated and also to reduce the interference (abit) with the trigger when down.. I will be trimming this bit off also.. Edited June 21, 2010 by YWHIC Quote Link to post Share on other sites
Paulry 50 Posted February 21, 2010 Report Share Posted February 21, 2010 (edited) Keep up with the photos. Can't wait to see the finished job. I bought a 4" angle grinder a little while back and have used it for other chores. And bought a Dremel for conversions. On one conversion I used the angle for one of the rivets on the trigger guard and liked how it went so much on my last conversion all I used was the 4" grinder, talk about speed! It is scary with that big wheel and torque but rivets just melt with that damn thing. Look forward to more photos! Edited February 22, 2010 by Fluid Power Quote Link to post Share on other sites
photoshooter 5 Posted February 21, 2010 Report Share Posted February 21, 2010 Lookin good YW I love seeing the play by play pics. I'm glad to see I'm not the only one opting for a new trigger guard. I like the idea of recycling the old one but I'm a neat freak and like that the new one fastens front and back. Looking forward to seeing more. Quote Link to post Share on other sites
paprotective 362 Posted February 21, 2010 Author Report Share Posted February 21, 2010 (edited) After the dremel arrived I simply snapped off the 'lower' back tang with a pair pliers. Then dremeled off the rear 1st rivet from the inside.. Then I bent the 'clinton-plate' up to number 2 rivet and dremeled that off. Then I bent the plate to the number 3 rivet. And then dremeled that off.. This is with the plate off. Edited February 21, 2010 by YWHIC--OutOfLine Quote Link to post Share on other sites
paprotective 362 Posted February 22, 2010 Author Report Share Posted February 22, 2010 Before I did the second rivet I drilled into the spot weld and got the triggerguard off in one NICE piece.. Then after all the rivets were off.. I painted the bottom flat black from wally-world.. Duplicolor engine works best I hear. Then after drying 10 minutes I bolted on the NEW trigger guard I bought for $18.. I also modded the G2 hammer (on bottom) to match the factory WIDTH so I could put my BHO back in. Quote Link to post Share on other sites
paprotective 362 Posted February 22, 2010 Author Report Share Posted February 22, 2010 Now the BHO isn't a problem IF you know a trick.. or 2. I put the G2 hammer together with the hammer spring and 'twist-tied' it up and then put that into the receiver where it goes with the pin 80% through to hold it for me. I then dropped the G2 FCG (aka trigger group) in to the correct spot and slid that pin 80% in also. Then I put the BHO spring in BACKWARDs with the LONG leg facing the rear and LAYING in the receiver and slid the FCG pin all the way through. >>>>> Then I put the BHO plate in and aligned it with the HAMMER and that pin.. Then using a standard FLAT screwdriver... Lift the LONG 'leg' onto the BHO arm NOTCH.. And TRIM off the extra length with small SHARP dikes.. (aka cutters) so it don't hit anything and bind up.. Voila.. Done.. Then pop in the 'retainer' plate to hold it all in.. Then release the hammer spring legs also.. Then put the safety arm in to tie it all togther.. Quote Link to post Share on other sites
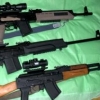
paprotective 362 Posted February 22, 2010 Author Report Share Posted February 22, 2010 This is the last pic before I put on the front gas tube.. The bolt assy. And the stock and handguard.. Notice the holes for the 'plugs' are empty. Don't get confused folks.. I'll explain about the stocks.. Here is my 5.45 finished.. Explanation here...>>>>>>>>>>. I took my Tapco off my 7.62 and swapped onto the 5.45.. My 7.62x39 is now dressed in wood.. Here is the other pics of the Russian bia'tches.... Quote Link to post Share on other sites
paprotective 362 Posted February 22, 2010 Author Report Share Posted February 22, 2010 Here is a better pic with my dig. camera. Enjoy folks.. And know YOU can do it too. Quote Link to post Share on other sites
gpqueen 545 Posted February 22, 2010 Report Share Posted February 22, 2010 Here is a better pic with my dig. camera. Enjoy folks.. And know YOU can do it too. Looks great. Let me know how the bulgarian mags run for you without the bullet guide. Quote Link to post Share on other sites
paprotective 362 Posted February 22, 2010 Author Report Share Posted February 22, 2010 Thanks. Will do CSS. Hopefully this post will help some new guys/gals to decide to DIVE in and do this also. This is my second restoration so time was a non-issue. I just took my time with it. I will say going from the back to the front with the rivets was easier then dremeling them from the inside (like last time). Pry / Dremel / Pry / Dremel/ Pry etc...and done... I got 150 rounds coming in to try her out... Probably on the 6th.. Going to scope the 5.45 also.. I got a RD on the 7.62 I got to site-in also... Busy-busy.. Quote Link to post Share on other sites
madmax4x4 68 Posted February 22, 2010 Report Share Posted February 22, 2010 I have put over 300 rounds with out a bullet guide with no problems. I will most likely put one in later but the bulgarian 30 and the 45 round mags have worked 100% I picked up some ammo for 120.00 a tin and recently a local had it for 107.00 a tin for pick up, but the surplus ammo I have smells really bad to shoot indoors Quote Link to post Share on other sites
paprotective 362 Posted February 25, 2010 Author Report Share Posted February 25, 2010 Finally got my 150 rounds of ammo in today from a non-vendor (JG). Took about 8 days total but without tracking (they don't do tracking and state such on there site) it makes it a PITA.. (I got 0 patience).. Loaded it all up and hand-cycled it. The one Circle 21 mag (used) FTF on the last round as it appears the follower don't lift it HIGH enough.. I tried 3 times to make sure I wasn't nuts.. The Circle 10 (also used) works fine and I noticed the follower goes abit higher than the 21.. Depending on how things pan-out $$ I may order a couple more of these from CSS in a few (3) weeks.. Going to try to tweak it out.. Quote Link to post Share on other sites
paprotective 362 Posted February 25, 2010 Author Report Share Posted February 25, 2010 After a few try with the file and anyalyzing the mag. The follower is the culprit (on the 21) as it does not lift the last round high enough (also noticed the HUMP in the follower was shorter) to get into the hole.. Going to order a BG tonight to be safe.. Then order a few more of these mags next week. Quote Link to post Share on other sites
paprotective 362 Posted February 25, 2010 Author Report Share Posted February 25, 2010 Ordered the Dinzag BG for 5.45 Kit (and an Extra Tap/Bit also) for $35 total and $4 s/h. (My 7.62x39 took 2 taps..) Be ordering more mags from CSS after next week (when i can test this thing out totally). Circle 10/21's for $15 each (even used) is a great deal IMHO.. Thanks Greg and CSS. Quote Link to post Share on other sites
Recommended Posts
Join the conversation
You can post now and register later. If you have an account, sign in now to post with your account.