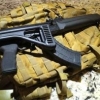
pfbz 3 Posted May 31, 2012 Report Share Posted May 31, 2012 Finished up my first Saiga conversion tonight! A Saiga 7.62x39 (~$380 shipped from Bud's), CSS kit with billet trigger guard, Tromix/Tapco FCG, Tapco folding stock, Ergo AK grip, bullet guide, etc. Everything went surprisingly easily without too much drama. There is so many posts/websites/videos/vendor instructions showing a multitude of ways to accomplish a particular task, I often spent too much time trying to figure out which of the ten different ways to do something I should try. For example: Drill the rivets from the inside, or the outside, or use a dremel, or a bench grinder, or a belt grinder... or don't even bother drilling and just punch them out! (I started drilling from the inside, but then just went to the grinder and knocked the rivet heads off.) Also, I screwed around for at least 30 minutes trying to install the BHO spring with the "dental floss" method without much luck. Tried just pushing it into place with a pair of needle nose pliers as suggested in the CSS video, took about 20 seconds! At any rate, Version One is done. I'd like to put on a higher quality metal folding stock sometime down the road, vent or replace the front furniture, and improve the stock sights at some point. And I'll probably tear the whole thing down again tomorrow and put it back together, just so I have the process down. 1 Quote Link to post Share on other sites
hutchsaiga 93 Posted May 31, 2012 Report Share Posted May 31, 2012 Nice job. Tearing down the trigger group is pretty much the easiest of any rifle, so you shouldn't need to practice, once you put it in, and know how it works. It's pretty easy from there. Glad to see you're gunna replace that tapco side folder. They get pretty shitty feedback on here And also... Shoot the living shit out of it:) Quote Link to post Share on other sites
mogunner 240 Posted June 1, 2012 Report Share Posted June 1, 2012 Looks great! Any problems with the bullet guide install? Seems there's been a lot of people breaking taps. Quote Link to post Share on other sites
Josh250 0 Posted June 1, 2012 Report Share Posted June 1, 2012 Sweet!! I now want a folder! Great looking rifle! I too went with the ergo grip! Any problems with the grip install?? I had a slight gap and had to sand to make it fit properly. Quote Link to post Share on other sites
pfbz 3 Posted June 1, 2012 Author Report Share Posted June 1, 2012 (edited) No problems with the bullet guide install or tapping the thread. I went slow, used a bit of cutting oil, and counter-rotated frequently to clear the chips. The fit on the Ergo pistol grip was perfect with no tweaking. I used a CSS billet trigger guard with the integrated grip nut, perhaps that makes it fit a bit differently? The Tapco folder fit pretty well too, I maybe should have tweaked the fit ever so slightly before screwing it in. The Tapco seems sturdy enough when new. I read some negative reviews, but also a few owners who thought they were fine. From what I've read, if you aren't careful to fully release the mechanism before folding and releasing, plastic wedges that lock the folder open can get worn and make the stock a bit sloppy.... But at $33 for a Tapco folder vs. $120-$150 for something like a DPH/Ace/Tromix metal stock with the required additional folding mechanism, I thought I'd try out the Tapco first. On tearing it down and redoing all over again, I really like to be able to disassemble and reassemble my firearms quickly and without thinking about it, so mostly it is to do the BHO assembly and retaining plate one more time to feel confident I could strip it/reassemble it anywhere without fumbling about. Plus, while I used locktite on the bullet guide, I didn't locktite in the trigger guard bolts yet, so I want to do that. I'm also a bit paranoid after reading about people having problems with the BHO plate dropping inside the gun and jamming it up, *definitely* don't want to have to worry about that. I like having a hold-open, but if there is any significant chance of a reliability issue, I'll dump it and do the modified selector lever for the BHO. Edited June 1, 2012 by pfbz Quote Link to post Share on other sites
shades_of_grey 1,092 Posted June 1, 2012 Report Share Posted June 1, 2012 Looks great, pfbz, and thanks for sharing some tips that made the process easier. Quote Link to post Share on other sites
pfbz 3 Posted June 3, 2012 Author Report Share Posted June 3, 2012 One other note on my first build... SEM automotive trim paint (available at any automotive paint supply or Amazon) is pretty much a perfect match for the color and sheen of the Saiga. Can go right over bare metal without primer, but I used some rustoleum primer anyway. Quote Link to post Share on other sites
Straydog 18 Posted June 3, 2012 Report Share Posted June 3, 2012 Nice job, your gonna love it... Quote Link to post Share on other sites
Recommended Posts
Join the conversation
You can post now and register later. If you have an account, sign in now to post with your account.