imarangemaster 315 Posted May 25, 2009 Report Share Posted May 25, 2009 (edited) I have an unpinned, dual dimples on each side, FSB. Ok, I got a two jaw pulley puller with a screw down limiter to prevent spread, contoured the jaws to go around the barrel, got a brass washer to insulate the crown, and can't get the dang thing off! I read somewhere on here or the 223 forum that someone had to grill out the dimples before they pulled it off. I searched but didn't find it. HELP! I want to put on my 24mm 74 brake. Edited May 25, 2009 by imarangemaster Quote Link to post Share on other sites
Kymasabe 1 Posted May 26, 2009 Report Share Posted May 26, 2009 Good luck! All the '08 guns I've seen have that crimped on front sight block (and gas block should you ever need to remove that). On the older guns, you could drive out the pins and pull the sight block, but not with the crimped-on sight blocks. You'll need to drill out the crimps, all the way to the barrel, then you'll be able to pull the front sight block. They're not making them any easier to work on. See if your local gunsmith has a front sight block in stock, some of the Bulgarian ones are already threaded for 24mm and can be pinned in place. Quote Link to post Share on other sites
imarangemaster 315 Posted May 26, 2009 Author Report Share Posted May 26, 2009 (edited) I already have the 24mm FSB with bayonet lug, 24mm AK103 type brake and also have a Bulgarian bayonet on the way. UGH! If drilling the dimples doesn't work, I think I may just slice the side of the FSB laterally through the dimples with a carbide cutting wheel down to the barrel. Then I should be able to take it off. I supposed the discontinuance of the original pin on system is another effort to keep us from returning them to their intended configuration. Edited May 26, 2009 by imarangemaster Quote Link to post Share on other sites
shades_of_grey 1,092 Posted May 26, 2009 Report Share Posted May 26, 2009 ...I supposed the discontinuance of the original pin on system is another effort to keep us from returning them to their intended configuration. Maybe, but I think they started crimping FSB's on rather than pinning em in place because it's probably cheaper. Quote Link to post Share on other sites
bigsal 757 Posted May 26, 2009 Report Share Posted May 26, 2009 I already have the 24mm FSB with bayonet lug, 24mm AK103 type brake and also have a Bulgarian bayonet on the way. UGH! If drilling the dimples doesn't work, I think I may just slice the side of the FSB laterally through the dimples with a carbide cutting wheel down to the barrel. Then I should be able to take it off. I supposed the discontinuance of the original pin on system is another effort to keep us from returning them to their intended configuration. Drilling the dimples should work. Post pics if it doesn't. Quote Link to post Share on other sites
imarangemaster 315 Posted May 26, 2009 Author Report Share Posted May 26, 2009 I will try the dimples after work tonight. I am assuming the dimples mate with indentations in the barrel that were created before the FSB was slid on. Quote Link to post Share on other sites
skifast 2 Posted May 26, 2009 Report Share Posted May 26, 2009 Mine was pinned. I could only knock out one pin. So I ended making a cut along the axis of the barrel. Quote Link to post Share on other sites
SaigaNoobie 66 Posted May 26, 2009 Report Share Posted May 26, 2009 HAHAHAHA. Cut that bastard off. Just don't cut your barrel! Quote Link to post Share on other sites
imarangemaster 315 Posted May 27, 2009 Author Report Share Posted May 27, 2009 Got it off! Holy cow! It took drilling, beating with a brass hammer and the puller. What a pain in the butt! The dimples they drill in the barrel for the FSB dimples are dang big. I got the 24mm FSB that I got from Blackthorn driven on and centered, about 3/16 past the end of the threads so I can use a thin 14mm L muzzle brake indexing nut (set with industrial loctite) to keep it from sliding forward. With the set screw set into a dimple in the bottom of the barrel, and as tight as it is on the barrel, I doubt if it will ever move, but I might as well be a little redundant. I will use the set screw and dimple to prevent lateral motion if the FSB gets whacked. Now if the muzzle nut will get here from Dinzag, I will be set. I still have to fit the plunger, spring and roll pin for the brake detent in it to keep the AK103 brake indexed. I have trued up the FSB to vertical but am not going to dimple the barrel and set the set screw until I fire it and make sure that the front post is relatively centered in the wings for 25 meter POA. That way I can adjust the front sight base slightly so I have a good front sight picture. I won't be able to work on it anymore until Thursday night because of other commitments, but it is almost there! I will probably be able to sight it in on Saturday. Quote Link to post Share on other sites
bigsal 757 Posted May 27, 2009 Report Share Posted May 27, 2009 Got it off! Holy cow! It took drilling, beating with a brass hammer and the puller. What a pain in the butt! The dimples they drill in the barrel for the FSB dimples are dang big. I got the 24mm FSB that I got from Blackthorn driven on and centered, about 3/16 past the end of the threads so I can use a thin 14mm L muzzle brake indexing nut (set with industrial loctite) to keep it from sliding forward. With the set screw set into a dimple in the bottom of the barrel, and as tight as it is on the barrel, I doubt if it will ever move, but I might as well be a little redundant. I will use the set screw and dimple to prevent lateral motion if the FSB gets whacked. Now if the muzzle nut will get here from Dinzag, I will be set. I still have to fit the plunger, spring and roll pin for the brake detent in it to keep the AK103 brake indexed. I have trued up the FSB to vertical but am not going to dimple the barrel and set the set screw until I fire it and make sure that the front post is relatively centered in the wings for 25 meter POA. That way I can adjust the front sight base slightly so I have a good front sight picture. I won't be able to work on it anymore until Thursday night because of other commitments, but it is almost there! I will probably be able to sight it in on Saturday. Good Work! One request though: Post pics of the process so others may benefit from your operation. Quote Link to post Share on other sites
imarangemaster 315 Posted May 28, 2009 Author Report Share Posted May 28, 2009 Here's a pic of the old factory front sight base, with the dimples drilled (a large drill works better), the new 24mm FSB set on th barrle with some exposed threads (14mmL) and the thin 14mm L muzzle indexing nut. The next picture is the with the muzzle nut on. This will keep the FSB from moving forward when the blast wave hits the rear of the front face of the brake. Realistically, as hard as I had to go to drive the FSB on, and having a 8/32 set screw into a large dimple on the bottom of the barrel, I doubt if it would move without the nut. It is just redundancy. I was going to industrial locktite the nut to keep it from moving, but think I might just hit it with some silver solder. Next I need to install a detent, spring, and roll pin for the brake retainer. using a level steel table, and a 90 degree carpenter square, the FSB is exactly square with the trunion and rear sight housing, and absolutely 90 degrees to the table. Quote Link to post Share on other sites
bigsal 757 Posted May 29, 2009 Report Share Posted May 29, 2009 Here's a pic of the old factory front sight base, with the dimples drilled (a large drill works better), the new 24mm FSB set on th barrle with some exposed threads (14mmL) and the thin 14mm L muzzle indexing nut. The next picture is the with the muzzle nut on. This will keep the FSB from moving forward when the blast wave hits the rear of the front face of the brake. Realistically, as hard as I had to go to drive the FSB on, and having a 8/32 set screw into a large dimple on the bottom of the barrel, I doubt if it would move without the nut. It is just redundancy. I was going to industrial locktite the nut to keep it from moving, but think I might just hit it with some silver solder. Next I need to install a detent, spring, and roll pin for the brake retainer. using a level steel table, and a 90 degree carpenter square, the FSB is exactly square with the trunion and rear sight housing, and absolutely 90 degrees to the table. Great work. Are you using a laser to level it? Quote Link to post Share on other sites
imarangemaster 315 Posted May 29, 2009 Author Report Share Posted May 29, 2009 Ok, nut silver soldered on so it won't back off, spring detent installed, front sight and drum installed, AK74 7.62x39 brake installed, and Bulgarian bayonet installed. Now the cleaning rod! It will be refinished with either my trusty Krylon (easy to touch up with Testors) or high temp flat black when I am done. Right now everything is kinda dusty and dirty from the work bench. Pics of finished product will be posted in the picture thread. My question is this: "What took me so long to decide to do it right!" Damn it's cool with the brake and bayonet! Quote Link to post Share on other sites
imarangemaster 315 Posted May 29, 2009 Author Report Share Posted May 29, 2009 To level it, I used a level and carpenter's square. I braced the receiver with trunion and front sight block true 90 degrees to steel table (checked from both sides) and front sight base sides also true 90 degrees to steel table (checked both sides). I also gave it the "eyeball check". I am pretty good at visual-spacial. When I was in 8th grade, I sed to correct my older brother's mechanical drawing homework. Quote Link to post Share on other sites
paprotective 362 Posted May 29, 2009 Report Share Posted May 29, 2009 That looks like a big PIA. I don't have those skills or tools.. I want a J-Tac type on mine... Anyone on here in central NJ or philly area thats has done this and can help.. I can buy the beer or pizza or both.. PM me... Quote Link to post Share on other sites
imarangemaster 315 Posted May 29, 2009 Author Report Share Posted May 29, 2009 It is a big PIA! I was a military and police armorer, and also built hundreds of AR platforms on the side "back in the day" mostly late 80s and early 90s, so I am not shy about working on my own weapons. I am definitely calling it quits, though, after I do the cleaning rod! Then I will refinish the rifle and just enjoy shooting it. If Zombies, Cuban, or North Korean paratroopers drop into Southern Illinois, by God I'll be ready! :haha: :haha: Heck, I can even stick them in the butt with my nice Bulgarian bayonet! Quote Link to post Share on other sites
usmc_mwroseberry 0 Posted May 29, 2009 Report Share Posted May 29, 2009 It is a big PIA! I was a military and police armorer, and also built hundreds of AR platforms on the side "back in the day" mostly late 80s and early 90s, so I am not shy about working on my own weapons. I am definitely calling it quits, though, after I do the cleaning rod! Then I will refinish the rifle and just enjoy shooting it. If Zombies, Cuban, or North Korean paratroopers drop into Southern Illinois, by God I'll be ready! :haha: :haha: Heck, I can even stick them in the butt with my nice Bulgarian bayonet! On paint I went with the High temp rustoluem and it's worked great for me. May want to look into it. It also matches the factory color quite well. Good luck, Merritt SGT USMC vet. Quote Link to post Share on other sites
bigsal 757 Posted May 29, 2009 Report Share Posted May 29, 2009 To level it, I used a level and carpenter's square. I braced the receiver with trunion and front sight block true 90 degrees to steel table (checked from both sides) and front sight base sides also true 90 degrees to steel table (checked both sides). I also gave it the "eyeball check". I am pretty good at visual-spacial. When I was in 8th grade, I sed to correct my older brother's mechanical drawing homework. Rangemaster> nice. Good work on the FSB. Plenty of lazy people convert their weapons half way and ignore the brake (In fact Im one of them. Ive got two 7.62's and I need to still remove the FSB on one of them). Anyway congrats! USMC> I never thought about rustoluem. How durable is it compared to duracoat or krylon based products? Quote Link to post Share on other sites
imarangemaster 315 Posted May 31, 2009 Author Report Share Posted May 31, 2009 Update: All done, except for the cleaning rod. I decided not to cut it down, as with the muzzle brake on, I can use the 20" factory rod and not take the brake off. Since I only shoot non-corrosive, I would rather just leave it on, since I generally only do a quick clean, if at all, on the AK anyway! Later, I may pick up a Rommy rod just for looks. I picked up the Rustoleum semi-gloss black, and it rocks! Re-did the barrel, and it is almost a match to the factory finish. I went ahead, though, and gave a thin coat overall and touched up the rest of the weapon. The AK 74 block I roughed up a little with a sponge sanding block to give it more to hang onto, though Rustoleum is pretty tough in my experience. It is a much closer match than the gloss Krylon I was using. I can touch up the weapon for the rest of my life with the original can! I got the Type 81 4 cell CHi-Com chest pouch off EBAY today, so I should be set. Not as easy to grab as the 5 cell "snatch and grab" Hungarian leather pouch, but definitely better for actually using. I will post some pics in the picture thread of my Russian mistress with her make over. I still have to sight it in again, but that will be in a few days. At least I am on vacation, so besides the endless list of "Honey Do's" my wife has planned, I shoot be ablre to go down buy the creek and sight her in. :rolleyes: Quote Link to post Share on other sites
unclejake 428 Posted May 31, 2009 Report Share Posted May 31, 2009 Congrats B.!!! I KNOW that the pics will be great! I hope wifey will let you enjoy the fruits of your labor while on vacation. Good job Bubba! Quote Link to post Share on other sites
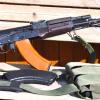
imarangemaster 315 Posted May 31, 2009 Author Report Share Posted May 31, 2009 Here's a pic of the Blackthorne 24mm FSB, Combat Hunting.com AK103 brake, and the Bulgarian bayonet. BTW, the bayonet and sheath both have circle 10 on them. It was refinished with Rustoleum semi-gloss. I will post some better pics of the finished project in the picture thread. Quote Link to post Share on other sites
bigsal 757 Posted June 1, 2009 Report Share Posted June 1, 2009 Here's a pic of the Blackthorne 24mm FSB, Combat Hunting.com AK103 brake, and the Bulgarian bayonet. BTW, the bayonet and sheath both have circle 10 on them. It was refinished with Rustoleum semi-gloss. I will post some better pics of the finished project in the picture thread. Have you shot it yet? It came out good, but you may want to coat it with Moly Resin semi-flat black to get closer to the original saiga paint job (I say this because from your pic the Rustoleum looks a bit off... ) Still, cosmetics aside, it came out awesome! Good work. Quote Link to post Share on other sites
imarangemaster 315 Posted June 1, 2009 Author Report Share Posted June 1, 2009 Here's a pic of the Blackthorne 24mm FSB, Combat Hunting.com AK103 brake, and the Bulgarian bayonet. BTW, the bayonet and sheath both have circle 10 on them. It was refinished with Rustoleum semi-gloss. I will post some better pics of the finished project in the picture thread. Have you shot it yet? It came out good, but you may want to coat it with Moly Resin semi-flat black to get closer to the original saiga paint job (I say this because from your pic the Rustoleum looks a bit off... ) Still, cosmetics aside, it came out awesome! Good work. Some of that is the damn flash on the camera. It is an indoor pic, which for some reason my camera sucks at. I'll take some daylight pictures outside. In real life, it does not seem so shiny. I tried the flat black, and it was TOO flat. Krylon was too glossy. This is more like low gloss than semi gloss! I plan on shooting it tomorrow afternoon. Quote Link to post Share on other sites
bigsal 757 Posted June 1, 2009 Report Share Posted June 1, 2009 Here's a pic of the Blackthorne 24mm FSB, Combat Hunting.com AK103 brake, and the Bulgarian bayonet. BTW, the bayonet and sheath both have circle 10 on them. It was refinished with Rustoleum semi-gloss. I will post some better pics of the finished project in the picture thread. Have you shot it yet? It came out good, but you may want to coat it with Moly Resin semi-flat black to get closer to the original saiga paint job (I say this because from your pic the Rustoleum looks a bit off... ) Still, cosmetics aside, it came out awesome! Good work. Some of that is the damn flash on the camera. It is an indoor pic, which for some reason my camera sucks at. I'll take some daylight pictures outside. In real life, it does not seem so shiny. I tried the flat black, and it was TOO flat. Krylon was too glossy. This is more like low gloss than semi gloss! I plan on shooting it tomorrow afternoon. Nice dude, Im anxious for a range report. Quote Link to post Share on other sites
GregM1 241 Posted June 1, 2009 Report Share Posted June 1, 2009 Here's a pic of the Blackthorne 24mm FSB, Combat Hunting.com AK103 brake, and the Bulgarian bayonet. BTW, the bayonet and sheath both have circle 10 on them. It was refinished with Rustoleum semi-gloss. I will post some better pics of the finished project in the picture thread. Have you shot it yet? It came out good, but you may want to coat it with Moly Resin semi-flat black to get closer to the original saiga paint job (I say this because from your pic the Rustoleum looks a bit off... ) Still, cosmetics aside, it came out awesome! Good work. Some of that is the damn flash on the camera. It is an indoor pic, which for some reason my camera sucks at. I'll take some daylight pictures outside. In real life, it does not seem so shiny. I tried the flat black, and it was TOO flat. Krylon was too glossy. This is more like low gloss than semi gloss! I plan on shooting it tomorrow afternoon. your camera has trouble processing in that low of a light at its current settings, try to turn your iso to the highest speed or highest sensitivity setting. it will make the shutter move faster but can also keep your images to dark. just have to find the balance. plus your white balance setting is off as to why the color doesnt appear right. you are under probably a mixture of tungsten and florescent bulbs indoors. try the alternate modes for that also. Quote Link to post Share on other sites
imarangemaster 315 Posted June 1, 2009 Author Report Share Posted June 1, 2009 Thanks for the update on the camera. It is an older digital camera. My newer digital with all the whistles and bell took a crash and is DOA, so I am using this old thing. The daylight pictures in the picture thread came out OK. Quote Link to post Share on other sites
centexasman 0 Posted April 15, 2010 Report Share Posted April 15, 2010 Here's a pic of the Blackthorne 24mm FSB, Combat Hunting.com AK103 brake, and the Bulgarian bayonet. BTW, the bayonet and sheath both have circle 10 on them. It was refinished with Rustoleum semi-gloss. I will post some better pics of the finished project in the picture thread. What plunger pin set did you use for the Blackthorne FSB. I just received mine and it seems that there are different one's out there to pick from. Quote Link to post Share on other sites
imarangemaster 315 Posted April 16, 2010 Author Report Share Posted April 16, 2010 I used a piece of drill bit cut to length and modified where appropriate. Quote Link to post Share on other sites
Recommended Posts
Join the conversation
You can post now and register later. If you have an account, sign in now to post with your account.