3rdgeargrndrr 31 Posted September 4, 2011 Report Share Posted September 4, 2011 (edited) Thanks Saiga-12, I have been a lurker for a while and I know that tutorials exist, however, i did want to input some of my own thoughts on this great subject. Although each rifle has its nuance, the steps are basically the same, I have only converted two 7.62x39, one 308 and one 5.45 so i am still a newb compared to other guys with plenty more conversions under their belt. Although you can use basic hand tools such as a hammer, drill and punches, I find it much easier to use an angle grinder or die grinder to save a lot of frustration, time, pain and drill bits. Be sure to read through and watch all of the other conversions posted to familiarize yourself with the internals of this great rifle A note on the .308 the trigger plate was held down by 2 extra rivets. For those who wish to follow my guide, My tutorial will use 1 upgraded handguards, 2 a handguard mil surplus retainer, 3 an AK74 gas tube, 4 upgraded stock and 5 Tapco unmodified g2 single hook trigger system. Please use forum sponsors to acquire these items. Any and all suggestions or corrections welcome. Dont be scared of this conversion. After doing a few of these i can say it would be really difficult to permanently screw up the rifle. Best of all you will appreciate your saiga much more aesthetically and without the long trigger creep. Some tutorials and Resources: http://forum.saiga-1...sion-with-pics/ http://gunpoints.org/blog/archives/168 http://www.cross-con...iga_Conversion/ http://home.comcast.net/~navy87guy/home/saigaconversion.html http://www.ipscgun.c...CONVERSION.html Edited September 10, 2011 by 3rdgeargrndrr Quote Link to post Share on other sites
3rdgeargrndrr 31 Posted September 4, 2011 Author Report Share Posted September 4, 2011 (edited) Edit: To me, reinstalling the BHO spring and lever was too much a pain, so I notched the selector lever; Make sure to purchase a regalar FCG if you plan on omitting the BHO lever Edited September 10, 2011 by 3rdgeargrndrr Quote Link to post Share on other sites
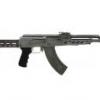
3rdgeargrndrr 31 Posted September 4, 2011 Author Report Share Posted September 4, 2011 my 5.45 conversion Quote Link to post Share on other sites
vulcan16 971 Posted September 4, 2011 Report Share Posted September 4, 2011 (edited) Nice write up. May I suggest using a burnishing pad on the forward and aft clinton plate rivets and just grinding them smooth. Drill the middle one to secure the trigger guard to the receiver. This method leaves no unnecessary open holes, and once painted looks great. Looks almost as good as welding and blending the holes Takes a extra five minutes but well worth the effort. I have used this method on at least ten conversions(mine & friends) If using a dremmel, a rotary carbide bit also works great. Credit goes to GregM for developing this great conversion method of smoothing the rivets instead of drilling them. Edited September 4, 2011 by Jetmech Quote Link to post Share on other sites
abz400 3 Posted September 5, 2011 Report Share Posted September 5, 2011 how much did you get the rifle for unconverted?i'm thinking about getting a 5.45 or just get a arsenal already converted. Quote Link to post Share on other sites
3rdgeargrndrr 31 Posted September 6, 2011 Author Report Share Posted September 6, 2011 Depends on how much u can swing the deal. Apparently the price will be different for any given region. Figure $350-450 for the saigas new and depending on availability Quote Link to post Share on other sites
3rdgeargrndrr 31 Posted September 6, 2011 Author Report Share Posted September 6, 2011 Nice write up. May I suggest using a burnishing pad on the forward and aft clinton plate rivets and just grinding them smooth. Drill the middle one to secure the trigger guard to the receiver. This method leaves no unnecessary open holes, and once painted looks great. Looks almost as good as welding and blending the holes Takes a extra five minutes but well worth the effort. I have used this method on at least ten conversions(mine & friends) If using a dremmel, a rotary carbide bit also works great. Credit goes to GregM for developing this great conversion method of smoothing the rivets instead of drilling them. i just used these plugs, they save time and look great http://store.carolinashooterssupply.com/servlet/-strse-149/Saiga-FCG-hole-plugs/Detail 1 Quote Link to post Share on other sites
vulcan16 971 Posted September 6, 2011 Report Share Posted September 6, 2011 (edited) Just seems a crying shame to remove metal and replace it with plastic, when you already have the proper tools to do the job. Guess you would have to see the finished work in person to appreciate the difference. I only use the plugs on the sides because no access to a proper welder. How much extra time did it take you to photograph, edit, and post pics? Your rifles and pics look great. Edited September 6, 2011 by Jetmech Quote Link to post Share on other sites
3rdgeargrndrr 31 Posted September 8, 2011 Author Report Share Posted September 8, 2011 post a link, i'm interested Quote Link to post Share on other sites
Couch-commando 0 Posted October 15, 2011 Report Share Posted October 15, 2011 Could you better explain how you secured that handguard retainer? I'm definitely interested in how you did this build! Quote Link to post Share on other sites
saiga545 47 Posted October 30, 2011 Report Share Posted October 30, 2011 Could you better explain how you secured that handguard retainer? I'm definitely interested in how you did this build! I agree, how do you keep it from sliding forward without the top support lever? Quote Link to post Share on other sites
thebobrusso 27 Posted October 30, 2011 Report Share Posted October 30, 2011 What furniture is that....surplus? Ironwood? Quote Link to post Share on other sites
3rdgeargrndrr 31 Posted December 31, 2011 Author Report Share Posted December 31, 2011 I JUST USED A VISE AND HELD IT IN PLACE WITH AN EXTENSION BAR WHILE I PRESSED THEM TOGETHER. yOU WILL NEED TO GRIND THE INSIDE OF A SURPLUS HANDGARUD A TAD SO IT SLIDES MORE EASILY, THOUGH. AS FOR FURNITURE I GOT OFF OF CENTERFIRESYSTEMS AND OFF OF CAROLINASHOOTINGSUPPLY <-GARY IS GRRRREAT Quote Link to post Share on other sites
markdavidson 28 Posted December 31, 2011 Report Share Posted December 31, 2011 Nice write up. May I suggest using a burnishing pad on the forward and aft clinton plate rivets and just grinding them smooth. Drill the middle one to secure the trigger guard to the receiver. This method leaves no unnecessary open holes, and once painted looks great. Looks almost as good as welding and blending the holes Takes a extra five minutes but well worth the effort. I have used this method on at least ten conversions(mine & friends) If using a dremmel, a rotary carbide bit also works great. Credit goes to GregM for developing this great conversion method of smoothing the rivets instead of drilling them. I'm late to the party, I know, But I would like to know more about this. my two sporter FCG holes will be taken up by an ACE internal receiver block. I do have access to a welder (person, not machine) so I can get them filled, but if I can skip the need< I'll be content. Quote Link to post Share on other sites
vulcan16 971 Posted December 31, 2011 Report Share Posted December 31, 2011 (edited) Nice write up. May I suggest using a burnishing pad on the forward and aft clinton plate rivets and just grinding them smooth. Drill the middle one to secure the trigger guard to the receiver. This method leaves no unnecessary open holes, and once painted looks great. Looks almost as good as welding and blending the holes Takes a extra five minutes but well worth the effort. I have used this method on at least ten conversions(mine & friends) If using a dremmel, a rotary carbide bit also works great. Credit goes to GregM for developing this great conversion method of smoothing the rivets instead of drilling them. I'm late to the party, I know, But I would like to know more about this. my two sporter FCG holes will be taken up by an ACE internal receiver block. I do have access to a welder (person, not machine) so I can get them filled, but if I can skip the need< I'll be content. Use this type bit to shave the rivets smooth. Take your time and it will leave the bottom smooth. The aft rivet will also need to be shaved down some inside the receiver to install your adapter.http://www.ebay.com/...347396713551489 Edited January 2, 2012 by Jetmech Quote Link to post Share on other sites
vulcan16 971 Posted January 2, 2012 Report Share Posted January 2, 2012 (edited) removed Edited January 2, 2012 by Jetmech Quote Link to post Share on other sites
3rdgeargrndrr 31 Posted January 9, 2012 Author Report Share Posted January 9, 2012 Nice write up. May I suggest using a burnishing pad on the forward and aft clinton plate rivets and just grinding them smooth. Drill the middle one to secure the trigger guard to the receiver. This method leaves no unnecessary open holes, and once painted looks great. Looks almost as good as welding and blending the holes Takes a extra five minutes but well worth the effort. I have used this method on at least ten conversions(mine & friends) If using a dremmel, a rotary carbide bit also works great. Credit goes to GregM for developing this great conversion method of smoothing the rivets instead of drilling them. I'm late to the party, I know, But I would like to know more about this. my two sporter FCG holes will be taken up by an ACE internal receiver block. I do have access to a welder (person, not machine) so I can get them filled, but if I can skip the need< I'll be content. Use this type bit to shave the rivets smooth. Take your time and it will leave the bottom smooth. The aft rivet will also need to be shaved down some inside the receiver to install your adapter.http://www.ebay.com/...347396713551489 i'll try this when i convert the 12, and update, thanks Quote Link to post Share on other sites
Recommended Posts
Join the conversation
You can post now and register later. If you have an account, sign in now to post with your account.