gr8santini 13 Posted July 4, 2009 Report Share Posted July 4, 2009 (edited) I'm finally getting around to refinishing my Saiga 12 gauge shotgun that I've had for months sitting in parts in my safe and in boxes. Along with the shotgun itself, I'm refinishing 6 10rd mags, 1 5rd mag, and a railed forend. I'm trying a digital pattern using the following Duracoat colors: Urban Mirageflage White Cooler Green Tango Down Flat Dark Earth Combat Black OD Green It may turn out looking like crap, but I've enjoyed the project! The prep consisted of disassembly of the main components, lightly sanding the plastic, blasting the old finish off the metal, then degreasing all of it. Below is a series of pictures from each step. UM White: Cooler Green (I should have put more flattening agent in this mix...it's a bit shiny): Tango Down FDE with stencils over it: Combat Black: Tomorrow, I'll put stencils over the black, then finish the whole thing off with OD green. More Pics tomorrow. I'm hoping for a result similar to this 870 I did, but with some additional colors: Edited July 10, 2009 by gr8santini Quote Link to post Share on other sites
BUFF_dragon 3 Posted July 4, 2009 Report Share Posted July 4, 2009 (edited) you can always add the matte or satin clear coat to flatten everything and smooth out the template lines if you needed too........ looks good so far BTW... I'm getting ready to do some custom painting on mine, have all the duracoat sitting in the box. I'm just making sure that the conversion runs perfectly and everything is SMOOTH before tearing it back down to paint. Edited July 4, 2009 by BUFF_dragon Quote Link to post Share on other sites
uzitiger 193 Posted July 4, 2009 Report Share Posted July 4, 2009 Nice paint job. Where did you get the top cover aperture sight? Quote Link to post Share on other sites
gr8santini 13 Posted July 4, 2009 Author Report Share Posted July 4, 2009 Nice paint job. Where did you get the top cover aperture sight? A guy from this board, gunfixr made it. He does great work. Look for him in the "Firearm Sales Company" section of this forum. That's his business. Quote Link to post Share on other sites
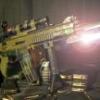
gr8santini 13 Posted July 5, 2009 Author Report Share Posted July 5, 2009 Refinishing complete...now I just have to put it all back together and get some better pics: The skull tells me when the mag is full: Quote Link to post Share on other sites
Jpanzer 1,265 Posted July 5, 2009 Report Share Posted July 5, 2009 Dude, that really looks badass! Quote Link to post Share on other sites
ten 1 Posted July 5, 2009 Report Share Posted July 5, 2009 cool ive been wantin to see some s12 duracoat projects though mine preferences would be some sort of wicked tiger stripe pattern, colors unknown Quote Link to post Share on other sites
ten 1 Posted July 5, 2009 Report Share Posted July 5, 2009 (edited) cool ive been wantin to see some s12 duracoat projects though mine preferences would be some sort of wicked tiger stripe pattern, colors unknown Edited July 5, 2009 by TarrantulaGears Quote Link to post Share on other sites
Azrial 1,091 Posted July 5, 2009 Report Share Posted July 5, 2009 Very nice work! Quote Link to post Share on other sites
22_Shooter 1,560 Posted July 5, 2009 Report Share Posted July 5, 2009 That is unreal. I always drool at your Duracoat jobs! Quote Link to post Share on other sites
Elkhound 91 Posted July 5, 2009 Report Share Posted July 5, 2009 That is flat out AWESOME! WJ Quote Link to post Share on other sites
gr8santini 13 Posted July 5, 2009 Author Report Share Posted July 5, 2009 Thanks for the kind words guys. Now, I'm going to do my XD45 and Robinson Arms XCR to match! Quote Link to post Share on other sites
impalafunk 2 Posted July 5, 2009 Report Share Posted July 5, 2009 Wow Thats probably one of the best camo jobs I've ever seen, Good work man! Quote Link to post Share on other sites
Moe Zambeak 53 Posted July 5, 2009 Report Share Posted July 5, 2009 Man, you really have some talent!!! That is spectacular!!! :super: Quote Link to post Share on other sites
gr8santini 13 Posted July 5, 2009 Author Report Share Posted July 5, 2009 Thanks everyone for the kind words. Now, I have a super AK / Saiga noob question...What's the best method for putting the front sight post back in? Quote Link to post Share on other sites
elvis christ 451 Posted July 5, 2009 Report Share Posted July 5, 2009 (edited) Dude, I saw another gr8santini refinishing thread, I clicked so hard I think I broke my finger. Thanks alot, asshole. I always look forward to seeing pictures of your work. As usual, this particular specimen looks great. ETA: what's the deal with the combat black over the FDE? I don't understand... Finished product looks great, but I don't understand a few of the layers of paint. Edited July 5, 2009 by elvis christ Quote Link to post Share on other sites
gr8santini 13 Posted July 5, 2009 Author Report Share Posted July 5, 2009 Dude, I saw another gr8santini refinishing thread, I clicked so hard I think I broke my finger. Thanks alot, asshole. I always look forward to seeing pictures of your work. As usual, this particular specimen looks great. ETA: what's the deal with the combat black over the FDE? I don't understand... Finished product looks great, but I don't understand a few of the layers of paint. I tried to go light coats before dark coats, so the FDE came before the black. I wanted some black in the pattern for "shadowing", or something, so I put it on over the FDE and put down some stencils. Does that answer your question? Quote Link to post Share on other sites
elvis christ 451 Posted July 5, 2009 Report Share Posted July 5, 2009 Yeah, sort of. But I don't understand how the black (or the FDE, for that matter) comes through, when both are painted over, completely... Obviously, I know dick about painting camo patterns on a gun. Quote Link to post Share on other sites
gr8santini 13 Posted July 5, 2009 Author Report Share Posted July 5, 2009 Yeah, sort of. But I don't understand how the black (or the FDE, for that matter) comes through, when both are painted over, completely... Obviously, I know dick about painting camo patterns on a gun. Oh, that's easy, and not very well illustrated in the pictures. After each coat, I apply stencils for each color before putting another color down, then paint the next color over the stencils. Quote Link to post Share on other sites
elvis christ 451 Posted July 5, 2009 Report Share Posted July 5, 2009 I figured as much, after I started thinking about the actual process. But in the pictures it looked like you did the whole thing in black, but looking at the pictures closely, you can see that the paint isn't exactly smooth all the way through, which I highly doubt you would let happen, considering the work I've seen you do in the past. I guess the abnormalities in the paint were the stencil taped to the actual surface huh? Quote Link to post Share on other sites
gr8santini 13 Posted July 6, 2009 Author Report Share Posted July 6, 2009 I figured as much, after I started thinking about the actual process. But in the pictures it looked like you did the whole thing in black, but looking at the pictures closely, you can see that the paint isn't exactly smooth all the way through, which I highly doubt you would let happen, considering the work I've seen you do in the past. I guess the abnormalities in the paint were the stencil taped to the actual surface huh? Despite my best efforts, the stencils do pull up in spots, and I don't completely cover the whole project with each coat so there will be abnormalities in the process. Also, I don't mind the uneven layers caused by multiple coats of stencils. Quote Link to post Share on other sites
gr8santini 13 Posted July 6, 2009 Author Report Share Posted July 6, 2009 Here are some pics to show how devastatingly effective this pattern is in my AO (my backyard): Quote Link to post Share on other sites
gr8santini 13 Posted July 7, 2009 Author Report Share Posted July 7, 2009 Added a Primary Arms Micro Dot to it. This will eventually be replaced by an Aimpoint, or a Trijicon Reflex RX30, but will do for now. Quote Link to post Share on other sites
GeorgiaPD 408 Posted July 7, 2009 Report Share Posted July 7, 2009 Beautifully done..Again!!! Quote Link to post Share on other sites
bigcec1 72 Posted July 7, 2009 Report Share Posted July 7, 2009 That is a nice paint job Im trying to fix my first Failed duracoat project LOL but very nice work Quote Link to post Share on other sites
6-Speed 0 Posted July 7, 2009 Report Share Posted July 7, 2009 looks good! I have always wanted to do a digital camo on one of my guns. Did you make the stencils up yourself? Or did you find them online? Quote Link to post Share on other sites
gr8santini 13 Posted July 7, 2009 Author Report Share Posted July 7, 2009 looks good! I have always wanted to do a digital camo on one of my guns. Did you make the stencils up yourself? Or did you find them online? The stencils came from the Bulldog Arms website. $9.99 per sheet. With so many colors and doing 7 mags plus the Saiga, I went through about 6 sheets. Quote Link to post Share on other sites
gr8santini 13 Posted July 10, 2009 Author Report Share Posted July 10, 2009 Going to shoot this beauty for the first time tomorrow morning. It will be interesting to see how the modified AGP mags work with my magwell by jdtravers. Gunfixr did the conversion for me including cutting the barrel down and permanently attaching the Tromix shark brake. He also welded the rail on the gas tube and installed/fabricated the iron sights! I have a gunfixr gas plug on it as well. I'll post some pics and or video tomorrow. Quote Link to post Share on other sites
gr8santini 13 Posted July 13, 2009 Author Report Share Posted July 13, 2009 Moar pics: Quote Link to post Share on other sites
gtnichols 51 Posted July 13, 2009 Report Share Posted July 13, 2009 OK, I am inspired i am going to paint my x39 up the same or very similar ,.. Quote Link to post Share on other sites
Recommended Posts
Join the conversation
You can post now and register later. If you have an account, sign in now to post with your account.