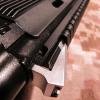
FunkedOut 91 Posted January 29, 2012 Report Share Posted January 29, 2012 1st post. cheers. got an IZ-111 from classic arms. importer is TGI. S/N shows it's 2011 production. Acceptance certificate dated 11/10/11. 19" threaded barrel plastic thread protector 4 ports - nice looking holes, at least the 3 i can see. the 4th is hidden from view but feels fine (unobstructed). extended barrel hood Manual BHO No optics rail The box had a QR code that contains the following information: Wolf Performance Arms http://www.wolf-arms.com So, I guess Wolf would handle any warranty work for this shotgun? 1 Quote Link to post Share on other sites
FunkedOut 91 Posted January 29, 2012 Author Report Share Posted January 29, 2012 (edited) cleaned it good and shot it. after 50 shells of 00B, this gun cycled perfectly: Winchester 2-3/4" 00B on setting 1 Winchester 3" 00B on setting 1 Winchester 2-3/4" Super Speed Xtra | 1oz. | 8 shot | 1350fps | on setting 2 Winchester 2-3/4" Super-Target | 1-1/8oz. | 8 shot | 1200fps | on setting 2 the gun would FTE with lo-brass on setting 1; a good thing. the gun would not cycle Fiocci Exacta Nickel-Plated 00B on setting 1; cycled fine on setting 2. i felt way less recoil out of these shells. all of the 3" extracted fine with the extended barrel hood. it was only 14 shells; that's what i had. total count of about 200 shells. i think this gun is gassed properly. now it's time to convert this pig. the factory trigger is awful. first ten shots or so, it would not reset. i had to smack it for the reset. at first, i thought the plastic thread protector was shite. then i warmed up to it and figured i'd keep it on. looks like this gun had other plans. to anyone interested in keeping the plastic thread protector, tighten it real good. i thought if i tightened it anymore, i'd strip it. i do that. (eta: I think I finally got this picture posting thing figured out...) Edited February 3, 2012 by FunkedOut Quote Link to post Share on other sites
kresk 10,063 Posted January 29, 2012 Report Share Posted January 29, 2012 Welcome to the forum! Congrats and enjoy! Quote Link to post Share on other sites
ChileRelleno 7,071 Posted January 29, 2012 Report Share Posted January 29, 2012 Welcome to S12.com & congrats on the new toy! Quote Link to post Share on other sites
gunfun 3,931 Posted January 29, 2012 Report Share Posted January 29, 2012 Here is a good replacement for your plastic thread protector. http://forum.saiga-12.com/index.php?/topic/43443-s-12-winchoke-adapters/page__st__30 Quote Link to post Share on other sites
forceflow17 16 Posted January 29, 2012 Report Share Posted January 29, 2012 Congrats man. Picked up mine converted from classic arms a few days ago, but haven't had a chance to shoot it yet. Quote Link to post Share on other sites
FunkedOut 91 Posted February 3, 2012 Author Report Share Posted February 3, 2012 (edited) Thanks for the warm welcome. ...and don't worry, "pictures of my new weapon son" are sure to follow... How about this slant brake? It's cheap and should help protect my threads until I get a thread protector ordered. It might even stay on better than the factory plastic one did? Edited February 7, 2012 by FunkedOut 1 Quote Link to post Share on other sites
Ronin38 2,117 Posted February 4, 2012 Report Share Posted February 4, 2012 If you fire it like that... Take Video!! Congrats on the new gun, I just got mine last week and did the conversion last night! Quote Link to post Share on other sites
FunkedOut 91 Posted February 5, 2012 Author Report Share Posted February 5, 2012 (edited) back by poplar demand, pics of a factory s12: and now stripped as far as you can go without permanent modifications now, to void the warranty... Edited February 5, 2012 by FunkedOut 1 Quote Link to post Share on other sites
FunkedOut 91 Posted February 5, 2012 Author Report Share Posted February 5, 2012 (edited) double tap Edited February 5, 2012 by FunkedOut Quote Link to post Share on other sites
FunkedOut 91 Posted February 5, 2012 Author Report Share Posted February 5, 2012 so i decided to use the mini-mill on this one. taking the head off rivet: drilling through that rivet: and a nice little ring popped off: then i tried to bend the trigger guard out of the way so i could get at the next rivet and the spot weld just gave. it made life easier to finish up: it was easier for me to set up for the trigger pins with the trigger guard gone: warranty voided. 2 Quote Link to post Share on other sites
FunkedOut 91 Posted February 5, 2012 Author Report Share Posted February 5, 2012 had access to some tools and an extra set of hands so i went to town. MIG'ed and blended any extra holes put 5 spot welds and 2 plug welds (up front) on AK-builder's extended reinforcement plate riveted AK-builder's trigger guard in place quickly blasted the receiver KG K-PHOS with an airbrush. this stuff works really well. i was pleasantly surprised. 1 Quote Link to post Share on other sites
FunkedOut 91 Posted February 5, 2012 Author Report Share Posted February 5, 2012 then it was back to the mill to cut out the pistol grip hole. i'd say you're better off doing this before installing the trigger guard. i did it like i did it because the timing was right; have tools, use them. 1st, i indicated off of the rear trigger guard rivet and drilled the center of the pistol grip hole with a 3/8" drill bit: then removed most of the remaining steel with a 1/4" end mill: finally cleaned up the corners with an 1/8" end mill: not exactly square corners (.0625" radius), but it looks good and works perfectly. 1 Quote Link to post Share on other sites
FunkedOut 91 Posted February 5, 2012 Author Report Share Posted February 5, 2012 a couple more. i can hardly wait... 2 Quote Link to post Share on other sites
todmich 16 Posted February 5, 2012 Report Share Posted February 5, 2012 You seem to have an awsome tool setup, almost makes me feel bad for sitting at my kitchen table doing my conversion. Awsome looking job so far!!! 1 Quote Link to post Share on other sites
armory 142 Posted February 5, 2012 Report Share Posted February 5, 2012 Awesome job!! I am so glad you read up and made sure your gun was good to go before conversion. That will save you a lot of headaches later on. Great work and welcome aboard!! 1 Quote Link to post Share on other sites
Spartacus 1,619 Posted February 5, 2012 Report Share Posted February 5, 2012 Very nice work! 1 Quote Link to post Share on other sites
JamesM 3 Posted February 5, 2012 Report Share Posted February 5, 2012 Great thread and pictures. Looking forward to the rest of the build. Quote Link to post Share on other sites
SABOTAGE 4 Posted February 7, 2012 Report Share Posted February 7, 2012 Looking good! I'm hoping to have the same outcome with my trigger guard, minus the reinforcement plate only cause I dont have a spot welder. Quote Link to post Share on other sites
snafu360 21 Posted February 7, 2012 Report Share Posted February 7, 2012 Doing it right man.. Keep us updated,looks good! Quote Link to post Share on other sites
fauxknight 30 Posted February 7, 2012 Report Share Posted February 7, 2012 Beautiful work and a nice set up to do it in. Quote Link to post Share on other sites
FunkedOut 91 Posted February 8, 2012 Author Report Share Posted February 8, 2012 (edited) I wanted to install an Arsenal trigger group. I use these on my AKM's and like them. I was interested when I saw they offered a Saiga 12 version and bit the hook. Here's a couple of comparison pics with the Arsenal hammer on the left and the Izhmash factory hammer on the right: No need to remove any metal from the hammer for clearing the BHO lever. The Arsenal hammer is actually 15 thou narrower than the Izhmash factory hammer. Arsenal up front on this one: I think I'll leave any profiling and polishing for later. I want to shoot it first and let the marks show me how the surfaces are working against each other. That Pauly sure does beautiful work. Edited February 8, 2012 by FunkedOut 3 Quote Link to post Share on other sites
FunkedOut 91 Posted February 8, 2012 Author Report Share Posted February 8, 2012 (edited) All of the Arsenal trigger groups I've installed, needed to have the back of the disconnector fitted to allow the safety selector to rotate past it when installed. Yes, even when pulling the trigger, it doesn't clear. I'd rather fit the parts that I can replace easily than the parts I cannot. First thing to do is install the trigger, disconnector and spring with the trigger pin in the receiver. Insert the safety selector, pull the trigger and rotate the safety selector until it stops against the disconnector. Scribe a line on the disconnector at the safety selector's edge as seen in this next pic: remove the disconnector, grind down the back of the disconnector with a dremel sanding drum (the larger diameter variety). check fit and repeat as needed. a little cold blue and it's good to go. Edited February 8, 2012 by FunkedOut 2 Quote Link to post Share on other sites
FunkedOut 91 Posted February 8, 2012 Author Report Share Posted February 8, 2012 I notched the BHO lever to clear the safety selector so I could install the safety last. Easiest way to do this is to install the hammer pin and the BHO lever. Use your finger to hold the lever against the receiver and press the lever up until it stops at the rail. Now scribe the portion of the BHO lever that is visible from the safety selector hole. the notched BHO lever should look something like this: and while we're at it, let's notch this thing so the spring won't jump off it: That's it. Everything should come together real easy now. I've read where many complain that the BHO level stabs their trigger finger when firing. This is my first AK with BHO so I will give it a try before I re-profile my lever. 2 Quote Link to post Share on other sites
FunkedOut 91 Posted February 8, 2012 Author Report Share Posted February 8, 2012 Everything did come together real easily after all that, and now basic conversion is complete. I need to get out and make some noise with this thing. 3 Quote Link to post Share on other sites
G O B 3,516 Posted February 8, 2012 Report Share Posted February 8, 2012 Sweet! Clean and simple. Quote Link to post Share on other sites
Sian 14 Posted February 8, 2012 Report Share Posted February 8, 2012 Totally jealous of your tool setup man. Welcome! Quote Link to post Share on other sites
Scorch95 1 Posted February 8, 2012 Report Share Posted February 8, 2012 Did you use the extended reinforcement plate or the polish plate with the molot grip? I ask as I would like to use the same setup but unsure which one I need. AK builders lists the combo pack with the polish plate but they show an extended plate for the shotgun. Thanks in advance. Quote Link to post Share on other sites
FunkedOut 91 Posted February 8, 2012 Author Report Share Posted February 8, 2012 Did you use the extended reinforcement plate or the polish plate with the molot grip? I ask as I would like to use the same setup but unsure which one I need. AK builders lists the combo pack with the polish plate but they show an extended plate for the shotgun. Thanks in advance. extended. when you order the combo pack, you get the option of either. Quote Link to post Share on other sites
FunkedOut 91 Posted February 17, 2012 Author Report Share Posted February 17, 2012 well, shit... i finally got a chance to shoot it and got FTE left and right. buck, bird, slugs, 2-3/4", 3"; didn't matter. guess arsenal didn't make the S12 version of their FCG "drop-in.". i've got the Izhmash hammer in there now. should've taken it with me when I shot it, but I went for the hero test. i'll shoot it like this to confirm it's the problem before profiling the arsenal hammer to match. it racks smoother with the Izhmash hammer in there. only other changes are trigger, disconnector and disconnector spring. the front handguard too, but I can't see the factory handguard sealing/blocking gas block vent enough to make any difference. i'll look there last. Quote Link to post Share on other sites
Recommended Posts
Join the conversation
You can post now and register later. If you have an account, sign in now to post with your account.