PacketStorm 0 Posted January 17, 2008 Report Share Posted January 17, 2008 Well I am right in the middle of my Saiga x39 conversion. I picked up the FCG (3 parts), Buttstock (1 part), Pistol Grip (1 part), screws & rivet kits from Tapco. I should have know it was going to be one of thse projects from the start. Share your building blunders here. I busted everything open like it was christmas thinking wahooo.... So i disassembled my rifle to basic components (no permanent mods yet) and found out that there is no pistol grip screw or nut. What the h3ll? I quick went back to tapco's website and looked, sure enough there are the additional parts I need. You would think they might add a note on the page for the grip (BTW... here are the additional parts you may need). So the parts are on their way, I'll just continue with the build. Start drilling out the rivets and pulling everything apart. The guts came out pretty easy. Now for the floor plate. I'll just start with the dremmel and then finish up with the drill... oh yeah, I lent out my dremmel to my brother-in-law (who is over two hours away). Ahhhhhhhhh! Well no problem, back to the real tools and I will bust out the old hand file and go old school. Things are looking good and I was on my merry way again until....wait for it.... the cordless drill goes crashing off my saw horse and the only 1/4" bit I have smashes into a million pieces. Quick what other sizes do I have in the box? That one will work...battery goes dead. Back to the file. I'm working like an animal with shavings going everywhere back rivet busted through, front rivet busted through and I now have to work out the one inside the pistol grip. I decided to shave down the sides because I can spin the bottom plate almost 360-degrees. Everything is going well until...I slice my finger open on the top of the back rivet that I decided to wait to fully remove. After a quick trip to the screw organizer and a little super glue later my finger is back in working order (note to self... investigate what toxins are now in my system from gluing my finger shut). So got the bottom plate off and still have to grind down the weld to get the trigger guard back on. I'm waiting for my dremmel or taking a trip to my father-in-laws to use the bench grinder. Still waiting for the pistol grip nut, so I thought, lets see how the parts go together and practice a bit so when the parts arrive I will be in good shape. Good thing for manual testing, as I would have had a full auto empty the magazine problem, with my hammer backwards. The hammer would cycle back, but would not lock down. Quick investigation shows that I have that part in backwards. Ok now lets pull this apart and fix the hammer issue. Things are looking better now. Well my build is somewhere near halfway done and I realize that the only riveting I've ever done is with those little cheap "pop-rivets" from the squeeze gun. This will definately be interesting to see how things turn out. This is quite a fun project. It is always an adventure going through and learning this way. I really have to admire Mr. Mikhail Kalashnikov for his design work. This is the most fun I've had in tearing apart my weaponry. Quote Link to post Share on other sites
oldandslow 3 Posted January 17, 2008 Report Share Posted January 17, 2008 Great story.. We all resemble you. Instead of one part order, you need 4. In reality, only an extra 30 bucks for shipping and 3 extra weeks waiting for parts. Gives you time to retrieve your Dremel. You don't become an expert reading about it. Well I am right in the middle of my Saiga x39 conversion. I picked up the FCG (3 parts), Buttstock (1 part), Pistol Grip (1 part), screws & rivet kits from Tapco. I should have know it was going to be one of thse projects from the start. Share your building blunders here. I busted everything open like it was christmas thinking wahooo.... So i disassembled my rifle to basic components (no permanent mods yet) and found out that there is no pistol grip screw or nut. What the h3ll? I quick went back to tapco's website and looked, sure enough there are the additional parts I need. You would think they might add a note on the page for the grip (BTW... here are the additional parts you may need). So the parts are on their way, I'll just continue with the build. Start drilling out the rivets and pulling everything apart. The guts came out pretty easy. Now for the floor plate. I'll just start with the dremmel and then finish up with the drill... oh yeah, I lent out my dremmel to my brother-in-law (who is over two hours away). Ahhhhhhhhh! Well no problem, back to the real tools and I will bust out the old hand file and go old school. Things are looking good and I was on my merry way again until....wait for it.... the cordless drill goes crashing off my saw horse and the only 1/4" bit I have smashes into a million pieces. Quick what other sizes do I have in the box? That one will work...battery goes dead. Back to the file. I'm working like an animal with shavings going everywhere back rivet busted through, front rivet busted through and I now have to work out the one inside the pistol grip. I decided to shave down the sides because I can spin the bottom plate almost 360-degrees. Everything is going well until...I slice my finger open on the top of the back rivet that I decided to wait to fully remove. After a quick trip to the screw organizer and a little super glue later my finger is back in working order (note to self... investigate what toxins are now in my system from gluing my finger shut). So got the bottom plate off and still have to grind down the weld to get the trigger guard back on. I'm waiting for my dremmel or taking a trip to my father-in-laws to use the bench grinder. Still waiting for the pistol grip nut, so I thought, lets see how the parts go together and practice a bit so when the parts arrive I will be in good shape. Good thing for manual testing, as I would have had a full auto empty the magazine problem, with my hammer backwards. The hammer would cycle back, but would not lock down. Quick investigation shows that I have that part in backwards. Ok now lets pull this apart and fix the hammer issue. Things are looking better now. Well my build is somewhere near halfway done and I realize that the only riveting I've ever done is with those little cheap "pop-rivets" from the squeeze gun. This will definately be interesting to see how things turn out. This is quite a fun project. It is always an adventure going through and learning this way. I really have to admire Mr. Mikhail Kalashnikov for his design work. This is the most fun I've had in tearing apart my weaponry. Quote Link to post Share on other sites
bkelm18 0 Posted January 17, 2008 Report Share Posted January 17, 2008 I just did my conversion yesterday. I learned some things and learn some ways not to do things. Next time, and I can for-see there being another conversion in my future, I'll know better. Quote Link to post Share on other sites
22_Shooter 1,560 Posted January 18, 2008 Report Share Posted January 18, 2008 My conversion blunders: 1) Cut my finger on some jagged metal after drilling. 2) Then when I was filing the mag catch/testing to fit, the mag catch got stuck, so I forced it, hand slid and smashed my finger into something, I don't know what. But it hurt like hell, left a little bloody indentation in my finger, and it was numb for about a week. I don't know what that was about . By the way, what are you messing with rivets for? To fill in the holes from the original FCG? If so, check out this thread http://forum.saiga-12.com/index.php?showtopic=3440 . I got some with my order from Dinzag, so I was set, but you can pick them up at a hardware store. Quote Link to post Share on other sites
Bonesaw 1 Posted January 18, 2008 Report Share Posted January 18, 2008 I got a conversion blunder story too. I was using the dremel cutting wheel to cut through the trigger guard (taking the extra length off the back), when the cutting wheel broke. Thanks to my quick reflexes I avoided becoming blind in one eye and instead got half the disk lodged in my cheek. That was a blast to pull out lol. Quote Link to post Share on other sites
wlnt 2 Posted January 18, 2008 Report Share Posted January 18, 2008 If you have never riveted before with anything but a pop rivet, I would VERY STRONGLY" recommend a screw kit from Tapco that takes the place of the rivets. http://www.tapco.com/catalog.aspx?id=304 "AK Screw Build Set AK0686 Price: $4.99 " Believe me, it can be difficult without the extra pain of using rivets. I would also recommend the Tapco: AK Retaining Plate AK0680 Price: $11.99 louielouie Well I am right in the middle of my Saiga x39 conversion. I picked up the FCG (3 parts), Buttstock (1 part), Pistol Grip (1 part), screws & rivet kits from Tapco. I should have know it was going to be one of thse projects from the start. Share your building blunders here. I busted everything open like it was christmas thinking wahooo.... So i disassembled my rifle to basic components (no permanent mods yet) and found out that there is no pistol grip screw or nut. What the h3ll? I quick went back to tapco's website and looked, sure enough there are the additional parts I need. You would think they might add a note on the page for the grip (BTW... here are the additional parts you may need). So the parts are on their way, I'll just continue with the build. Start drilling out the rivets and pulling everything apart. The guts came out pretty easy. Now for the floor plate. I'll just start with the dremmel and then finish up with the drill... oh yeah, I lent out my dremmel to my brother-in-law (who is over two hours away). Ahhhhhhhhh! Well no problem, back to the real tools and I will bust out the old hand file and go old school. Things are looking good and I was on my merry way again until....wait for it.... the cordless drill goes crashing off my saw horse and the only 1/4" bit I have smashes into a million pieces. Quick what other sizes do I have in the box? That one will work...battery goes dead. Back to the file. I'm working like an animal with shavings going everywhere back rivet busted through, front rivet busted through and I now have to work out the one inside the pistol grip. I decided to shave down the sides because I can spin the bottom plate almost 360-degrees. Everything is going well until...I slice my finger open on the top of the back rivet that I decided to wait to fully remove. After a quick trip to the screw organizer and a little super glue later my finger is back in working order (note to self... investigate what toxins are now in my system from gluing my finger shut). So got the bottom plate off and still have to grind down the weld to get the trigger guard back on. I'm waiting for my dremmel or taking a trip to my father-in-laws to use the bench grinder. Still waiting for the pistol grip nut, so I thought, lets see how the parts go together and practice a bit so when the parts arrive I will be in good shape. Good thing for manual testing, as I would have had a full auto empty the magazine problem, with my hammer backwards. The hammer would cycle back, but would not lock down. Quick investigation shows that I have that part in backwards. Ok now lets pull this apart and fix the hammer issue. Things are looking better now. Well my build is somewhere near halfway done and I realize that the only riveting I've ever done is with those little cheap "pop-rivets" from the squeeze gun. This will definately be interesting to see how things turn out. This is quite a fun project. It is always an adventure going through and learning this way. I really have to admire Mr. Mikhail Kalashnikov for his design work. This is the most fun I've had in tearing apart my weaponry. Quote Link to post Share on other sites
Navy87Guy 1 Posted January 19, 2008 Report Share Posted January 19, 2008 I busted everything open like it was christmas thinking wahooo.... So i disassembled my rifle to basic components (no permanent mods yet) and found out that there is no pistol grip screw or nut. What the h3ll? I quick went back to tapco's website and looked, sure enough there are the additional parts I need. You would think they might add a note on the page for the grip (BTW... here are the additional parts you may need). Don't be too hard on TAPCO. Remember that they sell replacement grips. With any other AK, you would alrady have a grip nut. It's only homebuilds and Saiga conversions that leave you without one. Since those are relatively rare, I don't blame them for not mentioning it. If you buy the SAW grip, it does come with the screw but not the nut. I hate to say it, but a search and read through some of the posts here would have saved you a lot of trouble - especially trying to remove the floor plate. A cold chisel and a couple of sharp blows would have saved you some trouble. But half the fun of the conversion is the "learning". Your second one will go a lot smoother! Jim Quote Link to post Share on other sites
uzitiger 193 Posted January 19, 2008 Report Share Posted January 19, 2008 I'm an engineer with aircraft experience: The first thing is that pop rivets don't work very well and will work loose after shooting. Solid rivets are a different story and that's why they use them on aircraft. If you use solid rivets make sure you deburr the mating surfaces to allow the rivet to do its job of holding the parts together as one unit. If you can't use rivets then use screws or U drive screws. The AR15.com forum has a tutorial on building AKs using U drive screws and I built on using them. I also messed up when converting my S-12 when I tried to use the rear trigger hole for the pistol grip screw and ended up with an extra hole in my receiver. While the pistol grip covers it, I still have a hole which weakens the receiver. Quote Link to post Share on other sites
nalioth 405 Posted January 19, 2008 Report Share Posted January 19, 2008 If you can't use rivets then use screws or U drive screws. The AR15.com forum has a tutorial on building AKs using U drive screws and I built on using them. Let's not start this here, please. Drive screws (also called u-drives) are made for attaching sheet metal to other metals. They can (and do) back out when used on AKs. This is your health / life we're talking about. Quote Link to post Share on other sites
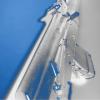
wlnt 2 Posted January 29, 2008 Report Share Posted January 29, 2008 (edited) There was not a pistol grip nut hole pre-cut in my receiver of the last Saiga I got ;so I had to cut one. Well, my measurements were off and I ended up having to do a "C Section" to get my pistol grip hole cut. I was trying to think of a way to re-inforce the receiver in the pistol grip area when I remembered seeing these. Here is the reinforcement plate. I got one (from AK-Builders) that had 3 holes pre-drilled; one for the trigger guard and two more opposite each other at the other end. I drilled the other two holes from the plate through the receiver and put in screws with nuts. Right now all I have is those 3 screws holding the plate to the receiver, but I think it will be alright without adding JB Weld or any other epoxy. louielouie Edited January 30, 2008 by louielouie Quote Link to post Share on other sites
charger SE 0 Posted July 8, 2008 Report Share Posted July 8, 2008 I went through buttstock identity issues. First was the 10$ wood skeleton stock. Hmmm....NAH! Then (im embarrassed to admit this) assembled a collapsible monstrosity out of the telescoping stand of a junk ocillating fan using the sawed off reciever end of the factory stock, and lots of epoxy. (it actually worked, but was one of those "i just want to see if I can do it" things. Never left the house with it on there. WECSOG gone horribly wrong. Quote Link to post Share on other sites
acercanto 6 Posted July 8, 2008 Report Share Posted July 8, 2008 Hahaa, that's awesome. I usually scrap my plans before they even get out of my head onto paper. Quote Link to post Share on other sites
IndyArms 10,186 Posted July 8, 2008 Report Share Posted July 8, 2008 It couldnt be any WORSE than the SHOVEL HANDLE I saw on a gun that Bob Ash posted pictures of... Forget WHERE it was now... but it was pretty "REDNECK"!!! Quote Link to post Share on other sites
nalioth 405 Posted July 8, 2008 Report Share Posted July 8, 2008 It couldnt be any WORSE than the SHOVEL HANDLE I saw on a gun that Bob Ash posted pictures of... Forget WHERE it was now... but it was pretty "REDNECK"!!! ... but that wasn't planned. It was from Iraq, so it was "insurgent combat efficiency" Quote Link to post Share on other sites
Sporq 0 Posted October 31, 2008 Report Share Posted October 31, 2008 Your story sounds like an average week at work for me The super glue was a great idea, as it was supposedly originally designed for skin bonding before they switched to a different yet similar product called "derma-bond". There is also this stuff called "new skin" which works rather similarly, but comes in a little bottle with a brush in the cap. I really hope I don't have as many problems when I finally start modding my s12. Quote Link to post Share on other sites
Bayoupiper 738 Posted November 1, 2008 Report Share Posted November 1, 2008 It also helps to NOT take your recently disassembled Saiga to an expert like Red Jacket to show it off. Your ego will suffere irreparable damage from the tongue lashing you are likely to get for "gouging" the metal............. Quote Link to post Share on other sites
Recommended Posts
Join the conversation
You can post now and register later. If you have an account, sign in now to post with your account.